Up next in 10

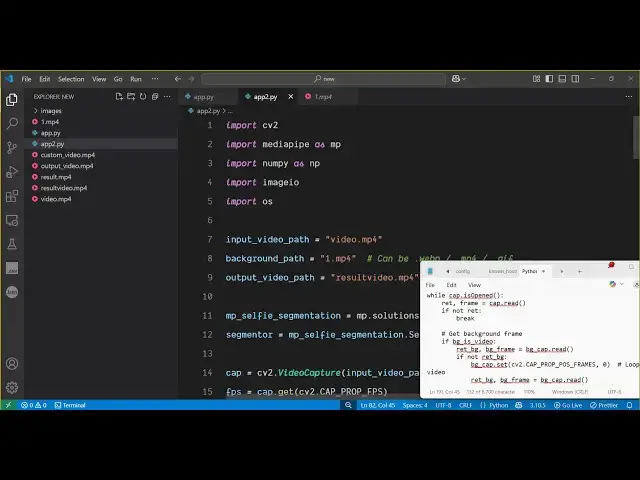
Python 3 OpenCV Script to Replace Background of Video With Custom Image & Video Using Mediapipe
Jun 3, 2025
Get the full source code of application here:
https://codingshiksha.com/python/python-3-opencv-script-to-replace-background-of-video-with-custom-image-using-mediapipe-library/
Show More Show Less View Video Transcript
0:00
uh hello guys uh welcome to this video
0:02
so in this video I will show you uh how
0:04
to replace your background inside the
0:08
video with a custom image and video so
0:12
this will be a fun little project I will
0:15
show you inside Python so you can
0:17
actually So we have this original video
0:20
just see this is actually a original
0:22
video with the original person with a
0:25
gray background so now I will show you
0:27
how to change this background with a
0:30
custom image and a video using a Python
0:33
module that I will show you open CV and
0:35
media pipe so these are two different
0:38
modules so this is we will manipulate
0:40
this background so with a custom image
0:44
so if I show you the custom video so we
0:48
can actually change the background and
0:50
apply a background video right here as
0:53
you can see the video is playing in the
0:55
background and
0:57
uh I will show you how to do this you
1:00
can basically apply any background video
1:03
inside this video as you can see we can
1:06
even change this background with a
1:08
custom image so you can see we have a
1:10
desert image and we actually replace the
1:13
background with this image so you can
1:15
take any image for example and apply
1:17
this to this video so now let me show
1:20
you both the scripts which actually does
1:23
this i've given both the scripts in the
1:26
description of the video so first of all
1:27
we will write the script for
1:29
manipulating the background of the video
1:31
with a custom image and for both these
1:34
scripts you need to install these two
1:36
modules so the very first module is Open
1:40
CV- Python so this is actually a very
1:43
famous module of Python which is open
1:46
source simply execute this command to
1:48
install this and second of all we need
1:50
to install this module which is media
1:53
pipe which is also very important module
1:56
so which applies these machine learning
1:58
algorithms to replace the background
2:00
with a custom image and video so just
2:02
install these two modules and now just I
2:05
will show you one by one this is the
2:08
first script which will change the
2:12
background of the video with a custom
2:13
image so we simply import open CV then
2:17
we import media
2:19
pipe and then we import the numpy as
2:22
well numpy package and then here we
2:25
specify the path of the video so our
2:28
video is available in the same directory
2:31
and then here you need to specify the
2:33
background image path so this is present
2:36
inside the images folder and we are
2:38
taking
2:40
desert.jpg so we can take any image for
2:44
example let me
2:47
take any other image let me take this
2:51
profile dot jpg so let me change this to
2:55
profile jpg so after that now we just
3:00
need to initialize this
3:03
media pipe
3:08
library like this mp do.solutions
3:10
solutions dot selfie
3:13
segmentation and then we just need to
3:16
say
3:17
segmentor MP
3:21
dot selfie segmentation dot
3:26
selfie so in this way you can initialize
3:29
it and here you just need to pass the
3:31
model selection so which is set to one
3:35
so it contains various machine learning
3:37
models but we are using the basic model
3:39
which will actually is one after that we
3:42
just need to load the background
3:44
image so for using the background image
3:47
we read this by open
3:50
CV it is present inside background image
3:52
path after that if the background image
3:55
is not there then we simply raise an
3:57
exception that background image not
3:59
found but if the background image is
4:02
there then we just need to use the open
4:05
CV we load the
4:07
video by this video capture
4:10
method after that we
4:13
simply use this video writer
4:19
method like this we load this MP4 video
4:22
after that we get the FPS again we use
4:27
Open CV it contains
4:31
this this constant after that we specify
4:35
the wid width of the video which we can
4:38
get easily by
4:43
this and similarly we will be getting
4:46
the height of the
4:52
video so after that
4:56
we put this into the output
4:59
file that's it after that for resizing
5:03
the background to match video frame size
5:07
we do
5:08
this again we use open CV we resize the
5:12
image to match with the
5:15
video like this after that we now apply
5:20
this while loop to the full video so
5:24
here we are putting it to each frame in
5:27
the video we are reading each frame and
5:29
applying this background
5:31
image like
5:35
this so when the video is reached then
5:38
we break from this loop while
5:41
loop and then we are taking each frame
5:44
right here by open cv CV2
5:48
dots just remove this semicolon
5:51
semicolon is not
5:58
required so we now need to get the
6:01
segmentation marks so this is little bit
6:04
complicated script but essentially it is
6:06
removing the background and replacing it
6:08
with a custom background so here we are
6:11
using this machine media pipe
6:15
library and then here we need to combine
6:18
this output frame and for this we use
6:21
numpy
6:22
library and then we write this so the
6:26
whole script will be given in the
6:28
description like this and then we
6:31
release everything open
6:34
CV like this we release the resources we
6:39
close the segmentation that's
6:41
all so if you run this
6:49
now so here we specify I think output
6:55
video
6:58
path i think we haven't specified the
7:00
output video path as well we need to
7:03
specify
7:05
it so we specified this video will get
7:08
created let me change the name to
7:09
result.mpp4
7:14
so if you just run this script now so
7:16
what will happen it
7:21
will apply the it will first of all
7:24
remove the original background and then
7:26
replace it with the custom image that we
7:28
applied so just wait it will take around
7:32
15 to 20 seconds it is little bit slow
7:35
because this libraries open CV media
7:38
pipe actually requires so much
7:40
processing to
7:42
remove so if you have a longer video
7:45
then it will take more time so just you
7:47
need to wait so once it completes it
7:51
will give you notification that your
7:52
process is complete
7:57
so just
8:04
wait so you can see in the background it
8:07
is using TensorFlow this media pipe
8:10
library actually applies the artificial
8:13
models and TensorFlow inside Python to
8:16
remove the background so once it is
8:19
completed it will show you the
8:21
notification so just wait for the
8:23
process to finish
8:31
so that's why I'm not pausing the video
8:33
you can see now the process is complete
8:35
saved as
8:37
result.mpp4 if I try to open this now
8:40
you will see the background has
8:41
successfully
8:44
changed you can see we successfully
8:48
removed the background guys to the
8:50
overall video with a custom image and
8:53
same we will do this for video as well
8:55
so let me show you the script for the
8:58
video it is little bit slightly
9:01
different but the overall logic remains
9:04
the same we first of all require all the
9:07
packages then we specify the input video
9:11
background
9:12
path so here we specify
9:15
which this is our original video this is
9:18
the custom video that we will use for
9:21
the background
9:24
it's a 17-second video so you can take
9:27
any video for
9:28
example and this will be
9:32
the output video which will get created
9:35
after that we again we initialize the
9:38
media pipe
9:43
model this is really important we need
9:45
to initialize then we simply again use
9:48
the open CV to first of all remove the
9:52
original background by open CV library
9:55
this is the all the code is same then we
9:58
just need to detect the background type
10:01
whether it's a video or image like
10:06
this then we initialize
10:09
it three variables to remove the
10:13
frames and there we have this if
10:15
condition that if
10:19
the video
10:21
contains any of the background we need
10:24
to remove it first of all so we remove
10:27
we actually read this background
10:32
video we resize it or if it's a video
10:35
then we capture this video in the
10:38
background so we have all these
10:40
scenarios then again we apply this while
10:43
loop which will
10:46
actually remove the background for each
10:50
frame you will see we are opening this
10:53
while loop for each frame in the video
10:55
we are setting this background video
10:57
like this by open
10:59
CV
11:01
and the code remains the same and then
11:04
lastly we are releasing all the
11:07
resources you can see both the scripts
11:10
I've given in the description of the
11:11
video so if you
11:15
now execute this once again this will
11:19
actually remove the background and the
11:22
output will look something like I showed
11:24
earlier so thank you very much guys for
11:26
watching this video uh please hit that
11:28
like button subscribe the channel and
11:30
also check out my website
11:32
freemediatools.com
11:34
uh which contains thousands of tools