Up next in 10

PHP 7 Script to Upload Large Size Videos to MySQL Database and Display & Play it in Browser
Dec 21, 2025
Buy the full source code of application here:
https://procodestore.com/index.php/product/php-7-script-to-upload-large-size-videos-to-mysql-database-and-display-play-it-in-browser/
Show More Show Less View Video Transcript
0:06
Uh hello friends, today in this tutorial
0:09
uh we will be building a PHP MySQL
0:12
system inside which we will be looking
0:14
at how to upload uh videos to MySQL
0:17
database. So the size of the videos will
0:20
be pretty large in gigabytes and uh
0:24
megabytes also 500 mgabytes to 1 GB. I
0:27
will be showing you how to upload large
0:29
side videos. Something like YouTube does
0:32
because whenever you upload uh large
0:35
size videos to your YouTube channel,
0:37
YouTube also does the same thing.
0:41
So in this video, this is the
0:44
application we will be building in this
0:45
tutorial. You will see that if you open
0:48
the page here for the very first time,
0:50
there is upload option and choose file
0:52
button will be there. And if you click
0:55
the videos option,
0:57
the set of videos will be shown here.
1:00
It is currently empty because we we are
1:03
storing these videos inside our MySQL
1:06
database. This is a structure of the
1:08
database. It contains two columns which
1:10
is ID and the video URL actual video URL
1:14
from where we will be storing our video.
1:17
So this is the uh MySQL database guys
1:20
table. Here you can see videos and
1:23
inside our uploads folder we will be
1:26
storing all the video files which will
1:27
be uploaded. So this is the PHP script
1:30
here. So simply let me show you the demo
1:32
here and uh if I click the upload option
1:35
choose file. If I click this option go
1:38
to the videos tab.
1:40
If I try to upload this video which is
1:42
438 kilobytes.
1:44
So click on the upload button. If I
1:47
click the upload button you will see the
1:49
video will be uploaded.
1:51
And uh if I need to play this video, I
1:53
can also play this video. You can see
1:55
that.
1:58
And this is the view.php page. If I want
2:01
to upload uh more videos, I can click
2:04
the upload button. Click the upload
2:06
option and click upload. So now this
2:09
video is uploaded. Now you can see that
2:11
this is the second video is uploaded.
2:14
If you want to upload more videos, you
2:16
can upload this. Click the choose file
2:19
button and let's suppose I take the
2:21
example of this video. You can see it is
2:23
246 mgabytes. So it is very large size
2:27
video. If I click upload
2:32
it will take some time. And now you can
2:34
see 1 minute 54 seconds video is
2:37
uploaded. I can't play this video
2:39
because of the copyright issue. So you
2:41
can see the video is uploaded. You can
2:42
play the video file accordingly. And if
2:46
I show you the editor here inside our
2:48
uploads folder, all these videos are
2:50
being uploaded. If you see if I reveal
2:54
in file explorer, these are the video
2:56
files which are uploaded to the PHP
2:58
server here. And actual paths are being
3:01
stored inside our database. So basically
3:05
if I refresh this data uh table here and
3:09
if I show you the entries, you can see
3:12
that video URL is stored here. This is
3:15
the first, second and third. So in this
3:17
way we are storing the video URL guys
3:19
and then we are displaying it in the
3:21
browser and actually we can also play
3:23
this using the video tag. So we will be
3:27
building this simple application of uh
3:29
just uh uploading the videos to a MySQL
3:33
database using PHP script and also
3:35
displaying it in the browser as well. So
3:38
if you like this video then please hit
3:40
the like button, subscribe the channel
3:41
as well.
3:43
JScript is saying love for Pakistan. So
3:46
thank you very much JScripts for
3:48
watching this video from Pakistan. And
3:51
uh please hit the like button if you
3:52
like this video. And uh if you want the
3:55
full source code of this PHP script
3:57
guys, if you want this full script, you
4:00
can go to the video description link
4:02
here. Just go to the edit option. I have
4:04
given my blog post link here in the
4:06
video description of this live stream.
4:08
So all the source code is given to you.
4:11
So just go to it and copy all the source
4:14
code. So let's start building this
4:16
application guys. For building this you
4:18
will need a special software called as
4:21
exam control panel. XAMP is a Apache PHP
4:25
server. So which is very much helpful
4:27
when you are developing PHP
4:29
applications. So simply write here exam
4:31
control panel download and uh this is
4:35
crossplatform software. It is available
4:37
for Windows, a Mac and uh all operating
4:41
systems, Linux as well. So simply go to
4:44
this website and download the exam
4:46
server. I have already downloaded it and
4:49
installed it. So after installing it,
4:52
you need to start the Apache and the
4:53
MySQL server. The admin server of MySQL
4:57
is this where you can create your
4:59
database and tables. So simply I will
5:02
delete this.
5:05
You can also
5:08
uh just uh write the SQL queries here.
5:12
And uh if I want to drop a database, I
5:14
will simply write this query which is
5:16
drop database test DB like this.
5:22
So for this we will be creating a new
5:24
database. So simply we will create uh
5:26
right here
5:31
inside this we will create a brand new
5:34
database
5:36
which will be video upload. So simply
5:40
create this database. You can see our
5:42
database has been created and inside
5:45
this we will have uh video table. Just
5:49
create this table and it will have the
5:51
ID field and uh URL which will be a text
5:56
entry. Just select the text entry and
5:59
apart from that guys uh we need to make
6:02
this as uh auto increment. So for that
6:06
it is very much
6:12
just put this auto increment. This will
6:14
make this as primary key of the table.
6:16
it will be unique every time and it will
6:18
be auto incremented. So now after this
6:21
this will be the ID and URL. After that
6:24
you can uh save this table. So a table
6:28
is created which is ID and URL. That's
6:31
it. Now we can uh simply go to our uh
6:37
uh
6:39
C drive and uh basically whenever you
6:42
install exam it is located in the C
6:44
drive and exam folder will be there. Go
6:47
to htox and here you need to create a
6:50
new folder here for your project which
6:52
will be video upload.
6:55
Uh it is already exist. So
7:00
video project
7:05
so I will open this inside uh visual
7:07
studio code text editor. So you will see
7:09
that guys uh now inside this we need to
7:13
simply create a index php file here. So
7:17
whenever you open the application for
7:19
the very first time then we need a
7:21
simple upload button to upload the
7:24
files. So here we will be having a
7:26
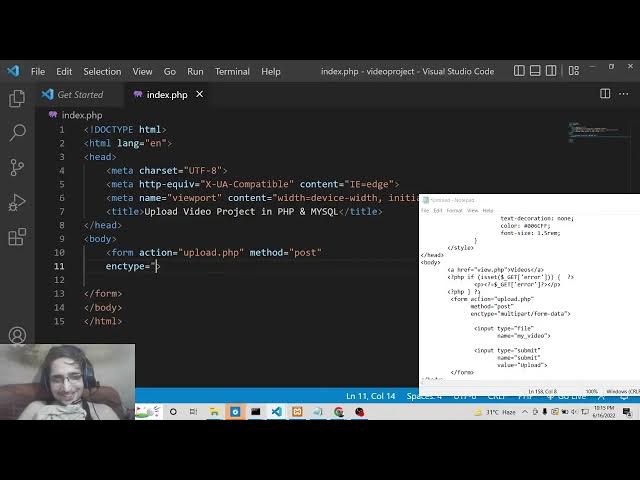
simple having HTML uh title. So here we
7:31
will say upload video project inside
7:36
PHP and MySQL.
7:41
So here guys what we need to do is that
7:46
we will have a simple form.
7:52
So inside this form here if you submit
7:55
the form here the action parameter will
7:57
go to upload.php
7:59
and the method will be here post
8:02
and the third parameter will be encoding
8:05
type. So whenever you are uh uploading
8:07
videos or making any sort of uh work
8:10
with the image files video files you
8:14
need to provide this parameter which is
8:15
multi-art
8:19
form data. So this thing you need to do
8:22
and inside this we will have a simple
8:24
input field which is input type of file
8:28
and the name we will be giving it to my
8:31
video. You can give any name of your
8:33
choice. After that we will have a simple
8:36
input field uh of submit button. In
8:39
order to submit the form and uh we will
8:41
be giving a name parameter to it of
8:43
submit and a placeholder text on the
8:47
button. So we will have upload video.
8:51
That's it. So just close this.
8:55
And now if I open this uh right now guys
8:58
inside my browser you will see if I type
9:00
here localhost video project
9:04
you will see now we have this choose
9:06
file button. If I click this this pop-up
9:10
window will appear and this upload video
9:12
option is there. So now what we need to
9:15
do is that we need to make this
9:16
upload.php PHP file. Whenever we upload
9:19
the file, we need to upload this to our
9:21
database. For having the connection to
9:24
the database guys, we need to first of
9:25
all connect to the database. So for
9:28
connection, we will need to write a
9:29
simple file which will be called as
9:31
connection.php.
9:33
So this will actually connect the PHP
9:36
code to our database. So this will be a
9:38
PHP file and here we will give the
9:41
username.
9:43
The username will be uh local host sorry
9:46
root sorry sorry host. So host will be
9:50
here local host because we are
9:51
developing it at the local host level.
9:54
The username typically the default
9:56
username is root if you haven't changed
9:58
it. And the password is empty. This is a
10:01
default password. And the database name
10:04
guys uh this is DB database name that we
10:08
configured here which is our uh if I
10:10
cross check four people are watching the
10:13
stream guys we are uploading videos to
10:15
MySQL database using PHP inside this
10:17
live stream. So you can see that we have
10:20
created this database which is called as
10:22
video upload. So we will give this name
10:25
to our database value here which is
10:28
video upload and make sure that you put
10:30
the semicolon guys because in PHP
10:33
semicolon is required. If you don't put
10:35
it you will get an error. After that
10:37
guys we will have the connection to our
10:40
database. So we will use the MySQL
10:43
connect method in order to connect to
10:45
the database. So here we need to pass
10:47
all the entries here which is the host
10:49
name, username, password and the
10:52
database name. So just pass all these
10:55
information and put a semicolon. And
10:57
here inside our if condition guys we
11:00
will check here if the connection is
11:02
successful or not. So if the connection
11:05
is successful then we will simply echo
11:08
out a statement that uh connection
11:10
failed because uh in the else scenario
11:14
if the connection is successful then we
11:16
will say that uh connection to database
11:19
is successful.
11:23
So just put a semicolon.
11:27
So now we can uh
11:30
uh launch this file here guys. We can
11:32
cross check if the connection is doing
11:35
online or not. We can uh
11:39
execute this file. So you will see that
11:41
connection to database successful. So
11:43
now we are successfully connected to
11:45
this database that we have created here.
11:47
So now this is very much easy. Now we
11:50
can add the video URL but before that we
11:54
need to create a uploads folder here
11:56
guys. Here we will be storing all the
11:58
video files. So beforehand you need to
12:01
create this uploads folder. So after
12:03
creating it guys now we need to write
12:06
our code for the upload.php
12:09
file here. So this file will be called
12:13
here because here we are submitting this
12:16
in the inside of a form element. We are
12:18
calling this upload.php
12:21
script here whenever we submit the form
12:24
here. So right here inside this guys
12:29
inside our upload dot php. Now we will
12:33
first of all check
12:37
using is set method and uh the method is
12:42
post here. So that's why we will check
12:44
it inside the submit. This is coming
12:47
because we have given the name parameter
12:49
to it of submit and also we need to
12:53
check for similarly using is set for
12:58
dollar files
13:00
my video my video because we have given
13:03
the name attribute to this like my
13:05
video. So this is a typical way by which
13:08
you check for the
13:12
data which is coming from the form
13:14
inside our PHP script. So here first of
13:17
all guys what we need to do we need to
13:19
uh include the connection file here
13:21
which we have uh configured right here
13:23
we need to include the connection file
13:24
inside our upload dot php. So we can do
13:27
this using a include statement and
13:29
inside double quotes we can write here
13:31
db sorry connection dot php
13:36
put a semicolon and now we will get the
13:39
video name here the name of the video by
13:42
using dollar files my video and there is
13:48
a property inside this array which is
13:50
name
13:52
and uh we will also need to get the
13:53
temporary name using the simple syntax
13:57
dollar files my video
14:02
temporary name like this
14:05
and lastly we need to get the error
14:07
variable if any sort of error take place
14:09
we can get this error like this
14:14
error. So now we need to check if any
14:17
sort of error take place.
14:19
So if no error take place this scenario
14:22
will be there. So this will be zero. The
14:26
value will be zero in triple equal to
14:28
sign. So in that scenario no error has
14:30
taken place. So we can see successfully
14:32
upload this video. So we can simply say
14:35
we can extract the extension using path
14:37
info method of PHP. So here we need to
14:40
pass the video name.
14:43
And uh the second is this extension path
14:46
info
14:48
extension. This is the constant that we
14:51
need to pass.
14:59
and uh path info extension. Yeah, after
15:04
that guys what we need to do is that
15:08
video extension LC we need to change it
15:11
to lower case. So we will use the string
15:14
to lower and uh here we will pass the
15:19
video extension which is like this.
15:23
So here we will configure the allowed
15:25
extensions. So which extensions we allow
15:28
to upload. So this will be a simple
15:31
array and here we will write all the
15:33
extensions which are we are allowing. We
15:35
are allowing the MP4 webm
15:40
AVI. So this is popular video formats.
15:43
So you can include more formats here if
15:45
you like. LV.
15:49
So just put a semicolon. And here we
15:52
will check now inside our if condition
15:55
if the input file is the extension that
15:58
we allow. So we are simply passing our
16:02
video extension
16:05
in lowerase characters. So we are just
16:07
checking it using allowed extensions.
16:11
So if it is a allowed extension then we
16:14
simply need to
16:18
upload this.
16:23
For uploading it we need to write new
16:25
video name.
16:27
So we will give it a unique ID to it of
16:31
uh video dash true and we will
16:35
concatenate with
16:39
the extension. So for concatenating it
16:43
you you will know that uh we need to
16:45
just write this dot symbol inside PHP
16:54
and we will be concatenating using dot
16:57
and then followed by the extension which
16:59
is uh
17:02
the extension is simply this extension
17:04
which is video extension LC. That's it.
17:10
And now we need to provide the upload
17:12
path. So where the video will be
17:13
uploaded, it will be uploaded inside our
17:15
uploads folder that we have created. So
17:19
here we need to concatenate to the new
17:21
video name.
17:29
And this is the function guys which
17:31
actually upload the file here which is
17:33
move uploaded file. And here we will
17:36
take the temporary name
17:40
and transfer it to the video file path
17:43
video upload path. That's it.
17:47
And now the video is uploaded to this
17:50
uploads folder. So now we need to simply
17:54
uh insert this to the database.
17:58
So for inserting it to the database we
18:00
will write a simple SQL query here which
18:02
is SQL. So we will have insert into the
18:06
table name which is videos and here we
18:09
will pass the video URL
18:12
values and the values will be simply
18:15
coming from this will be a new video
18:20
name. That's it.
18:27
Put a semicolon. And now we need to
18:30
execute this query.
18:34
So here we will say MySQL
18:37
query
18:38
and uh we will pass the connection
18:40
object to the database as the first
18:43
argument and then we will pass the SQL
18:45
query which is SQL and then we will
18:47
redirect the user to the location page
18:50
index space. So we can redirect the user
18:52
like this view dot PHP.
18:56
So for now we will redirect to the
18:58
homepage which is index.tphp PHP
19:02
and now this is the if condition is
19:04
complete. Now guys you can see that if
19:06
no error take place
19:09
but if uh any sort of error take place
19:12
in the else scenario we will simply say
19:18
you can't upload files of this type.
19:33
And again we need to redirect the user.
19:35
So we will simply say location
19:38
index dot php question mark error is
19:42
equal to em.
20:01
And here also if no error if no input
20:04
has taken place then we also need to
20:06
redirect the user
20:09
back to the index page index.php.
20:15
So now we can test this file now guys
20:17
test our application.
20:21
If I choose the file here, click upload
20:24
video, you will see that uh now if I
20:26
check here inside my uploads folder, you
20:29
can see the file has been successfully
20:31
uploaded. This is the file which we have
20:34
uploaded here. You will see
20:40
and if I check the database, uh this is
20:43
our database. If I check the video
20:45
table,
20:54
uh video upload. Oh, sorry. I think we
20:57
uh
21:00
uh if I check here in the connection uh
21:02
this is video upload. So inside upload
21:06
dotphp I I think the table insert into
21:10
video sorry not videos because the table
21:13
name I think it is incorrect my table
21:16
name is video not videos that's why the
21:18
error was taken place if I once again do
21:20
this process once again choose the video
21:23
file
21:24
click upload so now if I refresh it you
21:27
will see that this entry might get added
21:44
uh this is I think
21:48
if I uh oh sorry this is URL not
21:52
uh video URL this was from previous
21:55
table you can see that if you look the
21:57
structure it was previous table which is
21:59
video URL. So for this table, this is
22:03
URL. So we need to replace it here. URL
22:07
just replace it URL.
22:11
Oh, I think this is reserved keyword. So
22:14
we need to change this. So
22:18
we need to edit this. So
22:22
change this. So yes,
22:26
video URL. So simply change this. So
22:29
save it.
22:37
So now if you now refresh it guys uh
22:40
once again do this process once again uh
22:43
upload this.
22:45
If I now check the my database. So
22:54
one entry is added here. You will see
22:56
that guys one entry has been added. If I
22:58
choose a second file,
23:02
this is second entry added here. So we
23:04
are successfully inserting the video
23:07
URLs inside our MySQL database and also
23:09
we are storing this all these videos
23:12
files inside the uploads folder. So now
23:14
we simply need to play it inside the
23:16
browser. We also need to display it. So
23:18
for displaying it we need a separate
23:20
file which will be called as view
23:22
do.tphp. So we need to create this file.
23:25
So we will say that view dot php. So
23:28
inside this file uh we just need to
23:30
write simple HTML code here guys. So
23:34
this will be called as view videos
23:39
and play it.
23:42
And uh
23:45
the very first thing here we will be uh
23:48
having a simple link to the homepage if
23:50
you want to upload more videos.
23:57
That's it. And uh after that guys uh
24:01
inside our uh div
24:05
we will be giving a class to it of
24:08
album.
24:10
So inside this we will have a simple PHP
24:13
tag.
24:14
So here we will be in uh displaying all
24:18
videos here.
24:20
So we will be running a simple SQL query
24:23
here which will be selecting
24:26
all data from the videos table video
24:30
table and it will be ordering it by the
24:34
ID
24:35
in the descending order. That's it.
24:39
And now we need to get the result inside
24:41
of a result variable. So we need to
24:43
execute this query here using MySQL
24:46
query. We need to pass the connection
24:48
object and also the SQL.
24:53
That's it.
24:55
And the very first thing guys, we also
24:57
need to include our connection file. So
25:00
we need to include connection dot PHP.
25:05
Connection dot PHP. So after doing this,
25:08
we need to now inside our if condition,
25:11
we need to check how many number of rows
25:13
are returned to us. So we will simply
25:16
check here my SQL num rows and here we
25:19
will pass the result and if it is
25:22
greater than zero then we uh surely know
25:25
that some result has been received. So
25:28
now we need to simply display the
25:30
videos. So we can use the while loop
25:33
here. So here we can say video is equal
25:36
to MySQL I
25:39
uh MySQL I fetch.
25:43
we will use the assoc associative array
25:45
and uh we will pass the result that's
25:48
it.
25:49
So inside this so you just need to write
25:53
like this. So
25:57
uh
25:59
just wrap it inside our PHP tags here.
26:07
So in in between this you will have the
26:09
video tag here.
26:16
uh we don't require the closing closing
26:18
tag so just require the video. So inside
26:22
our source we need to write uh the
26:25
videos are present inside the uploads
26:27
directory uh
26:30
and then we will provide the address
26:32
which is video
26:36
video
26:38
URL
26:42
that's it.
26:54
That's all. And uh in order to have the
26:57
controls as well, which is the play and
26:59
the pause button, we also need to add
27:02
controls. That's it.
27:08
And also we need to close this video
27:10
tag.
27:21
And also we need to write for the
27:27
you can see that uh
27:34
if my SQL Okay.
27:50
Just write like this.
27:57
Yeah. So I think
28:06
There is some kind of
28:21
uh let me paste it guys. So I think I'm
28:25
just doing some kind of mistake here.
28:27
This is just with the formatting
28:29
not anything else.
28:32
Let me paste it. So now you can see
28:34
that. So we are getting all this
28:37
information from the videos from the
28:39
video table here. Ordering it by
28:41
descending order. So we are looping
28:43
through we are using the associative
28:45
array and we are just displaying the all
28:48
the videos. So the videos are present
28:50
inside the uploads folder.
28:53
So now if you see here uh if you go to
28:57
the view page view.php PHP.
29:01
So already you will see that uh DB
29:03
connection. Oh sorry um yes yes this is
29:08
called as connection.
29:15
So now you can see that connection to
29:17
database successful. So these are all
29:19
the videos which are already there
29:21
inside the database. So we are fetching
29:22
it from you can see that already two
29:26
videos are already present. So that's
29:28
why they are displayed right here.
29:32
So it is taking the shape of a gallery
29:34
here. So if you want to upload more
29:37
videos, you can do it. If you click this
29:40
option, just choose file
29:44
upload video. So once we do this upload
29:48
video, we need to redirect the user to
29:50
the view page. So what we can do is that
29:52
go to upload.php and here just redirect
29:55
the user to view.php. That's it.
29:57
So now if you upload the video you will
30:01
be redirected to the view page. You will
30:04
see that view.php. So now four videos
30:07
are there. So in this way guys you can
30:09
com you can just upload large size
30:12
videos. And one more change guys you
30:15
need to do if you want to uh upload very
30:18
large size videos such as in gigabytes
30:20
or megabytes. So there is a unique file
30:24
available inside
30:26
uh examp
30:29
folder and here you will find out this
30:32
uh PHP configuration file which is
30:35
present right here which is
30:37
configuration settings file. So just we
30:40
need to open this inside our notepad
30:42
editor and I have given these values
30:45
here which you need to configure. So
30:48
right here at the bottom. So here
30:52
if I just paste this. So you need to
30:55
manually search for all these values and
30:57
just increase it to a higher limit. So
30:59
first is upload max file size. So this
31:03
typically means that how many uh size
31:07
you are uploading the files. So simply
31:10
find out this. So it is already present
31:12
inside this file. So you can see that I
31:14
have already increased this value to a
31:17
very high value. You can see that the
31:20
next value is post max size.
31:24
post
31:26
max size.
31:37
So you can see again we have increased
31:39
to a very high value. And the last one
31:42
is maximum execution time. So these
31:46
three values you need to do for most
31:49
people it will work for high. You can
31:51
see I have increased it to a very high
31:53
value. So just change these three values
31:56
and make sure that you restart the exam
31:59
here before change after changing these
32:02
values. Make sure that you save these
32:03
also. Save this and also restart it. For
32:07
restarting it, simply stop this and
32:09
again restart it. So this will make sure
32:13
that you can also upload large size
32:15
videos such as in GB and also in
32:17
megabytes.
32:20
So thanks very much guys for watching
32:22
this video. If you like this video,
32:29
please make video on uh YouTube
32:31
analytics API using JavaScript for
32:34
websites please.
32:39
videos.
32:45
Uh I don't have any that much time
32:48
because uh I love live streaming because
32:50
uh using live streaming it's it becomes
32:54
more and more easy to upload videos
32:56
because you don't need to pre pre-record
32:58
the videos and then upload it to
32:59
YouTube. Using live stream is a good
33:02
good option. So that's why I do it. Sir,
33:04
I need your small help. Can you please
33:07
help me, bro? Hear me and response me. I
33:10
need just ask your question.
33:15
So, please hit the like button, guys, if
33:17
you're watching it for the very first
33:18
time. And thanks so much for watching
33:20
this live stream. And I will be seeing
33:23
you in the next video.