Up next in 10

How to Get a Free Google Gemini API Key in Google AI Studio – Step-by-Step Guide!
Apr 16, 2026
Watch My Visual Studio Code IDE Setup Video For Fonts,Themes & Extensions
https://youtu.be/Bon8Pm1gbX8
Hi Join the official discord server to resolve doubts here:
https://discord.gg/cRnjhk6nzW
Visit my Online Free Media Tool Website
https://freemediatools.com/
Buy Premium Scripts and Apps Here:
https://procodestore.com/
Show More Show Less View Video Transcript
0:02
Uh, hello guys. In this live stream, I
0:04
will actually show you how to get a
0:06
Gemini API key for totally free. So,
0:09
Gemini, as other AI providers, provides
0:11
you with free access. You can actually
0:14
use their free API key for totally free.
0:17
So, come to Google and
0:19
simply type here Gemini API key.
0:23
So, uh, just type this. The very
0:26
[snorts] first website which comes, this
0:28
is from their Google AI Studio.
0:31
So, this is their official website.
0:34
Google Gemini key.
0:36
So, once you go to the Google AI
0:38
Studio.google.com,
0:40
right here.
0:42
You just need to have a valid Google
0:44
account for this. I've already logged
0:46
in. And this is the Google AI Studio,
0:48
right here.
0:50
You can interact with any model right
0:52
here as well.
0:53
As you can see, code, chat, image
0:55
generation, everything you can do.
0:57
But right here in the menu section, if
0:59
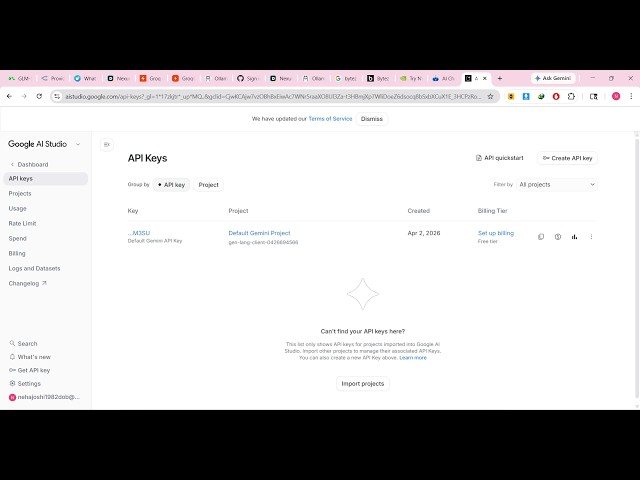
you see, you have this. This is your
1:02
profile information, settings, get API
1:05
key.
1:05
So, this is the third option right here.
1:07
Click this option, get API key.
1:10
And after that,
1:14
if you simply see,
1:16
you will see this option, create API
1:18
key.
1:19
So, just click this option
1:21
just name whatever you want to name your
1:24
API key.
1:28
And from here, you select the project,
1:31
whatever project you want to select. You
1:33
can name your project.
1:35
You will create a new project.
1:42
I think
1:44
Let me try this with a different account
1:46
here. So, just right here, Google Gemini
1:50
API key.
1:56
So, once you go to this section, AI
1:58
Studio.google.com/API
2:00
key. So, as you can see, I've already
2:02
created a bunch of projects here.
2:08
From here, you select the project,
2:09
create API key.
2:14
So, now the Gemini will give you this
2:16
API key for right here. You can copy
2:18
this key to clipboard.
2:20
That's all.
2:22
So, in this easy way, you can go to
2:24
Gemini, just get their API key very
2:27
easily. It's very easy. Simply, you need
2:29
to have a Google account for that and
2:31
click on this option, create API key.
2:33
And now, it's totally free to use their
2:35
Gemini
2:37
API key.
2:40
You can use it
2:43
using any client. It can be any VS Code
2:45
extension, Clean Ru Code.
2:50
So, let me just show show you how to use
2:52
this.
2:53
So, go to extensions and the very
2:57
good extension to use this is Clean.
3:04
So, [snorts] Clean, as you all know,
3:06
it's a very famous VS Code extension for
3:10
calling any AI providers.
3:13
So, click on install
3:15
and automatically install this extension
3:17
in VS Code.
3:18
So, once you install this, you just need
3:21
to go to settings to configure the API
3:23
key as
3:25
whatever API key you created
3:27
inside your Gemini.
3:30
So, this is just one way of how you can
3:33
use that API key of Gemini
3:36
inside any
3:39
uh, coding agent.
3:42
So, once it get installed, it will
3:44
appear right here if you see
3:48
by the name of Clean.
3:54
So, just wait. It is still installing
3:55
it.
4:01
You can even do this through Kilo Code
4:04
as well, if you see.
4:08
Just activate Kilo Code.
4:10
The process remains the same.
4:14
Kilo Code is also a coding agent where
4:16
it calls APIs. So, once you get your API
4:19
key,
4:20
it's easy for you to use this.
4:32
Let me show this in Clean here. So, as
4:34
you can see, now it is successfully
4:36
installed.
4:54
So,
4:55
you need to go to the settings of this
4:56
plugin to actually configure that API
4:59
key. So, as soon as it loads, it will
5:03
It is just taking time to load the
5:05
extension here.
5:08
So, just wait.
5:12
So, once it is loaded right here, you go
5:15
to the
5:18
right here, settings button.
5:23
And from here, you select your provider.
5:25
So, in my case, it is Gemini.
5:28
So, select
5:30
Google Gemini, the second provider from
5:32
here, API provider.
5:37
And then paste your API key. So,
5:38
whatever API key that you pasted, that's
5:41
all that you need to do. From here, you
5:43
select the model, whatever model that
5:45
you want to use.
5:46
Gemini 2.5 flash or pro.
5:50
Let me select this one and click on
5:52
done.
5:53
And just say hi.
5:56
Just run this model and if your API key
5:59
is correct, then the
6:00
response will come
6:02
correctly 100%.
6:05
Because Google allows you to use that
6:08
API key for certain limit.
6:12
So, 100% the response will come. So, as
6:16
you send the request, hi, the response
6:18
will come.
6:20
So, thereby, you can build out any sort
6:22
of quality-looking applications. So, we
6:24
are actually using this model, the
6:25
latest model, Gemini 3.1 pro preview
6:28
model.
6:30
We pasted the API key that we got from
6:34
So, in this easy way, you can use any
6:36
coding agent, Clean, Ru Code, Cloud
6:40
Code, Codex, Deep Seek, or any sort of
6:43
coding agent.
6:45
Simply configure the API key and
6:48
start
6:52
using it.