Up next in 10

Buy the full source code of application here:
https://bit.ly/3VNdeke
Show More Show Less View Video Transcript
0:01
Uh hi friends, today in this tutorial I
0:03
will be telling you that how to make a
0:05
bulk email sender using Google appcript
0:08
using the Gmail app class uh using
0:11
Google Sheets. So this is a demo
0:13
application. You can see that inside my
0:15
Google Sheets there are three columns
0:17
name, email, message and I have stored
0:20
Gotham, Hersshad and Sunny and these
0:22
three emails are stored inside the email
0:23
column and these are the customizable
0:26
emails that are there. Hello Gotham,
0:27
hello Hersha. Then hello Sunny. And I
0:29
will be sending bulk emails now. So this
0:32
is my Google Appcript code here. You can
0:34
see that if I run this application,
0:37
it will send these bulk emails to these
0:39
email addresses at the same time. So it
0:41
is running here. So just wait. And now
0:43
if I open this uh inbox of uh the first
0:47
email address, you will see that one
0:49
email will be received here. You can see
0:52
that hello Gotham. So if I open this
0:54
email, hello Gotham. This is a test
0:55
email. Same case with this sunny also.
0:58
You can see that hello sunny this is a
1:00
test email. At the same time I am
1:02
sending bulk emails here. You can see
1:04
that and you can see that this also
1:06
hello hersa this is a test email. So how
1:09
many you can provide as many emails as
1:11
you want inside your Google sheet and I
1:14
will be reading these emails and I will
1:15
be sending a simple call to Gmail app
1:18
class and it will send the email for us.
1:20
So let's start building this application
1:22
from scratch. So in order to build this
1:24
first of all we need to go to Google
1:26
sheet and here we just need to create a
1:29
new sheet first of all. So the very
1:31
first link which comes in just click it
1:33
and create a blank sheet. So first of
1:35
all go to Google sheet and click on this
1:38
blank option. So this will redirect to
1:41
the Google sheet spreadsheet is it is
1:43
also known. And now in order to go to
1:45
the script editor you need to click on
1:47
the tools option and there is a option
1:49
here script editor. Click this option
1:52
and you will be redirected to the script
1:54
section where you will be writing your
1:56
Google app script code which will be
1:58
responsible for doing this task. So the
2:01
very first thing that we will write
2:02
inside my my function we will be
2:05
creating some rows here. So in order to
2:08
create a row first of all we will be
2:11
getting the reference to our sheet. So
2:13
we will be writing here
2:15
uh
2:17
spreadsheet
2:19
app dot get active sheet. So this will
2:23
return the active sheet for us.
2:25
And now in order to call we will be
2:28
calling it this method sheet. So
2:30
basically this will clear all the old
2:31
data which is there old data and it will
2:34
clear a sheet for us as the name
2:36
pronounced sheet.clear. Now we just need
2:39
to make a header row which will be
2:41
holding our data for us. First field
2:44
will be name name of the person. Second
2:47
field will be the email address and the
2:50
third field will be the message to send.
2:53
Three fields will be there. And now we
2:55
just need to insert this. So in order to
2:56
insert this we will be calling append
2:59
row and we will be passing this row
3:02
header row. That's it. And after passing
3:04
the header row, we also need to have our
3:07
customizable rows. Here we will be
3:10
having the first row variable. And
3:12
inside this, we will provide some static
3:14
data. First, we will be having Gotham.
3:17
And for the email address, let me write
3:19
here Sharma Gotham 1997 DOB at the
3:24
rategmail.com.
3:26
And the message will be hello Gotham.
3:32
This is a test email
3:36
and close this. And uh similarly I will
3:39
be creating the second row. This time
3:42
the name will be Harshut
3:48
and the email address will be
3:51
hers
3:53
chopra 1997
3:57
at the rategmail.com
4:00
and the message will be
4:03
hello harsh this is a test email
4:10
and the third row will be similar here.
4:14
Let's suppose I give a name of Sunny
4:17
and the email address will be Geeky
4:19
Gotham
4:22
1997
4:24
at the rategmail.com
4:27
and the message will be hello sunny.
4:31
This is a test email like this. So these
4:35
are our three rows. Now we just need to
4:37
insert them. It is very easy. We will
4:39
again use the append row function.
4:41
Append row. We will pass the first row
4:43
like this. First row. And again we will
4:46
execute append row.
4:51
Pass the second row also like this.
4:56
Close the parenthesis. And also we will
4:58
be passing the third row which will be
5:00
third row like this. And uh now guys if
5:04
I want to run this just to see the
5:06
progress I need to first of all save
5:08
this project. Let's suppose bulk email
5:10
sender.
5:12
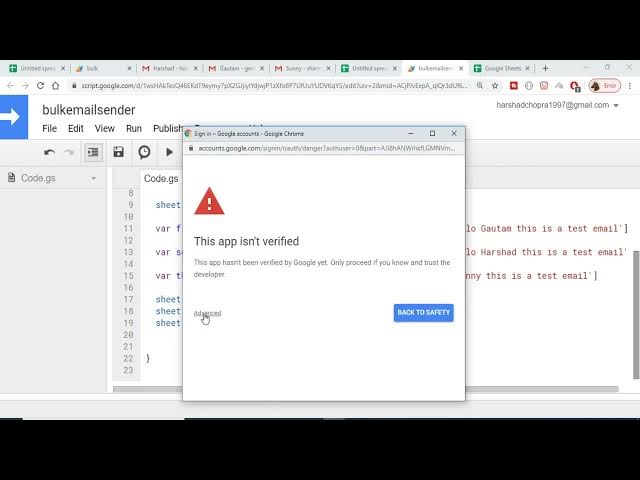
Click on okay. And now it will ask for
5:15
permissions if you execute it for the
5:17
very first time. So click on review
5:19
permissions. And you need to first of
5:21
all login with your account. So click on
5:24
advanc section. Go to this option. And
5:27
it will now ask for the permission. Just
5:30
allow it. And now it will run this code.
5:32
Here you can see that running function
5:35
my function. Now it has successfully run
5:37
this. Now if I check that you will see
5:38
that name, email, message and Goautam
5:41
Harshut, Sunonny and these are the
5:43
emails and these are the customizable
5:44
emails. Now we just need to run a simple
5:47
for loop and send out send out the
5:49
emails addresses. So now we just need to
5:52
get the reference to the last row.
5:56
In order to get the last row reference,
5:57
we will be using a method simple method
6:00
which is there inside the sheet variable
6:02
sheet dot get last row. This is a it
6:06
will return the last row which is there
6:08
inside Google spreadsheet. It will
6:10
return this fourth row. And now we just
6:12
need to run a simple for loop in order
6:15
to get all the cell values. So this is
6:17
very important. So here we will write
6:20
here for we will be declaring a I value
6:23
variable and we will start from the
6:25
second row because we don't need this.
6:28
We only need the values which are there.
6:30
Goautam hersi all these value we need.
6:32
So we will start for second position. So
6:34
we will just write here second.
6:37
And we will run until the last row. So
6:39
less than equal to last row.
6:42
So this will be fourth because last row
6:46
will contain the fourth value. It so it
6:48
will be running uh three times I ++
6:52
and uh inside this first of all we just
6:56
need to get the current email current
6:59
name. First of all we will get the name
7:01
of the person. So in order to get name
7:03
of the person we will be calling a
7:04
method which will be get range and here
7:07
we just need to provide the row and the
7:10
column. So row will be very simple row
7:12
will be I. So whatever be the current
7:15
iteration of I value and the column will
7:18
be static. It needs to be one position
7:21
because you can see that the column is
7:25
the row starts from horizontal position
7:26
and the column start for vertical
7:28
position. So the name field is there
7:30
inside column one. You can see that
7:31
Gotham Hershan. So the name field will
7:34
the column will be constant and the row
7:36
will be changing here. And now we are
7:38
just providing one here. In order to get
7:40
the value we will write get value here.
7:42
So it will get the value of the cell.
7:45
Now I can just also print out on the log
7:47
logger.log current name.
7:50
And similarly we will get the current
7:52
email address like this. current email
7:56
sheet dot again get range
7:59
uh range and this time
8:03
the row will again be constant on the
8:06
second position so I but the column will
8:08
change now it will change to second
8:10
position because the second column is
8:12
email so that is why we are changing the
8:14
column in order to get the value we will
8:17
again pass get value and again I can
8:19
just print out on the log like this
8:22
current with
8:25
and again lastly in order to get the
8:27
message we will be having current
8:29
message
8:31
and again this will be sheet dot get
8:33
range and here we just need to pass the
8:35
row value which will be again I and the
8:38
column this time will change to three
8:40
because the third column contains the
8:43
actual message which needs to be sent.
8:45
So this one and now in order to get the
8:47
value we will call get value and now
8:50
again we will need to log the value. So
8:53
we will be passing current message like
8:56
this.
8:58
And now we we just need to write a
9:00
simple line of code which will be
9:01
printing out which will be sending all
9:03
these emails. A simple line send the
9:06
email. And we will be using the Gmail
9:09
app class which is there inside Google
9:12
appcripts. Gmail app dot send email. So
9:15
this this is a button. This is a send
9:19
email method. So basically first
9:21
argument is takes is the recipient. The
9:23
current email we will pass here
9:27
and the subject will be the name of the
9:29
person. So we will write here current
9:33
name and the message will be body will
9:37
be current message. So very simple. So
9:42
in few lines of code we have made a bulk
9:45
email sender here in Google app script.
9:47
Now we just need to run this code. If I
9:49
run this code
9:51
now it will ask for additional
9:53
permission because I have used the Gmail
9:55
app class here. So you need to grant
9:58
permission. So once again you need to go
10:00
to this dialogue box. So it it will ask
10:03
for the permission for the very first
10:04
time. So if if you do this for the
10:06
second time it will not ask for
10:08
permission. Now it is sending out the
10:10
emails here. So just wait. It is running
10:12
the function. So now it has successfully
10:14
sent out the emails. Now if I check the
10:16
inboxes, you will see that the new email
10:18
has come up here. If I Hello Gotham,
10:21
this is a test email. If I again check
10:23
the inbox here, you will see that Sunny
10:26
here. Hello Sunny. This is a test email.
10:29
And lastly, if I check this email
10:31
address also, you can see that
10:34
if I just refresh this.
10:40
So you can see that guys, hello hers,
10:42
this is a test email. So in this way
10:45
guys, you can just make a bulk email
10:47
sender that we have made in this
10:48
application
10:50
in this video. So if you like this video
10:52
then please hit the like button, please
10:54
share this video and please also comment
10:56
if you like it and I will be seeing you
10:58
in the next video.