Up next in 10

Build a Preact.js Google OAuth2 User Login Using Google Identity Services SDK in Browser Using JS
Jan 9, 2025
Buy the full source code of application here:
https://procodestore.com/index.php/product/build-a-preact-js-google-oauth2-jwt-user-login-system-in-browser-using-javascript-jsx/
Show More Show Less View Video Transcript
0:00
uh hello guys welcome to this video so in this video we will be talking about how to integrate Google
0:07
authentication inside your preact application preact is actually a very
0:13
new framework in the market it is similar to react CH but it's very
0:19
lightweight and uh it it is very fast as compared to react it uses the same
0:25
concept of react but it's very fast so we'll be integrating the Google Authentication system here right here in
0:31
preact application so you will see if I go to the Local Host 8080 here my
0:36
application is running so you will see this sign in with Google button you need to select your Google account and this
0:42
is a very nice way which is uh Google identity services this is the actual one
0:48
tap authentication if you one tap it you will be authenticated and you will print
0:53
your information display name email address and the profile picture this is the Google identity Services s we will
1:00
be using it inside our preact application so if you just type here
1:06
Google identity
1:12
services so you will be redirected to your this documentation here you can
1:18
just see the documentation so you'll be looking at how to integrate this you can
1:23
do it for any account let's suppose I have a different account right here so the basic difference between the old
1:30
authentic old authentication that you did in Google because it will actually show you this personalized button here
1:37
you will actually see the profile picture of the email this is you will see the email
1:43
address and the display name as well so the user will see this and it is
1:48
trustworthy it will simply click it with one tap your user will be authenticated
1:54
it doesn't need to redirect you to a different page so in this way we'll be
1:59
using using it and for building this we will be using a new framework in the
2:04
market which is preact JS so preact is similar to react and but it's a
2:13
for 3 KB it's only size here so it's an alternative to react with the same
2:19
modern API that react uses but it uses it in a very efficient way and it's a very fast framework we will be using
2:26
this and all the source code is given in the description right here you can check out the description you can purchase the
2:33
full source code with full directory structure and support the link is given you can go to my website Pro Cod
2:38
store.com and purchase the full source code after that you will actually get the zip file from Google Drive so after the
2:45
payment is done you will be redirected to Google Drive where you can actually download the zip file and extract it to
2:50
get this full directory structure so now let's get started by building this project guys so first of all what I will
2:56
do I will stop this server which is running and uh I will open a new
3:05
directory so I will see uh go into my projects directory and here I will make
3:11
a new project preact project so I will simply invoke this command
3:17
npx preact CLI create
3:23
default and Then followed by the name of the project so I will say preact Google login this is my name of the project the
3:30
command is very simple npx pre CLI create default and followed by the
3:36
project name so if I just enter it it will actually create a preact project in
3:43
my root directory so it will hardly Take 5 to 10 seconds and uh then we just can navigate
3:52
to this project directory so just wait for the process to finish
4:03
so it is telling me that you need to install preact CLI package so you simply
4:08
press y so it will install the preact CLI package and after that it will actually
4:16
create your preact project as well so it will install all the packages and
4:22
modules which are necessary for this application so just wait for the process to finish so
4:30
it will depend upon your internet connection so once it is done it will
4:41
actually so I will not pause the video I will show you every step so just see how it happens so I
4:50
will not pause the video or recut the video so I will show you everything which is happening right here
5:03
so I will be back guys whenever it is done so now guys as you can see that the
5:10
project is done it taken some time so we just need to first of
5:17
all go into that uh project folder so I will say preact login Google and open it
5:24
inside vs code so let me show you the basic structure of a preact project we have basically very similar to react
5:31
project we have the source directory so here in package.json which actually
5:37
contains all the modules of preact we have various scripts out there build serve development script everything and
5:44
these are the dependencies that we are using the preact version which is the latest version at the time of recording
5:50
this video and preact router this dependency allows you to actually make routing inside preact
5:57
application and uh now in the source directory we have these components folder and right here this is our main
6:07
component app.js file if you see this file will be rendered on the browser and
6:13
this is actually the home app component inside this app component We have
6:18
basically router here and we have profile route and the Home Route uh let
6:26
me just run this application and show to you just npm run def this will start the
6:32
development server on Local Host 8080
6:38
so we just need to navigate to Local Host
6:47
8080 so it will take some time if you are running it for the very first time
6:53
so just wait for the command to finish and uh then it will start your local development server on Local Host
7:00
080 first of all it will compile the
7:05
project is little bit slow as compared to react but the performance is great
7:13
the size of the framework is minimal which is 4 kilobytes as compared to
7:23
react but I just noticed whenever I created project or running it it is slightly slow
7:30
it taken some more time
7:35
so I will be seeing you guys whenever so you can see now it is compiling it so
7:42
you will see that once it reaches 100% so the project is running you will see
7:48
if I refresh so this is actually the main preact project that you will see the home screen this is the Home Route
7:56
you can navigate to the profile route you will see Local Host 808 z/ profile
8:01
we have Dynamic routes as well you can see that this is actually the John route so here it is showing profile John so
8:09
this is the home app.js file so if I just delete everything from here and
8:14
just replace here H1
8:19
heading just write here hello world and just delete everything from
8:26
here refresh it you will see this this uh we'll refresh here so in this way you
8:33
can edit the preact project by going to the app.js
8:40
file so now what we need to do right here uh we need to so all the routes
8:45
will be contained inside the routes folder if you see we have basically two routes the Home Route and the profile
8:52
route each route has its own index.js file so by default all the routes that
8:58
you will do in reactjs it will be coming inside this routes directory so what I will do I will
9:05
simply delete this I don't need the Home
9:15
Route so routes directory is empty so here I will simply make two routes first
9:21
one will be a folder name login and the second folder I will make
9:28
is uh
9:39
profile so here just make a file
9:48
folder and a new folder once again here of login so now we will have two routes
9:56
right here this is a login this is is a profile so here also we have the index.js
10:06
file so I will just uh move this app.js
10:13
file or delete this I don't need this so I will simply delete this and I don't
10:18
need the components folder so I will simply delete this
10:29
so I just basically deleted unnecessary folders so we have the routes folder right here we have the basic index.js
10:36
file so right here in the in this index.js file we will basically be
10:42
writing the base app component which is simply a functional component and it is if you have studied
10:50
react J you will be finding this framework to be easy it is the syntax is
10:56
almost the same of react so here'll be giving an ID here of app and here we'll be having a router
11:05
tag this router will be coming from preact router which is the base package
11:11
so inside this we will have the login component so I will simply in the routes
11:18
directory it will be a simple functional component I will make it just changes to
11:24
login and in the profile also simple functional component just
11:30
change it to profile so now we have two uh routes right here this is a login
11:35
route profile route so now to include this it's very easy you simply say login
11:40
it will be imported from do routes login and the Path property here will
11:46
be so if you navigate to the Home Route this login component will be taking
11:53
place just close this tag and the second route will be for the profile so it
11:58
again will it will be imported you will see profile from routes folder and this path will be for slash
12:08
profile so when someone goes to slash profile in the application it will load this component that's all this is all
12:16
that we need to do how to do routing inside preact CHS application so if you navigate to Local Host 80
12:26
80 so it is saying I we need to run this file once
12:44
again so it is saying some error right here identifier app has already been
12:57
declared sorry just delete
13:03
this so now there will be no error if you navigate to the
13:13
homepage uh now if you go to/
13:18
profile these routes are there if I navigate this login component
13:32
okay let me just have a H1 tag right here
13:40
log this is a profile so
14:01
so now guys you can see that basically if I go to the homepage I will see this login message if I go to slash profile I
14:09
will see Slash profile you will see profile so the routing is perfect perfectly
14:16
working we configured the routing right here in the index.js file we basically
14:22
have two routes this is the Home Route this component will load if I go to the
14:27
homepage and if I go to SL profile this component will load so now the thing is
14:33
that we need to create a store for store file right here in the
14:38
source directory just create a file called as store.js so this will be a
14:44
global you may say it's a global store file where we can actually create a
14:50
object user and uh this object will be having three properties name email and
14:57
the profile picture so so image URL both these three values will will be null by
15:03
default when the application starts this object will be empty having these three properties email address display name
15:10
and the profile picture and uh after we authenticate we will be basically be
15:16
setting the values of these name email and image URL so just make this store.js file in the source directory here we
15:23
will actually keep track of everything after authentication so just make this file store.js
15:30
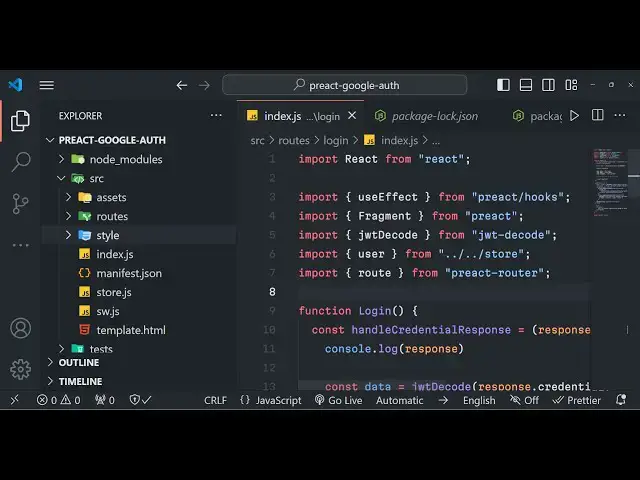
so after we do this we need to write our login component so just go
15:38
to index.js here login so right here we will actually be using the hook use
15:45
effect if you have studied react you will know use effect what is use effect
15:52
so preact also has a pre pre-built use effect
15:57
hook it will be coming from
16:04
preact SL hooks so use effect is this hook it will automatically execute
16:11
whenever your component loads for the very first time so this will be only be running once so in the square brackets
16:19
this signify it will only run once so
16:24
here we will need to actually perform the the operation of fetching the CDN of
16:33
uh Google identity Services SDK so we'll be creating a script element dynamically
16:41
script and then we will say script. source is equal to https
16:50
accounts google.com dog google.com/ GSI client so if you go to
16:57
this URL manually it actually contains a minified code CDN if you go to this it is actually
17:05
this Library code that is hosted on this CDN we are programmatically fetching it
17:11
inside of a preact application with the help of use effect hook so now what we
17:17
need to do right here we will simply say script. onload when the script is loaded
17:22
here we need to perform this operation window. google. accounts. id. initialize
17:32
window. google. accounts. id. initialize and here we
17:38
need to pass our uh client ID client uncore ID so this you will be getting
17:46
from the Google Cloud console and the call back function so when the
17:51
authentication is done we will be getting the credential so we will be making this function handle credential
17:57
response you can just name this function anything I just named this as handle credential response this will be the
18:04
call back function and now we just need to make this call back function right here at the very
18:11
top we can just make it here handle credential response and this response
18:17
will be coming at as an argument right here
18:23
so after this call back function we also need need to write
18:30
here add the Google login button so now to add
18:36
that button we will simply say window. google. accounts. id. render button so
18:44
these are all the methods of the Google platform Services SDK so now to add this
18:50
button we actually need to pass the location where we will be dynamically be
18:57
doing this so inside of jsx we just need to create a element right here inside of
19:03
a jsx here we'll be actually be creating a fragment instead of
19:08
div so this fragment will be of the part of preactjs if you just import this it
19:15
will automatically imput from preact so this fragment actually contains a
19:22
diff which will have an idea of Google sign in button
19:29
so we have given this ID to this div element now the text here will be simply sign in
19:38
with Google it can even be a button as well
19:45
if you just change it to button right here now we can simply say right here we
19:50
need to Target this element by get element by ID Google signin button
19:59
so here we can simply pass some options which theme that we want so put
20:05
a comma and the second parameter will be an object so so the theme of the button
20:11
will be outline second parameter is the size we'll be giving it a large button so
20:18
after you do this we do need to
20:27
actually so it is done I think we do need to add
20:34
this document. body. appen the script
20:50
tag use effect is done right here
21:01
okay I think I forgot to
21:12
yeah okay now it is done so after this we just need to add
21:17
this script tag to the body element so for this we can simply say
21:23
document.body.appendchild script that's all so if you just refresh
21:30
your browser guys what will you will be seeing if you navigate to Local Host
21:35
8080 you will see this button right here sign in with
21:41
Google and uh fail to render button because there
21:47
is no parent or option set this is because we haven't submitted our client ID guys because we do need to submit the
21:54
client ID as well so just go to Google Cloud console and right
22:04
here let me show you how you do need to do
22:10
this so click on this create credentials or or client ID and here you need to
22:16
submit web application authorized JavaScript origin just submit Local Host
22:21
8080 port number and also you need to submit HTTP Local Host both the version
22:28
with port number and also Local Host as well and redirect URI once again will be
22:34
the HTTP Local Host 8080 so this is important whichever port
22:40
number that you're developing so just replace it here click on Create and it will give you your client ID so don't
22:47
copy my client ID so just copy this paste it inside your client ID
22:55
section so once you paste it
23:13
uh now I think this function should
23:22
execute let me change that to div not a button let me change this to div just to
23:32
check just wait guys let me see what is that so now guys you can see that the button is showing right here sign in
23:38
with Google as you click this button uh this will open this window so here you
23:43
need to replace your correct client ID so simply copy this client ID and paste it right here all the source code is
23:51
given in the description can directly purchase it so just paste your client ID
23:56
after you paste it uh
24:02
you will basically see your profile picture will directly come email address display name everything this is a
24:08
personalized Google login button right here if you see in the preactjs application if I click it I I will be
24:15
able to select my account so once I select my account this function will actually execute
24:22
handle credential response if I try to console log this message
24:28
console log response which is coming right here click
24:34
this so if I show you this uh this object will be returned to me and this
24:40
response object will have the client ID and the credential so this credential
24:46
we want guys JWT token we need to decode this credential to actually get the user
24:51
information so for decoding this credential we do need to install a package which actually allows us to
24:58
decode this so simply install this package which is J
25:04
JWT decode I think this is actually the package jw- dcode so simply install this
25:14
package npmi JWT D code install this package inside your preact application
25:21
so once you install this it's it becomes very much easy to actually decode this
25:27
credential to actually get the user information I've already installed it so
25:32
I will start my development server so right here if you go to
25:38
your so what we need to do inside this function we just need
25:44
to say now to get the user data I will simply say JWT D code this will be
25:51
imported from this library that we installed and we will simply pass response. credential
25:58
so now it will have the user. name we will be importing the user from the
26:04
store file that we created early on if you see store.js so these three
26:11
properties are currently null so now we need to set these properties so user.name will be equal to data.
26:20
name user. email will be equal to data. email and user. image URL will be equal
26:28
to data. picture so if I just show you the data
26:33
as well console log data so it will be a simple object if you see in the
26:42
browser if you click it select your account so in the same page without
26:48
refreshing it it will first of all give you this credential JWT token then we
26:53
decode this and then we got an object right here which will have the name display name profile picture email
26:59
address given name everything email verified property true email address of everything so we are just storing this
27:06
information and then we need to redirect it redirect user to profile page so for
27:14
doing this we will use the route dependency which will be coming from preact router and here we'll be
27:20
redirecting the user back to the slash profile route so now the user will go
27:26
into the once they are authenticated they will land on the profile route so
27:32
now you can see that so it is very easy in preact JS guys uh now we'll go to the profile folder
27:39
index.js and now to show these details it's very easy we will simply first of
27:48
all right inside this jsx template we have this expression user we'll be
27:54
importing the user from the store file and now we simply check if the username
27:59
is available in that case only we will be showing the properties of the
28:06
user such as user.name
28:13
and the this will be user.
28:18
email and then user. image
28:24
URL if user. image URL is present then only
28:34
execute user. image URL then
28:40
only show the image so user. image
28:47
URL close this so if the user object is
28:52
not present then we'll use the tary operator and here you'll simply say
28:59
no user found no user Lo that's all so you'll see this message coming no
29:06
user logged in so we just need to go to first of all the homepage sign in click this and you will
29:14
see the display name email address profile picture will all be showing right here in this slash profile route
29:22
so in this way guys you can actually do simple Google identity Services SDK
29:27
Google Google authentication with a simple T click so we are not storing this
29:34
information in database that's why you are saying if I refresh the page all information will go away but you can
29:40
easily do it store this information in database as well so that it persist across if you refresh the page as well
29:47
so in this way you can integrate your Google login inside your preact JS application which is a very good
29:53
framework very fast it is based upon react CH thank you very much for watching this video please hit that like
29:59
button subscribe the channel and I will be seeing you in the next video
#Scripting Languages
#Other