Up next in 10

Build a Nuxt.js Google OAuth2 Login & Logout System With Sessions Using Vuex Store in Browser
Jan 9, 2025
Buy the full source code of application here:
https://procodestore.com/index.php/product/build-a-nuxt-js-google-oauth2-login-logout-system-with-sessions-using-vuex-store-in-browser/
Show More Show Less View Video Transcript
0:00
uh hello guys welcome to this video so in this video we will be integrating the Google oo login inside our next
0:08
application next as you all know it's a next year's very similar framework which is
0:15
based upon vue.js so next is uh a both server side and client side framework so
0:21
we'll be integrating the Google login system right here if you visit Local Host 3000 it will automatically detect
0:27
that you're already logged in and it will now show you this you are already logged in so go to profile page if I go
0:33
to profile page this is actually the profile of the logged in user you will see their display name email address
0:41
profile picture and a logout Button as well so if you we are storing information in session so if I
0:47
accidentally close this window it will automatically detect that we are already logged in if I go to the home page of
0:54
the application you will see you are logged in so I'm running this application on Local Host 3000 port
0:59
number number so simply it will display the profile information this is
1:05
a display name email address profile picture and a log out button so if I click Now log out so it will redirect me
1:13
to the homepage and now if I again refresh you will be redirected to the login page so if I now visit the H page
1:21
it will detect that I'm already logged out it will show me the login page so it's a state management that we are
1:28
doing it using View vuk Vex vuk is actually a state Management
1:34
in uh this framework which is uh next so
1:40
if you just again login you will see that this is actually the profile page
1:45
you can do it for any account right here if I open this account a different account Google account so you will be
1:52
logged out so if you're doing it for the very first time it will ask for the consent screen here you need to select
1:58
your Google account you need just need to allow the permission click on continue and you will see your profile
2:04
page you will see that so in this way if you close it open it once again
2:11
it will say to you that you're already logged in go to the profile page so this
2:16
is a Google o functionality guys you'll be integrating inside a next app so we
2:22
are using the latest version of next as you all know is based upon view
2:29
framework so it has both server side and client
2:35
side code so you don't require front end and back end differently you can use
2:41
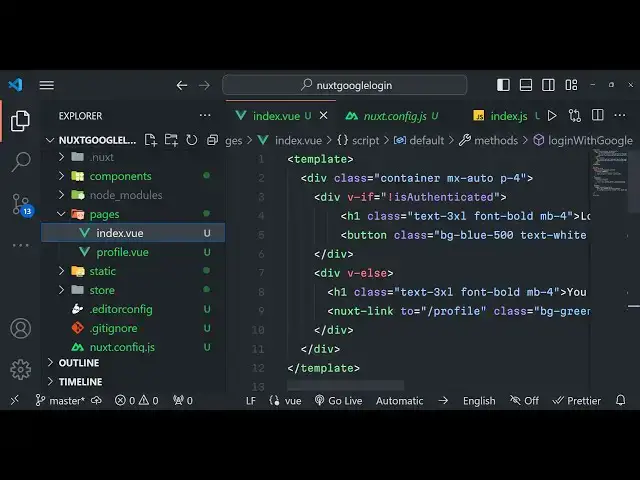
this it's similar to nextjs but it is based upon .js so this is actually the directory structure if you want to
2:48
purchase the full source code guys with full documentation and support from me you can go to the description link and
2:54
purchase the full source code you can go to Pro Cod store.com where you will actually get the source code after you
3:01
purchase it you will be redirected to Google Drive where you will get this ZIP file which will actually contain all
3:06
this directory structure and all the documentation will also be given step by step instruction will also be
3:12
given so the link is given so now let's get started by building this project I
3:18
will be seeing you in the next section so now to get started guys the very first step we need to create a new next
3:25
project so I will show you step by step I will go into my working directory where I will simply develop this project
3:34
so here you need to open command line so I will show you this command so simply
3:39
pause the video and write this command npm init NXT
3:44
next Dash app and at the rate latest so this is will tell the command to
3:50
actually download the latest version of next n npm in it next- app at theate
3:58
latest and the space followed by your project name so let me call this project as next Google
4:06
login so this is the command you can pause the video and write this
4:12
command enter it and now it will ask you some questions related to the project
4:17
such as the project name which framework you want to use so it is generating this project so it
4:25
will ask you for the project name so you can stick with the default option simply press enter we will be using JavaScript
4:32
not typescript and package manager simply drop down to npm and UI framework we
4:39
will not be using any UI framework for this template engine will be HTML next
4:44
modules we will be using the axio promise based HTTP client and Es lint we
4:51
will use it and testing we are not using any testing framework so rendering mode
4:57
we are not using Spa single page app so Universal is stick and deployment we are
5:03
not deploying it so we will stick to the default option server and development tools stick to the default option which
5:09
is recommended for vs code json. Json and just provide your GitHub username or
5:16
it is not required simply press enter Version Control select G so now it will
5:22
install these packages it will create your very first next app in the working
5:28
directory so just wait for the process to finish it is installing all the packages which are required so once it
5:35
finishes it will give you a notification and then you can open that project
5:41
inside vs code so just wait I'm showing you the full I'm not pausing any in the
5:47
video so just show just see everything which is happening right here
5:53
and and just wait it hardly take 15 to 20 seconds to
6:00
actually install all these
6:09
packages so you can see that it is doing
6:18
it so now you can see it has built our project so now we can CD into the
6:24
project here next Google login and here we can actually
6:30
open it inside vs code this is the very next basic project that you will
6:37
see it is similar to next Chas but it is far more simpler and easy to learn than
6:43
next Chas We have basically the components folder where you node modules
6:48
this is actually the pages this is the static assets folder this is a store folder
6:55
so then this is a main file which is nig. JS file so here you will be adding
7:01
all your third party modules that you want to and all the CDM for this
7:06
tutorial we're using the Tailwind CSS so here we will be providing the Tailwind CSS in the head tag that you see right
7:14
here it is far more simpler than next CHS next CHS is slightly complicated but
7:19
but next is slightly easier to learn so the very first thing we will do right here we need to install two modules for
7:27
our integrating the o Google login so this one will be atate
7:34
nextjs SL next this is actually the module which is responsible for
7:41
integrating the Google o or login so this package is specifically designed for nextjs and the second package will
7:49
be exos so exos as you all know is a HTTP client which is used to make API
7:57
request so this module is responsible on this module so that's why you need to
8:02
install AOS as well so enter it and it will actually install both these
8:13
packages so once it is installed we can start running this application simply
8:18
type npm run def this will start your development server on Local Host
8:26
3000 it will compile both the server site code and the client side code for
8:32
this tutorial we don't have any server s side code so we only need to write the
8:37
client side code so it is you can see it is listening on HTTP Local Host 3000 so
8:44
the environment is development rendering is server
8:50
site so you can see it is compiling for both client and server site
9:06
so now it is compiled so we can directly open Local Host 3000 so it will be this
9:12
is a welcome page that it gives you welcome to the next next application you
9:17
can basically edit this page which is located in the Pages directory index page and uh here you can change
9:26
this so every HTML needs to reside in the template tag right here this is a
9:31
base tag right here can say hello world so if you make
9:37
this change you will see that it will reflect so now we just need to configure
9:43
the O login so just go to this file which is next config.js file and right
9:48
here first of all we need to add the in the head
9:57
tag so right here we will I will delete everything from here
10:04
in the we don't need these meta tags so we can delete
10:15
this so we'll be having this script tag which is there in this head tag so this
10:21
will be a array just put a comma right here this will be object and it will
10:27
actually contain a source property and it will navigate to the Tailwind CSS CDN
10:33
do tailwind css.com and here we also need to provide
10:39
the second property which is defer to true so in this way you can add any UI
10:46
framework CDN like this in the script tag we dynamically adding it to the
10:51
whole application by configuring it in the next config.js file so it will add
10:57
this to your application all your HTML files globally so after
11:03
that you just need to uh write here you need to have
11:10
uh a modules you will have a modules folder
11:15
right here this will be empty by default in these we need to add two modules that we have installed first module is at
11:24
theate nextjs exos comma and the second module is at theate
11:31
nextjs or next so these are the two modules that we have installed early on
11:36
using the command we are adding it to the modules array right here very simple and this will allow next to actually use
11:44
these modules in the application we are registering it globally inside this file
11:49
so the next thing we need to do is actually having the O
11:56
module this will be an object so just here we will be integrating the or
12:02
registering the o 2 login of Google so here we need to have
12:09
a strategy so it contains a strategies
12:15
object we need to provide it and it will have a Google strategy and here we need
12:20
to provide the client ID so client ID we need to provide it we
12:26
will be getting it using Google Cloud console and then the second option here will be
12:31
code challenge method and then the response type it
12:39
will be coming as a access token so X token uh space ID
12:45
token and then here we need to provide the redirect URI so redirect URI for
12:50
this will be HTTP Local Host 3,000 /all back you can do it anything but uh for
12:58
my purpose I I will be putting SL callback so you just need to provide the same you redirect URI in the Google
13:05
developer console as well so whatever that you provide here you need to provide in Google developer console and
13:11
the last option is the scope so what information you are requesting you're requesting the profile of the user and
13:17
the email address so in double codes you can just
13:27
write so these are the five options are there client ID code challenge method
13:32
response typ redirect URI and the scope so after you provide this options first
13:39
of all let me show you how you can get the client ID it's very easy uh go to
13:45
Cloud Google Cloud console and uh here you should have a project created it's
13:50
completely free go to API services and right here you will actually go to credentials
13:58
and click on o client ID and just select the
14:04
application type right here this will be web application and uh
14:09
just give the homepage URL in the authorized
14:14
JavaScript Origins so so just copy this URL and paste it
14:29
so this will be the homepage of the application HTTP Local Host 3000 and the call back URL will be HTTP
14:37
Local Host 3000 callback click on Create and then it will give you your client ID you only
14:44
need the client ID not the client secret this will be different for you so don't copy my client ID and simply I will
14:50
paste it so this is actually configuration is almost done after you
14:56
do this we also need to put a comma right here
15:04
and we also need to say here redirect and login will be the homepage
15:12
log out will also be the homepage call back so call back URL will
15:19
be will be configured you will see SL callback we have Define this callback
15:26
URL and then lastly is profile page so homepage will be the profile page it
15:32
will go to/ profile so redirect URI is an basically object it's containing four
15:39
values so where Google should redirect you so login page will be the homepage
15:44
log out will also be the homepage and call back will be/ callback and profile will be the
15:49
homepage so this is all that we need to do inside right here the configuration process is over
15:57
this is all that we need to do in inside this file now you can close this file
16:02
and uh we will now be building the templates in the next section so I will
16:10
be seeing you in the next section so now guys we will actually be uh writing
16:17
the State Management code for next application so in the last tutorial in
16:22
the last section we configured our next config.js file where we actually added the dependencies and
16:29
the configuration code for this is the client ID everything we added now there
16:36
will be this folder out there which you see which is the store folder so here this is the folder you need to create a
16:42
file right here so the file name will be index.js you can give any name of your
16:47
choice this will actually contain all the State Management code State Management code so this is similar to
16:53
next CHS in next CH we use Redux Redux is used know that it's a concept of uh
17:01
State Management for reactjs application similarly in vuejs we have a state
17:06
called as which is
17:13
uh this is uh in inside this vuejs we need to write
17:18
the state management and uh this is called as view VX V ex so here we will
17:27
first of all write some State here for this application so there will be a single state variable inside this it
17:34
will be the user currently the value of the user will be null by default so you
17:40
just need to Simply write this user will be null so when the
17:45
application loads for the very first time this user will be null because we haven't done the authentication so let
17:51
me restart the application just type here npm runev so that it will actually start your development server on Local
17:58
Host 3,000 so you will see that it will compile this application and it will
18:03
actually run your application Local Host 3000 so if you run it for the very first time this user variable will come out to
18:10
be null so you will see that so this is null and after that
18:16
there is a concept of called as mutations mutations are nothing but the
18:21
ACT actual actions that you perform to the state so one action will be for
18:27
performing guys which is set user we will be writing this defining this it
18:32
will actually take the current state of the user and it will also take a payload payload is actually kind of a data so we
18:39
will be setting the state so we'll simply say state. user is equal to the
18:44
user so what is user p in right here which is a payload we will be
18:49
manipulating the state we are changing the state here and state. user is equal to user so this is called as
18:56
mutation inside state management inside VX so we also need to have a gutter
19:04
method as well in order to get the value of the state we will be defining this Getters meths this is actually a syntax
19:10
of defining State inside VX we will have a function called as is authenticated it
19:16
will take the state as an argument and then it will return either the user is authenticated or not so this
19:24
double explanation mark right here double not sign it it will return the value as true or false whether the user
19:32
is authenticated or not so this function will return either a Boolean value true or false the second one will be logged
19:39
in user this is again will be it will take the state as an argument and it will return the actual user which is
19:47
present in the state so return state. user so these are the two methods that we defined guys which is contained
19:54
inside this uh VX store and this is actually M mutation that we Define set
20:00
user and this is a getter method these are the two methods we will be using inside our views whenever we will make
20:07
it in the next section so whenever you define your pages we will be def using these methods that we are defining in
20:13
the state in the store folder index.js
20:18
so after this there is also a concept called as actions inside the State
20:24
Management if you have studied VX you will know what I'm doing right here if you don't know just write this code
20:31
as it is next server in it we will be defining this and inside this you will
20:36
pass a commit
20:47
request and here we will have if condition if uh request or
20:55
session and uh request. session do
21:01
user if the session is there then we will simply call this commit method and uh we will call the mutation set user
21:08
and we will pass the user which is present in the session request. session. user we will actually call this mutation
21:15
if you see we have defined this mutation which is set user we calling this mutation from here from this next server
21:22
in it and after this put a comma and then you will Define this uh set user
21:29
also here commit
21:36
user commit set
21:42
user user that's all so this is actually the State Management code that we have
21:49
written in order to keep track of the authenticated user whether they are logged in whether they are not logged in
21:54
this is actual file you need to create guys in the store folder by default this folder will be empty just create
21:59
index.js file and write this code and now in the next section we will Define our views just create a profile. view
22:08
view view this will be the index page which will actually contain the login page this is a profile. view page which
22:14
will contain the profile details about the user so we will be defining these two routes in the next section so now
22:21
guys in this section we will actually be writing the views of our application
22:27
which the user will see So currently if you go to Local Host 3000 you see this hello world message so instead of this
22:34
we just need to delete this and have a login button so we will be conditionally be
22:41
renting this login button we'll use these tailin classes MX Auto
22:51
p-4 so right here we will actually have a conditional inside view view uh V if
23:00
which is actually a if else condition syntax we will be using this variable
23:05
which is is authenticated so is authenticated will be this method which will either return
23:12
true or false depending upon whether the user is loged in or not and here we just need to at the bottom side we just need
23:18
to declare the script tag and here we just need to Define this is authenticated so right
23:25
here we will be defining this uh asyn
23:31
function Asing data and here we just need to pass two variables which will be
23:37
passed to this function Au and store store and inside this function we will
23:44
be having this if condition so this variable that is passed here off it contains a property
23:50
called as logged in so if the user is currently logged in
23:56
then we will actually dispatch a event to VX store so now to dispatch
24:04
this event we have a function right here which is store. dispatch and we will be calling this again set user that we have
24:11
defined in the earlier section we will be passing this currently logged in user
24:16
right here we are dispatching this event which is set user if you see in the index.js file we have declared this
24:23
mutation which is called as set user we are currently calling this mutation so
24:28
this code will execute and it will actually call this mutation set user inside the index.js file so after that
24:37
your user will be logged in so put a comma here and there is this
24:44
computed property which is there inside vuejs so this is authenticated that we
24:50
are using inside our HTML this property either will return
24:56
true or false depending upon whether the user is logged in or not so you'll be returning this.t
25:05
store and gets is authenticated so you can see that we
25:12
have inside in index.js we have Define this getter method which is is
25:17
authenticated so we are actually calling this method so this will return either true or false depending upon whether the
25:23
user is logged in or not so this will evaluate to either true or false and right depending upon whether it's true
25:31
or false we will be showing the login button or we will be showing the profile details of the user so if the user is
25:39
not logged in in this scenario it will evaluate to true so in this case we will
25:44
be showing the heading to the user that please login so we'll be using the
25:49
Tailwind classes right here so we'll give it in heading which
25:55
is login so we'll have a simple button right here which will allow the user
26:00
user to login with Google so we'll be binding a on click event listener to
26:05
this button so when we click this button right here we will be executing this method login with
26:12
Google so we just need to give some Tailwind classes to this button bgblue
26:22
500 text will be in white color so text white padding to
26:28
it will be rounded and
26:34
uh it will also have some Shadow as well so if you just refresh your browser guys
26:40
what you will see if you navigate to Local Host 3,000 you will see this login with Google button so how this uh is
26:48
working behind the scenes is very easy it is actually evaluating this condition
26:54
V if so it totally depends upon this value so if this value comes out to be
27:01
true then the user is not logged in so that's why you are seeing this login with Google button so if the user will
27:07
be logged in then you will see the profile details then this condition will evalue to false so here it is calling
27:14
this function right here in the computed property and in turn this is calling the
27:19
index.js file in the getter function so it is all all this code is
27:25
interrelated to each other so now right here we will be
27:34
having the after this button that you see right here we will
27:40
have the another div tag and this time we will be defining the else condition
27:45
so if the user is logged in if this conditions to false right here so in
27:51
this case we will be defining or showing the user profile details such as the email address display name and the
27:57
profile picture we'll be giving Tailwind classes right here to this
28:03
also so we giving a heading to
28:08
that you will just put a message to the user that you are logged
28:15
in and then we will simply have next
28:22
link and you'll be having this two tag right here
28:28
you will just say to the user you are logged in so go to the profile page so you will be having this button right
28:35
here BG
28:46
green this is a built-in element of next next
28:58
so you will basically see this is actually the link tag which is built in inside
29:04
next which is called as next link it will basically link to the SL profile
29:11
route that we will make right here go to
29:16
profile so when the user is logged in this message will show show to the user you are logged in please go to this
29:22
profile page and right here whenever user goes to this this view will open
29:28
so right here this will here you will be showing
29:34
the details of the logged in user so right here if you just see right here we
29:40
will be defining one more entry methods method section so when we click
29:47
this uh if you see we are binding a on click listener to this login button when we click this login with Google button
29:54
this function we need to Define it right here in the method section so we'll be
30:00
defining this Asing function which will be login with Google so inside this function guys we will simply say await
30:07
this Dot and we will be saying Au login with this is actual function
30:13
which is present inside this module and here we need to provide the provider so
30:19
it has various social media providers Google Pinterest uh Twitter in this
30:24
specific video we talking about Google so here you need to provide the first argument is Google and then after that
30:30
it will actually interact with that VX store and we need to dispatch again and
30:37
we need to set the user after we get the user logged in user we can simply pass the logged in user like this or user
30:45
that's all we are now communicating with that index.js file and we are dispatching this logged in user and we
30:52
are calling this mutation set user and we are actually manipulating the state and pass the logged in user
30:58
whenever the authentication is done we are dispatching this event set user so now the thing is complete if you click
31:05
this login with Google button you will be redirected to the screen where you can actually select your consent screen
31:11
where you can actually select your Google account Grant the permission click on continue
31:17
and you will basically see render function or template not defined in component Pages profile. view so we need
31:23
to define something inside profile. view so we had redirected to this this Local
31:28
Host 3000 profile route so this is perfectly working fine now we just need
31:33
to have some right here we can say this is the profile
31:42
page so if you just uh refresh now you will see this is a profile page so we
31:48
are simply if you close this once again open that Local Host 3000 it will
31:56
automatically detect that you're already logged in it will show to you that you are logged in please go to profile page
32:02
I will simply go navigate to the profile page so now we need to display the logged in user details such as profile
32:09
picture display name email address this is very simple we can simply say the container
32:17
class MX Auto P4 so these are all Tailwind
32:23
classes and right here you'll be displaying first of all
32:29
the display name we say
32:43
profile so inside
32:56
this you will actually have a image tag and it will be equal to profile.
33:03
Picture This profile user will be coming if you just have a script tag right here
33:09
every view component has a template and script and a style tag as you all know so right here we will be having some
33:16
properties to this component export default computed component which is
33:22
computed property will be the profile method and it will be returning
33:29
this. Au user So currently logged in user which we will be passing to this
33:34
profile object profile. picture if you just refresh now you will actually see the photograph of the user I just need
33:43
to give it a class as well image source sorry you need to put
33:50
colon right here you will see the picture is there so we can actually give it a boot uh
33:58
Tailwind class here to make it round the width 16 height will also be
34:09
16 and it will be rounded full
34:17
mr4 so you can see it is rounded right here and after this we can actually give
34:36
the display name and the email address which is Double C bracket and we can here write here profile. name similarly
34:44
we can repeat this
35:00
so this will be profile.
35:06
email so you will see that we have the profile display name email address and
35:11
profile picture lastly we will actually have a simple button for log out functionality as
35:17
well so here we'll simply say log out
35:35
and give it a on a bind click uh on click listener to it bind it which will
35:41
execute this function log out so right here uh we can actually if you see we
35:46
have a log out button as well so just also assign a
35:53
style to it as well scoped just give it a
35:59
container class is Max width 600 pixel just do it and it will
36:06
actually Center it you will see that so it will give some padding and also we'll be giving
36:13
a border radius to the card class which is uh 8
36:22
pixel this is not necessary I have just written some stylesheet
36:31
so this Styles will only apply to this component that's it's advantage of using
36:36
styled component so right here now to define the methods we'll put
36:42
a comma right here and this is we will Define the log out
36:48
method which is very simple we say this do Au and we can def call the log out
36:55
method that Sol this will actually log out the user if you refresh click on log
37:00
out you will be redirected back to the login page if you click now if you try to go to the
37:07
homepage it will show to you you are currently logged in go to the profile page if you log out you will be logged
37:14
out so this is a very simple application guys we have developed and uh you can
37:20
log in with any route any Google account if you're doing it for the very
37:26
first time you will ask for the consent screen simply allow
37:33
access if you go to the home page you're currently logged in go to profile page
37:38
so this is a thing guys if you are interested in purchasing the full source code with full documentation and support
37:45
the link is given you can directly hit the like button subscribe the channel and I will be seeing you in the next
37:51
video
#Internet Software
#Other