Up next in 10

Angular 13 ng2-floating-action-menu Example to Create Floating Side Popup Social Menu in TypeScript
Dec 22, 2025
Buy the full source code of application here:
https://procodestore.com/index.php/product/angular-13-ng2-floating-action-menu-example-to-create-floating-side-popup-social-menu-in-typescript/
Show More Show Less View Video Transcript
0:09
Uh hello friends, today in this tutorial
0:11
I'll be showing you that how to
0:12
integrate a sidebar floating floating uh
0:16
social menu inside your angular
0:19
application. So many websites have this.
0:22
So this is something like this. You will
0:25
see this is a demo. So right at the
0:28
bottom right corner of the screen they
0:31
have this menu. So it sticks it floats
0:34
around whenever the visitor visits the
0:36
website. So it is very much useful in
0:38
sharing the website or getting the user
0:41
attention. So we will be building this
0:43
uh floating kind of action. You will see
0:46
that this is the demo of the application
0:48
we will be building. So if you just
0:50
hover onto it you will see all the
0:52
social networks. they can follow you on
0:55
GitHub, uh Facebook, all these you can
0:58
add this accordingly. So whenever you
1:00
click something on it, you will be
1:02
redirected to the GitHub repository,
1:04
GitHub profile of that person which has
1:06
created it. So that way the users can
1:09
interact with you by using their social
1:11
networks. So you can also click on it
1:15
individual.
1:17
So this is the floating bar. It sticks
1:19
whether you scroll this page.
1:22
So it appears at the bottom right corner
1:26
of the screen. So this is built using
1:29
angular library third party library
1:32
which is called as ng2
1:35
floating menu. So
1:39
ng2 floating action menu. So basically
1:41
if you just type it ng2 floating action
1:46
menu. This is the actual module that we
1:49
are using here. So this is its
1:51
documentation and uh it is a GitHub npm
1:55
repository. So you will just see here
2:01
this is the way by which you can install
2:04
this. Simply import this inside your
2:07
app.module.ts
2:08
file and simply include this HTML part
2:11
and this one. I will be guiding you step
2:13
by step. I will be showing you all the
2:16
options that it has. So in order to
2:19
build this I have given all the source
2:21
code in the video description. If you
2:22
want to download all the source code
2:25
just go to the video description link.
2:27
So inside the inside the edit portion
2:30
inside description of this video I have
2:32
given all the source code just click it
2:35
and after this let's start building this
2:38
application. So I have created this
2:41
angular project. Let me delete all this
2:43
and start from scratch.
2:46
So let me delete all the lines and start
2:50
from scratch.
2:53
So this is the brand new angular
2:54
application. You will see uh nothing is
2:57
there. So just open your app.module.ts
3:01
file which is present inside app folder.
3:04
So right here inside this file first of
3:06
all you need to install this module. The
3:08
command is pretty simple which is uh
3:13
ng2 floating action menu. So basically
3:16
you just need to go to command prompt
3:19
and uh just type this command which is
3:21
npmi ng2
3:25
floating action menu. So basically just
3:30
uh install this module by this command.
3:35
So it will not work with angular 13 by
3:38
this command. So you need to force it.
3:40
Just put a d-force
3:43
option. So basically it will force the
3:46
download and it will resolve the
3:48
compatibility issues. So now the module
3:51
is installed. So now you simply need to
3:54
add it inside your app domodule.ts file.
3:57
So for that for this you need to write
3:59
this line which is uh you need to import
4:02
this module. Import it
4:06
from the dependency which we have
4:08
installed which is ng2 floating action
4:10
menu. So from this we need to uh
4:15
floating action menu module. So just
4:18
import this and now you need to add this
4:21
inside the imports array. So just import
4:23
it floating action menu model module. So
4:27
now this is complete. So just close this
4:29
file. Now open the app.component HTML
4:32
file. So right here inside your ng2 we
4:36
will declare this directive of this
4:38
library
4:40
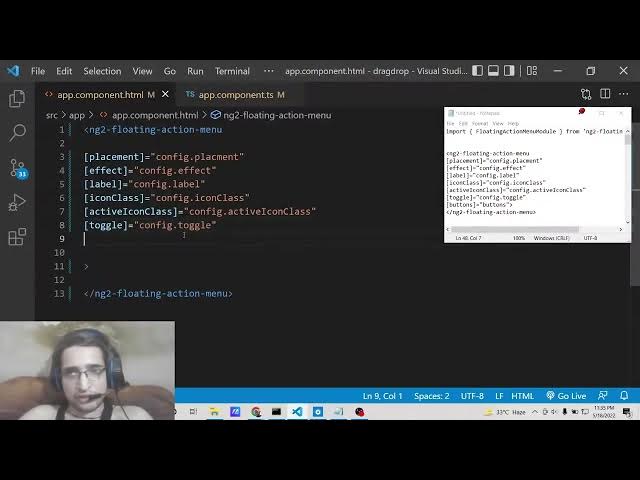
action menu. So this is the directive.
4:43
So basically it takes some options. So
4:46
in the documentation it is
4:50
uh described what is the meaning of each
4:52
option. So I will be replace just doing
4:55
it. Placement how you need to place your
4:57
uh floating action menus. So we we will
5:01
be declaring a variable which is called
5:04
as config dot placement
5:07
inside this uh app.component.ts
5:10
file.
5:12
So don't worry about it. Then we have
5:15
got the effect variable which is
5:18
something uh what effect you need to
5:20
apply to it. Again we will use
5:22
config.ffect
5:24
the label which appears on the actual
5:27
menu icons. So this will be again config
5:30
label.
5:32
So icon you can also attach custom icons
5:36
by using this icon class variable. So
5:38
this will be config icon class.
5:42
And then we got active icon class which
5:46
is similar whenever the social whenever
5:49
you hover onto any of the individual
5:52
menu items what is the icon class you
5:55
need to attach. So this will again come
5:57
through the config variable which we
5:59
will declare later on. So conf active
6:02
icon class. Next we got is the toggle
6:05
option. So this is very much useful.
6:08
There are two available options
6:09
available. Whenever you click on the
6:11
menu the menu will appear or if you
6:14
hover onto it. So again we will toggle
6:17
it using the toggle variable. And then
6:20
we got the buttons. So how many menu
6:23
items you need to display. So this will
6:25
be coming through the buttons array.
6:28
That's it. So this is all the options
6:30
which is necessary for this uh
6:32
directive. Now we need to move on to the
6:35
app do.component.ts file. So right here
6:38
we need to declare all these variables
6:40
that we have attached in the
6:41
app.component.html
6:43
file. So the very first thing we will
6:45
declare is the buttons array.
6:49
So after this title so basically you
6:52
also need to declare the config variable
6:55
just declare it.
7:07
So just declare it any and after that we
7:09
will declare the buttons array. So this
7:12
this will be a array of uh floating
7:15
buttons which will be appearing on the
7:17
website. So this will be floating
7:20
action button. So this will be you can
7:23
see automatically it has imported this
7:25
line at the very top. Visual studio code
7:28
automatically does this for me. So we
7:30
don't need to manually write it. So
7:32
simply close this tag and is equal to
7:35
this will be array. So simply a square
7:38
bracket. So inside this we will declare
7:40
individual object. For each object we
7:43
have got the icon class which we can
7:45
attach it.
7:47
So this one will be for GitHub. So we
7:50
will be in social GitHub
7:55
and the label whichever label you need
7:57
to attach. So this will be simply follow
8:00
me on GitHub
8:03
put a comma
8:08
and then whenever someone clicks on it
8:10
so what will happen? So on click
8:12
property is also there. So whenever
8:15
someone clicks on it what happens? So we
8:17
will be redirect the user to the actual
8:21
page of uh the creator. So we will
8:26
simply say window.loation.h HRF.
8:29
So my GitHub profile I will redirect the
8:32
user github.com/
8:36
1 2 3 4 5 6.
8:40
So this is one action button is added
8:42
successfully. So in the same manner you
8:45
can put a comma and you can add some
8:47
more buttons. So the pattern will be
8:51
similar. Again you need to provide the
8:54
icon class which will be now this would
8:56
for the Facebook
8:58
and uh you can give it a label follow me
9:01
on Facebook.
9:06
Put a comma what happens on click. So
9:09
whenever someone clicks on it what will
9:11
happen? So you can redirect the user to
9:14
your Facebook profile. So simply again
9:17
redirect them using this property.
9:30
So after this we have added two buttons
9:33
here. So now we need to uh just tell the
9:37
placements how the placements will be
9:40
there, how the buttons will appear. So
9:43
we have got the placements array.
9:47
This will again be a array. So for each
9:50
array and we will have a object the
9:53
value will be BR. So this will be bottom
9:57
right corner of the screen which is a
10:00
default position. Bottom right. The next
10:03
position is uh bottom left. If you want
10:07
to appear this menu items in the bottom
10:10
left position, you will write BL and the
10:13
key will be simply bottom left. Put a
10:16
comma and then we got the top right
10:19
position. So this will be TR. So the key
10:23
will be here top right.
10:26
And uh this needs to be surrounded your
10:30
quotes. So top right.
10:34
The next position is uh top left. So we
10:38
will have uh TL
10:41
and the key will be here top left.
10:45
So these are the four placements guys.
10:47
Top left, top right, bottom left, bottom
10:50
right. So we have declared all the
10:52
positions here. So after this we will
10:55
have our effects array. So how you need
10:58
to apply the effects to the menu items.
11:02
So this will be again be a array. So
11:04
inside each array we will have a object
11:07
the value will be uh MFB zoom in. So
11:11
these are the different effects you can
11:13
apply. So this will be zoom in zoom in
11:17
effect.
11:18
So you can try out individual effect
11:22
based upon what you like. The next
11:25
effect is uh MFB slide in. So this is
11:28
slide in effect.
11:32
So the key is simply slide in plus fade.
11:41
The next effect is uh
11:46
if you see this is this is an effect is
11:49
MFB
11:50
fountain.
11:54
So this effect is called as fountain
11:57
effect.
11:59
And the next and the last effect is MFB
12:05
slide in
12:07
spring. So this is a spring effect. If
12:10
you see
12:12
slide in
12:14
the parentheses
12:17
spring. So these are all the effects.
12:20
Four effects are there. Zoom in, slide
12:22
in, fade, fountain and slide in spring.
12:26
So lastly we have got the toggle. How
12:29
you need to appear this menu items.
12:32
Basically these are two ways either you
12:34
can click on the menu item or you can
12:37
hover onto it. So these are the two
12:40
toggle effect you can apply. And lastly
12:43
we will apply the effects using the
12:45
constructor property. So we will use the
12:48
config
12:51
object.
12:52
So this config object we are using
12:54
inside app do.component html you will
12:57
see this config.placement config config.
13:00
label. So here you need to initialize
13:03
this object here which is we are exactly
13:06
we are doing this thing here. So here we
13:08
will be telling the placement which is
13:12
uh
13:13
we will be putting this in the bottom
13:17
right position. So BR
13:20
then we will be putting uh the effect
13:23
will be MFB zoom in
13:28
then the label will be main button label
13:35
icon class.
13:39
We will be using this class which is in
13:42
plus round.
13:44
You can read the documentation. You can
13:46
change these options accordingly if you
13:48
don't want these options.
13:51
Active icon class I and close round.
13:57
And for the toggle we will use uh the
14:00
click this time. So basically whenever
14:02
you click the menu item the items will
14:06
appear. And for the buttons we will
14:09
initialize it to the this dots array
14:12
that we have declared. You will see that
14:14
this is array we have declared. So we
14:17
are using it inside our constructor. So
14:20
now basically if you run this
14:21
application by using ngsurf. So
14:24
basically this will start this
14:26
application hopefully
14:29
at localhost 4200.
14:37
So you will see it has compiled it
14:39
successfully. So we can open this
14:41
inside. Uh
14:47
so you can see that guys this is uh if
14:51
you see.
15:02
So this is main button label.
15:12
Uh I think we have made a mistake here
15:17
in typing the stuff. Let me see.
15:48
So the source code will be there inside
15:50
video description guys. Let me just uh
15:54
sometimes errors can come because you
15:57
are typing it live. So that's why the
16:00
errors can come.
16:15
So now you can see that guys it is
16:16
appearing on the bottom right position
16:18
here. So basically
16:21
whenever you hover onto it you will see
16:24
that.
16:25
So you can change this behavior. So I
16:29
can change this position. Let's suppose
16:30
I don't want it in bottom right. I can
16:32
change this to top
16:36
right. I can change to TR. So now
16:39
basically if I see it is appearing on
16:40
top right position. You will see that if
16:44
I want it to top left I can change it.
16:48
You will see that will appear now on top
16:50
left.
16:52
And uh lastly which is bottom left BL.
16:57
So
16:59
let me change the face here. Let me you
17:03
will see it is appearing here.
17:05
So in this way guys you can just
17:08
pinpoint the position exactly place
17:10
where you need need the items to place
17:13
in whichever position you want. And uh
17:17
one more thing you can also toggle here
17:20
you can change the if you want to click
17:23
it.
17:24
So whenever we click the items it will
17:28
appear now. So whenever you hover
17:30
nothing will happen. You need to
17:32
individually click it. So if you click
17:34
it now it will be
17:37
saying you can see that. So if you click
17:40
on individual links it will go to the
17:42
GitHub repository. You will see that.
17:45
So first of all hit the like button
17:47
subscribe the channel. All the source
17:49
code will be there inside video
17:50
description. So you can also change the
17:53
effects also which is there. So various
17:56
effects are there. So you can have uh
18:01
MFP fountain effect.
18:04
So this is the fountain effect is there.
18:08
You will see this is fountain how this
18:10
animations are taking place. You will
18:12
see that.
18:17
Then we have this uh
18:22
slide in spring.
18:29
So you can see that.
18:32
So whichever animation you like,
18:33
whichever effect you like, you can play
18:35
with these options. All the options are
18:37
available to you. So, it's a very handy
18:39
plug-in to have in Angular applications
18:42
in order to float your social menu in
18:46
whichever position you want and add your
18:50
social networks. So, thanks very much
18:52
guys for watching this video and I will
18:54
be seeing you in the next one.