Up next in 10

Angular 13 Draggable Image Carousel Project Using ngx-owl-carousel-o Library in TypeScript
Dec 22, 2025

Buy the full source code of application here:
https://buy.stripe.com/dR6eYe2oV54A43m4Cw
Show More Show Less View Video Transcript
0:07
Uh hello friends today in this tutorial
0:09
I will be telling you that how to make a
0:11
image carousel using angular 13. So
0:15
basically it will be a gallery of images
0:17
which will be shown inside a animated
0:19
manner. So this is called as carousel.
0:23
So we will be using a special library of
0:25
angular. So this will be shown something
0:27
like this. It can be draggable. You can
0:29
also drag images like this. So a simple
0:32
animation of images will be shown to you
0:34
in the form of gallery. You can have as
0:37
many images as you want. So side by side
0:40
it will be shown.
0:42
So when you load the application for the
0:44
very first time, it can also
0:46
automatically show on its own like this.
0:49
So here you can choose any image of your
0:51
choice. You can download image from the
0:53
internet and show to you show to the
0:55
user inside your angular application. So
0:58
you have visited many websites on the
1:01
internet where they have this uh
1:04
automatic image carousel showing the
1:06
images on the website. So this is
1:08
exactly the effect that we will going to
1:10
implement in this video especially
1:12
inside our angular application and the
1:15
dependency which we will be using is
1:17
this ngx-wall
1:21
carousol- o. So this dependency is
1:24
available if you just go to npmjs.com.
1:27
If you just search for this dependency
1:28
which is ngx owl carousel-
1:34
o it is a very famous dependency the you
1:37
can see 29,000 weekly downloads so it is
1:41
compatible with the version of angular
1:44
which is greater than six or equal to
1:46
six and the main thing is that it
1:49
doesn't use jQuery so it is it doesn't
1:51
use third party dependencies so it's a
1:54
free open-source module which implements
1:57
carousel of multiple images inside a
2:00
gallery. So various options are
2:02
supported. You can animate it depending
2:04
upon the options. So I will be showing
2:06
you
2:08
all the options in detail.
2:11
So I have given all the
2:14
source code in the video description
2:16
guys. So if you just go to the video
2:17
description of my blog post. So this is
2:19
the blog post I have written here. So if
2:21
you want this full source code of this
2:23
tutorial, you can go to the blog post
2:26
here. I have written here the complete
2:29
step-by-step source code. So now let's
2:31
get started guys by building this
2:33
application. So first of all I will go
2:35
into my projects folder and simply I
2:38
will open a new directory make a new
2:41
directory which is angular
2:44
carousel
2:48
cd into this and here we will make a new
2:53
project with the help of this command
2:55
which is ng new
2:57
followed by the project name. So now
2:59
this will create a sample uh angular
3:02
project. It is asking that would you
3:04
like to use angular routing. I will say
3:06
no. And we will use CSS for the
3:09
stylesheet.
3:12
So this typically take 15 to 20 seconds
3:15
to create your project. Doesn't it
3:17
totally depends upon your internet speed
3:19
and computer speed. So now it is just
3:21
creating the angular project. So please
3:25
hit the like button guys if anyone
3:27
watching this live stream and also
3:28
subscribe the channel as well.
3:31
Great thanks to go live Shivanchu is
3:34
asking. So thank you very much bro.
3:37
So [snorts] it is now installing these
3:39
packages. So just wait.
3:49
[snorts]
3:50
So now it has created this project guys.
3:52
So we can simply go into the project
3:58
and now we can open this project inside
4:00
the visual studio code texture edator.
4:02
So you can use any texture editor of
4:04
your choice but I'm using this text
4:05
editor. So you will see that inside the
4:07
source folder this is sample angularjs
4:10
project angular project. So now to run
4:12
this it is very easy. You just type
4:14
ngserve. Before that we need to install
4:16
this dependency which is uh ngx-wl
4:21
carousel- o. So just install this
4:25
dependency
4:27
with the help of this command. So you
4:29
need to just put d-force
4:33
because this can be uncompatible.
4:38
Let me see
4:43
if you see here uh the command here.
4:48
Just copy it.
4:59
[snorts]
5:01
So now it has installed it guys. So it
5:03
was just a spelling mistake. Ngs all
5:05
kerosol- o. So now it has installed it.
5:08
So now we can start our application by
5:11
writing this command which is ngsurf. So
5:13
this will start our application at
5:15
particular port number which is 4200.
5:18
So in the meanwhile we can just include
5:21
the steps. In order to include this
5:23
library so the very first step guys in
5:25
order to use this library you need to
5:28
include the stylesheets. So this can be
5:30
done using going to the file which is
5:32
angular.json file of your angular
5:35
project. So in the root folder you will
5:37
find this file which is angular.json.
5:40
So right here just go to this file
5:43
[snorts]
5:43
and you need to make slight
5:45
modifications. Just go to the styles
5:47
array here and you need to add these two
5:50
lines which is very much useful
5:53
which is node modules. Inside our node
5:56
modules folder, we have this ngx owl
6:00
koser- o. Inside lib,
6:05
inside the library folder, we need to
6:07
grab the styles.
6:11
And inside this, there is a pre-built
6:13
folder. Pre-built dash themes
6:20
dot
6:22
keros
6:23
dot. CSS. So we are including the CSS
6:27
file and once again we also need the
6:30
default main dot CSS. So the path will
6:33
remain the same. So we can copy this
6:35
path and simply paste it. So this will
6:38
change to
6:42
old theme
6:48
default
6:52
main dot CSS. That's it. This is all
6:55
that you need to do.
7:00
And make sure that you write this line
7:02
which is this one. Just move this line
7:04
to the last.
7:08
Just make sure that styles docs. That's
7:12
it. So this is all that you need to do
7:14
inside this file. So now you can close
7:16
this. So now we need to go to our app
7:19
folder and inside this go to
7:20
app.module.ts.
7:22
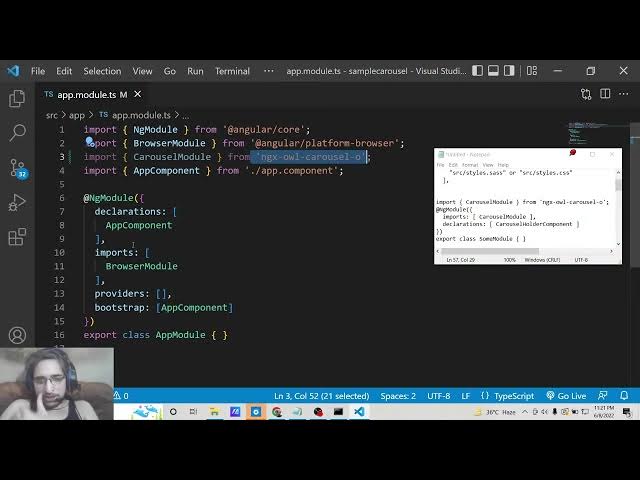
So here we need to register the module.
7:24
So simply we will import this at the
7:26
very top. So we will simply write here
7:29
import and uh we will simply say
7:31
carousel module
7:33
and it will automatically do for me. You
7:35
can see that ngx carousel-o.
7:39
So next step is that we need to add this
7:42
inside the imports array. So simply put
7:44
a comma and just add this carousel
7:47
module.
7:50
And uh that's all that you need to do
7:53
guys. So also close this file also. And
7:57
now move on to the app.component.ts
7:59
file. So right here at the very top you
8:02
need to import the options that this
8:04
library support which is o options.
8:09
So this will also import it from the
8:11
same library that we have installed. So
8:14
after this
8:18
we need to have the options custom
8:21
options. So this will be of the type all
8:24
options. So this library supports many
8:27
options sub such as loop option which is
8:30
it can be either true or false boolean
8:32
parameters. So I will put at true. So
8:34
this simply means that when you load the
8:36
page the animation will start
8:39
automatically.
8:42
So loop is true. That means mouse drag I
8:46
will put to true.
8:48
Touch drag. So these are all the gesture
8:50
options. So if you put this to false,
8:52
you cannot drag the carousel. [snorts]
8:55
Pull drag. All these options. True. You
8:58
can change these options. It is totally
9:00
dependent upon you whether you need to
9:02
customize this dot symbol. [snorts]
9:05
I will put this to also true. So three
9:07
dots should be shown just below the
9:09
images. You can also have the speeds as
9:13
well. How much speed that you want nav
9:16
speed. You can provide numeric value
9:19
here which is 700 nav text.
9:24
So this can be empty or you can write
9:27
something here also.
9:29
So all these options it supports guys.
9:31
And uh then we have got the it is
9:34
completely responsive. So that's why
9:37
inside this object it tells you at what
9:41
sizes how many images will be shown. So
9:45
at zero size I want that only one image
9:48
should be shown to the user. At 400 size
9:53
two images will be shown
9:58
and uh when the size becomes 740.
10:04
So basically if the size of the device
10:06
increases we are just saying that show
10:08
more images and when the size becomes
10:11
940
10:13
such as the desktop size we are letting
10:16
the user to show four images
10:20
and at last we want the navigation to be
10:24
true.
10:27
That's [snorts] it. Now we need to show
10:29
something on the screen guys. So we will
10:31
move on to app.component component html
10:33
file. So remove all this code and uh
10:36
right here we will have a simple div. So
10:39
we will say that sample carousel
10:43
with multiple images.
10:47
So right here we will have
10:52
old carousel.
10:54
This is a tag.
11:00
So now we need to attach the options
11:02
that we defined in the previous file. So
11:04
by this object options directive. So
11:08
here we can attach this needs to be same
11:11
the spelling the spelling needs to be
11:13
same custom options. So we where have we
11:16
declared here you will see custom
11:17
options. So this needs to be same.
11:21
So inside this we now need to ng
11:24
template
11:28
and uh here we can need to initialize
11:32
carousel slide. This is the slide that
11:34
we can attach slide one.
11:44
So we can copy this two more times to
11:46
show
11:53
So we can change this to slide two,
11:55
slide three.
12:00
So if you now refresh it.
12:06
So it will start this application on
12:08
4200. So it is just doing it.
12:16
>> [snorts]
12:18
>> So now it has compiled successfully. So
12:21
now it is listening on local host 4200.
12:23
So
12:47
>> [snorts]
12:51
>> So I think it is not showing because we
12:54
haven't uh put the images. So for having
12:57
the images it is very easy.
13:01
If you go to the
13:17
>> [snorts]
13:22
>> So you [snorts] can also show images
13:23
here instead of showing the text.
13:30
[snorts]
13:31
So this can be a valid image on the
13:34
internet. So you can copy the image
13:37
address.
13:46
Just copy the image address. So
14:20
>> [snorts]
14:45
>> I think there is some kind of error
14:47
which is taking place. Let me see why it
14:50
is doing this.
15:07
If you see this example,
15:17
I think for this the animations module
15:20
will also be needed. So let me paste
15:22
this
15:34
[snorts]
16:02
uh guys for this I can just tell you
16:05
that locally it is not working on my PC
16:08
but the steps are the same you can refer
16:11
this example which is hosted on stack
16:13
blitz.com
16:15
so here they have shown complete example
16:18
so [snorts] they taking these images
16:20
from API. So they are making HTTP
16:22
request. So at this moment of time my
16:26
this project is not working but the
16:29
steps are the same. You can refer my
16:30
blog post for better instructions.
16:34
So if you faced any sort of problem you
16:36
can ask in the comment section.
16:42
So [snorts] the steps are the same. You
16:43
can just play with these options.
16:50
like this. So, thanks so much for
16:53
watching this video.