Up next in 10


Have questions? Ask in the Chat!
Don't forget to check out Odyssey Custom Vans latest build currently For Sale here: https://www.odysseycustomvans.com/
Whenever you’re ready, there are 2 ways we can help you:
1. If you need a vetted parts list, download our → FREE DIY Van Build Cheatsheet to help you save time and money on Van Parts and Gear: CLICK HERE: https://vanbuilderhq.com/
2. If you want to get Done-For-You Van Build help, book a → FREE Consultation with my Calendly Link: CLICK HERE: https://calendly.com/odysseycustomvans/intro-call
Show More Show Less View Video Transcript
0:01
[Music]
1:19
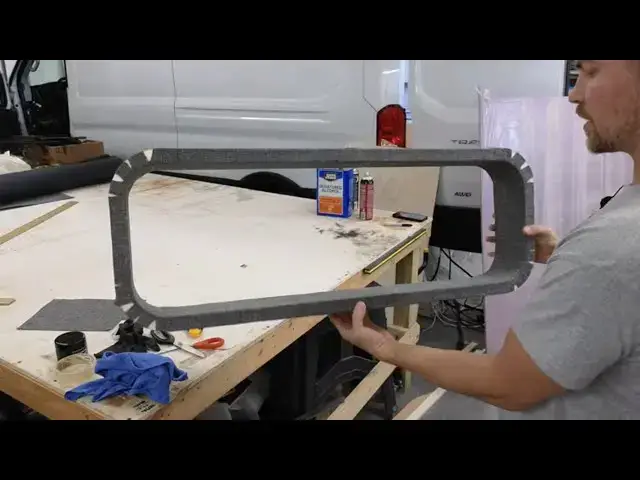
hey everyone welcome back to the live stream today we are working on upholstering our window pills so that's
1:25
what these guys are right here um we got these from ABC rig
1:31
and yeah we're trying them out um two
1:36
things I'm changing over to a different adhesive right now and I'll talk to you about that in just a second for
1:43
upholstery I'm not sure if I like it or not um let me fix this camera really
1:48
quick so I'm still here this camera I just need to there we
1:55
go all right so that is the window pill itself
2:01
I'm starting this process and I was going to film the second one but we're just going to jump into it we're going
2:07
to do it live so you guys get to join me and see if uh uh if I mess up or
2:14
not I don't think I will I'm pretty experienced in upholstery but this one
2:20
is the complex one because you got a bunch of Curves there's different sizes on it stuff like that so um let me see
2:28
if I can get you guys the best angle
2:34
here I think that's pretty good all right
2:40
so let's see
2:51
here all right so this is the window pill um now I'm going to set this one to
2:56
a to the side I'm going to grab the other one from inside the
3:17
van and so this one's going to look kind of raggy raggedy because uh what I've done
3:23
is this is basically I just had it taped into the
3:29
van first thing right off the bat we need to make sure that we do some alignment
3:36
marks on the top here and then we write top on it um then I'm actually going to do uh
3:43
like a t here for top because there is a little bit of
3:50
some these are not perfect so that one over there was shifted a little off center when they cut it out this one was
3:57
actually the one that's it's pretty much perfect um yeah so I what I did and this is in a
4:04
previous video but I taped this up to the window the awning window and then I went through and made sure that I
4:13
uh I got this kind of Center where it needs to be I took a piece of
4:20
metal um this e inch piece of aluminum here and I put it on top of this and
4:28
then what that did is that's going to give me my offset for not only my fabric for but for little adjustability because
4:35
on the top of the van right here this is where those uh bump out those beams that you're
4:42
going to have to grind and cut off are so what I did is I put this here shove
4:47
this up and then when I traced out my wall panel
4:54
um I'll show you this too
5:01
so when you trace out your wall panel like this you're able to trace from the
5:07
back and then that's how you locate this hole on the van so that's all in a
5:13
separate video it's in the live streams you might have to dig a little bit to find it um if you
5:20
have if you want that specific video I can stop in a minute um but just let me know in the
5:26
comments or the chat anyway you get this all situated and then you know where
5:34
this is uh it's the orientation is what's is what's so
5:41
important next step is this comes in two pieces so I did two alignment marks
5:48
right here be careful not to rip the
5:58
foam
6:16
all right so right here I've got a little alignment
6:28
mark and this is going to help you when you uh glue it together with the foam
6:37
adhesive uh which we'll do in just a minute so let me get this
6:50
realigned okay so get some alignment marks so when you purchase this this
6:56
will be uh in two pieces so you're going to have the first piece this piece here
7:04
is what mounts to the back of your
7:12
panel so here's your wall panel so imagine this wood piece goes here cuz
7:19
you're going to screw into this wood piece and that's what's going to hold it
7:24
you're not going to screw into this lighter one that doesn't have that face piece of uh quarter inch
7:40
plywood so those are the two pieces so they look like this when you get
7:47
them uh on the website you've got the VW 1033 that's the vent window which is the
7:55
half slider which is pictured here um so we use the
8:01
a1033 which is the awning style they don't have a picture of it but you guys might have seen that in the
8:08
van but anyway pretty much that wood frame is where you need to be
8:15
um you need to make sure that you uh have that oriented to the the back P
8:23
back face of your panel um um there we go and that's what
8:31
it looks like glued together all right so we're going to take a stab at getting this
8:38
thing put together
8:45
here so we'll get to this one this is the this is the second
8:50
side so we're just going to set this back in the
8:58
van and then we're going to fast forward to
9:03
this part so what I did is I I preut uh some upholstery for
9:10
this um and this is just wide enough to kind of come over the edge about one
9:15
inch CU we don't need to cover the whole entire thing um so this is just to come around
9:22
the face and then the rest of the uh rest of it will be glued in there
9:29
and I may even take uh like another piece when I've finished
9:35
of a puler and just wrap around this seam uh you're not going to see it but I
9:41
I want something to kind of hold that um it's just my my insurance
9:49
policy all right what I've done here is I've gone around and I've got uh
9:57
probably you know almost 10 in or 12 of excess
10:03
material and I've just taped this around here to get my outer profile to make
10:11
sure that I have enough material and then this is where I wanted
10:17
to start making the video so I have this pulled down in the
10:23
middle and then I want to overlap it about an inch now this is different than if you
10:30
watch ABC rig's uh video so their install method is different um it's
10:35
pretty close but mine is a little
10:40
different um I just I don't want a big wrap of fabric in here I think I think
10:46
we can achieve having the same uh layover on the top side where you're not going to see it and then the fact that
10:53
this is going to roll over to the other side I think it's going to be a plenty amount of
11:00
uh way to secure this so I'm just going to come in
11:08
here make sure you guys can see and this is where I'm just going to cut my straight
11:20
piece okay so this cut we're going to have
11:25
we're going to spray this backside we'll take tape it off and then we'll put some
11:30
more adhesive here and then this will lay over and then that'll be our the only
11:36
seam you see um and of course that's after we actually go through and apply adhesive
11:43
to this so now that we have that taken care
11:48
of uh so I'm going to
11:57
see
12:09
I may take this piece of tape off I just wanted to know that that's my overlap
12:15
piece all right so now we're just going to take all this off and I taped it to
12:23
the wood part so I wouldn't you know possibly tear up the foam
12:44
all right the t is the top so it's important the reason why is like
12:51
I said see how this backsides off so this wasn't cut out
12:56
correctly um but the inside is is right so that's all we care about but I've already taken into account that offset
13:04
on my window
13:16
so and if you guys have any questions feel free to
13:27
ask
13:44
now the roll that you get from Marathon you know the width is only a
13:50
little under 5T so this one um this is where you want to make sure you don't
13:55
waste fabric this one had to be cut out of a long long length so you can see how long this
14:01
is um so if I had to measure this just give
14:08
you a rough estimate so this
14:17
is this piece is approximately 87
14:22
in so 87 in long would be what you need to uh
14:29
yeah so 43 and a half that should be 87 in
14:38
right all right something I did off camera is I went ahead and I use this uh
14:47
this new product so this is what we are we're
14:52
testing here this is uh foam fast 74 and I told you guys that this uh was
15:00
cheaper than the super 77 so that's not
15:08
true it was 30 bucks on Amazon and Amazon has a picture of three
15:14
cans uh so I just bought it thinking it was three cans um because the cans I usually have
15:23
are 13 Oz and this is a almost 17 ounce can so anyway the photo was of three and
15:31
I got one for 30 bucks and that's pretty expensive um the other ones these
15:38
are I think of 13 to $17 uh it's still a lot for adhesive but
15:46
I'll probably I I may go back to to using this
15:54
um but the reason I like this is it's much more control the other one it fans out too much and
16:00
there's too much overspray this is much more accurate you've got a low medium
16:06
and high for your uh fan pattern I think is what it is so I still might go with
16:12
this um we'll just have to see all right uh
16:17
what we do we need to do is this is the top so we need to start at the top we don't don't need
16:25
to start at the bottom because our we're going to hide it up at the top so we need to flip it over just like we had it
16:32
earlier and then we're going to take our
16:38
fabric um let's see I may need to move the camera back a little
16:51
bit so we got to do two things at once um we need to get our spray board
16:57
out
17:10
so this you can see this is not sticky anymore make sure it's not sticky um
17:16
it's still going to be a little bit but as long as it can't transfer to the fabric that's all you're that's all you really care
17:23
about all right so that's my area that I I'm starting with this piece where the
17:28
tape is
17:33
um again don't have to be perfect on all this but having things to kind of lock you into a process is
17:41
helpful and Van building whether you're doing it DIY or or
17:55
not okay so now we're going to see we're going to do two things here one let's
18:02
see if we get any more tips off
18:16
this select spray pattern width by turning the tip hold the can 3 to 5
18:21
inches away uniform coat spray both surfaces to be bonded
18:29
allow adhesive to dry until aggressively
18:37
tacky test for attacking this by touching the adhesive with your knuckle if the adhesive is tacky and does not
18:42
transfer to your skin it is ready to bond so that's same thing I've told you
18:49
guys in the other videos um you kind of just want to touch it and
18:54
be able to pull away without uh the wet it's still being wet on your on your
19:02
hand okay so here's our piece down here is where we're
19:27
starting
19:32
so I'm make a line right there in the center and so that's where I'm going to
19:38
start my piece of
19:45
fabric let's try our high
19:57
setting okay let me just clean the tip
20:06
off there we go excellent so you I don't know if you
20:11
guys can see this but we've got a nice uh spray pattern
20:17
here yeah I think I'm might be using this in the
20:27
future
20:57
is
21:24
okay we're not going to do the back side because I want to be able to actually work with this a little
21:30
bit um so let's spray this piece over
21:57
here
22:26
for
22:35
so it's funny is uh in their videos this product sprays out orange and this one
22:41
does not spray out orange and their sprays out a little bit wider of a pattern so I'm not sure if
22:47
they change the the can or or
22:56
what
23:26
for
23:56
for was experimenting with his other
24:26
can
24:56
for
25:21
[Applause]
25:26
for
25:53
all right for this we might have to change our process for
25:58
install cuz this is a I'm trying to get this whole thing in
26:03
here with such a high tack
26:26
Force
26:56
for
27:16
[Applause]
27:52
okay so for this stuff it looks like I'm not GNA need to spray the foam
27:58
um this says it is foam fast however it's uh kind of seeping
28:08
into the foam more than I'd like now that's not
28:13
affecting the finish this is still nice and smooth but um I'm going to spray on the
28:20
fabric from now on not the foam even though it's called foam fast
28:25
which is
28:44
odd yeah so this stuff don't spray on the foam just spray on the fabric it's
28:49
it's plenty of it's extremely
28:56
tacky
29:17
all right so we'll just give that a minute to attack
29:26
up
29:56
for
30:26
you
30:51
all right almost there we're still waiting for couple more parts of this to tack
30:56
up
31:16
all right see if we got any questions in the chat nope not right now so we can
31:22
get this board out of the way for a minute
31:29
move this closer to where you guys can
31:39
see yes I'm I'm actually going to uh call up ABC I want to see uh
31:46
this color foam usually this the pink XPS I'm wondering what um type of phone
31:53
this is
31:58
it's nice it's really light it's very very hard it might be
32:04
XPS all right let's try one more time all right I think we're good so let's continue
32:24
here now what's hard is you're gonna you'll drift in One Direction uh you'll tend to
32:32
so I'm trying to bring it back over before we wrap around the other
32:43
side and I'm not pushing it down I'm just being extremely light with
32:48
it and then I'll even everything out when I get
32:56
done
33:16
[Applause]
33:25
that
33:38
okay all [Applause] right it's pretty good now what I'm
33:45
going to do is I need to get something to I'm going to wipe off this
33:54
uh get some denatured alcohol to wipe off off this little little bit of overspray I
34:25
got
34:41
and then when I'm happy with this seam I'm going to go around and I'll actually press it down
34:49
cuz it's just it's just
34:54
barely barely sitting on the foam right
35:00
now I do like this stuff it's so very
35:06
tacky but even though it says foam fast I would not spray it directly onto the
35:11
foam so that's something we have learned
35:20
today all right that seam looks amazing so now let's go in
35:27
and let's just give a little bit of
35:54
pressure yeah this seam looks great man that came out really
36:01
good all right the second fun part here so that is
36:07
um I'm actually going to use
36:14
this now we're going to take these edges and then we're going to wrap them
36:21
around so we need our big razor blade so super sharp razor blade
36:29
and we're going to kind of start our way and work our way around um I'm going to do the important side
36:36
first which is this side so this is the corner you'll you'll
36:42
see you probably won't see this one but we're just going to do one step by step so start with the middle
36:55
here
37:19
actually I'm going to spray the
37:25
wood
38:24
all right give that just a minute
38:55
y
39:25
for
39:45
the benefit is after we're done with this uh we'll be actually screwing this in so that'll make
39:51
a it's also a good backup method for making sure that this thing is nice nice
39:56
and
40:03
tight so in these Corners we're just going to
40:14
score score just a little spot to open this
40:20
up and then we'll probably score two two more
40:27
that should give us enough room right
40:42
there so when you come around this corner don't all the way go all the way
40:47
around uh kind of start it and then come over here start this
40:55
one so we want to be even coming from here and here going in because if we go
41:00
here we're going to be pulling it from the bottom and then we take away from whatever wiggle room we have uh
41:24
later and then you can see here see how we have this Gap but we're not
41:29
going to worry about that because we're upholstering the other panel and uh I'll show you how to fix
41:36
this if you think you've messed up on your other panel and you need to uh fix
41:43
it so if you messed up
41:49
um what you can do is you can take one of these uh tabs I'm not going to do
41:55
that CU this is a customer build but you can take one of these tabs cut it off that has that adhesive and
42:01
then just fill it into this
42:12
hole so that's that side um let's see I'll just do one just for
42:19
an example so I've got a piece of fabric here and let's just act like messed
42:30
up so all you're going to do is cut just a piece like
42:36
this and kind of cut an angle to it you whatever it looks like to
42:44
match uh what you kind of goofed
42:51
on and then see here
42:59
use our other adhesive really
43:18
quick and so you have this little fix it piece and then all you're going to do is just take
43:24
it and put it right in there that spot where um maybe it didn't cut right and
43:31
you see you've you've covered up that that bigger
43:53
Gap I sprayed my whole finger with that adhesive trying to get it
44:04
off all
44:25
right
45:24
for
45:50
if you notice I'm not wearing gloves because I like to actually feel if I've got adhesive on my fingers so I don't
45:56
transfer to this um if you got gloves on sometimes you'll forget and then
46:02
you'll put a big old spot of adhesive on your freshly upholstered
46:24
surface
46:54
for
48:14
so as you see I'm going back to the the old method because
48:21
uh yeah the foam doesn't like the Foam Fest for some for some weird
48:33
reason I think you need the pink foam I think this uh whatever we're using here is
48:41
not the right
48:54
foam
49:54
for
50:54
is
51:54
for
55:54
the
56:23
for
58:40
these foam Corners are interesting because it's there's nothing really to
58:46
support the the fabric when you pull it in so um I'm interested to see how this
58:52
is going to fit on the uh how this isn't going to expand over the
58:58
actual uh awning
59:23
window
59:50
all right that was the first one that took a lot longer than I expected but uh looks exactly how I want it to look the
59:59
seam is almost invisible you guys can see
1:00:08
that but yeah this uh came out perfect so this will go um we got our wood piece
1:00:15
up here in the front so we'll drill into that and then this will be going around
1:00:20
the window inside all right I'm going to go ahead and do the second one off camera um
1:00:26
that'll be it for this live stream and yeah look forward to the next live
1:00:32
stream as we do more um of this type of stuff and uh
1:00:39
don't forget to subscribe to Van Builder HQ YouTube as well as our website which
1:00:46
is vanb Builder hq.com we have a bunch of blog post and articles on here
1:00:52
covering everything DIY van related um I've also have at the top of the page a DIY van build cheat sheet that is free
1:00:58
for you guys it's the last three years of all of my Amazon purchases organized into an Excel sheet it's got solar
1:01:05
panels it's got fuses connectors mc4 connectors wires cables water pumps uh
1:01:11
probably the best section on there is the tools section it's free to download all you got to do is put your name and
1:01:16
email address after you click the link hit download now be sent right to your inbox and I think it'll really help you
1:01:22
with your DIY van build and if you're not doing a DIY van build but you're looking for a custom van
1:01:28
Builder that is my business Odyssey custom van so the van that we're currently building in this uh video is
1:01:34
John and Susan's van and um yeah so they uh we met up actually at a adventure van
1:01:42
Expo um actually when I filmed this video so we met at an event and uh they
1:01:47
got to see my work in the van and we're now building their van so if you want to contact me for a
1:01:54
consultation click here to schedule a call on the website again that's Odyssey custom vans click on the schedule and uh
1:02:01
pick a date and a time and you can hop on a phone with me hop my calendar and we'll talk about your custom van build
1:02:08
all right guys that is it for today see you guys in the next live
1:02:15
[Music]
1:02:22
stream
Autos & Vehicles
Curtains & Window Treatments