Up next in 10


Join me in this video as we explore the products and installation techniques needed to create the ultimate DIY campervan flooring system!
Whenever you’re ready, there are 2 ways we can help you:
1. If you need a vetted parts list, download our → FREE DIY Van Build Cheatsheet to help you save time and money on Van Parts and Gear: CLICK HERE: https://van-builder-hq.ck.page/846c83ab54
2. If you want to get Done-For-You Van Build help, book a → FREE Consultation with my Calendly Link: CLICK HERE: https://calendly.com/odysseycustomvans/intro-call?month=2023-07
Show More Show Less View Video Transcript
0:00
[Music]
0:07
hey everyone welcome back to the channel today's gonna be an exciting video because we are going to be talking about
0:12
the ultimate camper van flooring guide in just a minute we're going to go through a whole entire slideshow we're
0:19
going to go over tips tricks products stuff that I recommend we've been working on the floor of this 2020 Ford
0:26
Transit if you've been following the recent live streams we're doing step by step we have a playlist if you guys are
0:31
interested in watching this whole entire process take place and during this process I have put together the Ultimate
0:38
campervan Flooring guide and this is meant to help you guys out something you guys can follow
0:43
and we're going to go ahead and just get started the first thing I want to talk about is
0:50
your plan you need to make sure that you have some type of plan when you are starting this whole entire process so
0:58
consider your van layout floor plan for example where things go your bed
1:03
kitchen Power Plumbing Etc all that stuff is going to affect
1:08
your floor believe it or not now in some builds you can just start with the floor straight up and then later on plan where
1:16
additional items are going to go however you may find that doing some pre-planning and finding out where those
1:23
items are going to go in your van will actually help you have a more enjoyable experience as far as using the van when
1:29
everything gets built and finished next we want to consider the properties
1:34
of the floor materials that are used you might want to look at their weight thickness abrasion resistance
1:42
those things are going to depend on how you use the van and that rolls right into Aesthetics
1:49
versus budget so if you're not going to be too heavy on the floor you want to go with something simple more budget that's
1:55
fine if you want to go more to the Aesthetics more of a higher end the look and feel
2:00
versus practicality that's something to consider next we'll talk about is sound proofing
2:06
important to you next we'll talk about what season are you going to use your van in is it going to be just a
2:12
springtime summer fall winter that'll have to do with the insulative value of
2:17
the floor you decide to go with next we'll talk about does your floor system need to provide insulative value
2:26
and then last but not least is it easy to clean some flooring depending on which ones you pick up may be harder to
2:33
clean or keep clean and so that may be something to consider as well
2:38
let's jump in and talk about what you need to know about the campervan floor layers this is my opinion as far as how
2:45
the floor should be made and the reason is because each layer has a job to do
2:51
the first one is sound dampening so sometimes this
2:57
DIYs will forego this and not use any type of material for sound dampening and
3:02
that's okay this is just more of a nice to have I'd say but you definitely want to have
3:07
insulation you want to have a strong subfloor and then finally the top layer
3:16
we're going to go and break out each one of these and explain what they do and
3:22
how you will actually use that in your van for sound dampening
3:30
we're going to use a couple examples here and then we're going to get into this description
3:35
so let me go back here to this so throughout the video we're going to
3:40
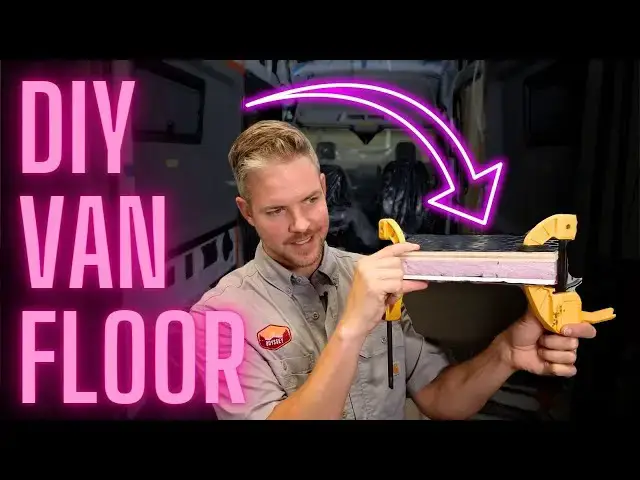
reference this little model here so this little example so this shows you all the
3:46
layers of the floor
3:52
but when we jump back to the slideshow we're going to talk about this kill map or Dynamat those are two companies that
3:58
you can use to help sound deaden the van I can reduce road noise and this is what
4:03
the material looks like it's got a foil back and then it has this almost like a tar kind of sticky back to it
4:12
and that's what it is used to adhere it to the van or even your walls so you can use it in multiple places
4:19
within your van all right so what does this layer do
4:24
this layer allows you to apply a sound dipping material such as kill mat or
4:29
Dynamat so we're talking about the first layer of your van floor
4:34
now the properties of this material change the resonant frequency of the van sheet metal floor and instead of a Ting
4:41
sound that lowers the frequency to more of a thud I know that's a technical way to explain
4:47
this but that's what it does so think of the weight of this material you can get this in all kinds of different weights
4:54
this is a 50 mil so it's the thinner version and if you need more sound
4:59
deadening effect you can go thicker sometimes people like to use
5:04
the thin stuff for the floor it's easier to cut but you can use the thicker stuff for the walls of the van sometimes they
5:10
make makes more noise so the thicker material works well what's cool is the adventure wagon kit
5:17
that we purchased for this build included the sound down material in the
5:22
kit there's all different ways to all kinds of different ways to purchase this there's links on Amazon
5:29
there is this comes in kits and then you can just buy it you can actually get some of this at car audio stores but if
5:35
you're building a van you're probably going to want to buy more material than they actually have in stock
5:42
but simply by adding this material to the van floor you're reducing the amount of noise that comes through the floor
5:48
and it just creates a quieter environment inside the van let's go to the killmat website so you
5:54
guys can just get familiar with this product now there's no affiliation with any of the products in this video it's
5:59
just helpful information for you guys going forward but this one is kill Matt so there's a
6:05
logo you guys might be familiar with that seen it on some YouTube videos and some builds
6:10
but if you go to products we have a couple different ones right here so down here this kill map 50 mil
6:18
this is the one that I purchased but as you can see there's different ones there's even an extra thick one that's
6:25
100 Mil and the boxes the higher up you go so the thicker the
6:31
material the less square footage you're going to get because they're going to use the same box so the 50 mil
6:37
the reason it's nice to have is you're going to get 50 square feet so you can definitely do a van floor no problem and
6:44
then you'll have just a little bit extra to put maybe in the sides of the van
6:49
but if you're doing the whole van maybe two boxes of the or like 100 square feet would be great
6:56
now a roller is something you're going to want to buy it's just a rubber roll roller and it allows when you roll it on
7:03
the kill mat that is what's actually making a contact and giving proper adhesion to the floor
7:10
if we hop on back we'll go to Dynamat and you guys might familiar with Dynamat
7:15
if you have sound systems in your car or your upgrading your sound system this is a
7:21
really good way to make your car sound better and not only for cars and audio systems but Vans as well so that's what
7:29
we're talking about so we'll go to products and we'll go to
7:35
let's click on this one and you can see it's pretty much the same type of material it's just from a
7:42
different company but they have a light version which would be the thinner
7:48
Mill and then they have the the thicker as well
7:54
that we just get you familiar with those two companies both great products there there are
7:59
other products on Amazon that you can check out but these two are pretty much the top ones in my opinion
8:07
this is a photo of me working on the van behind me and this is when we were starting off on the floor
8:13
the first thing we did is make sure we cleaned the floor very well so this product can adhere you won't have a lot
8:19
of dust and grime and stuff like that for obvious reasons but this material is
8:25
nice because it's easy to work with if you see over here on the left hand side I've got a wood board I'm using that to
8:30
score the material so I can put it in the van and what I'm doing is I'm putting it in
8:38
between the ribs because I need the ribs to be exposed because that's actually going to take up
8:44
adhesive but the kilometer for my install is doing two things one is providing the
8:51
sound deadening but then it's also providing a little bit of thickness to offset
8:57
my pieces of lattice so we're going to jump to the back of
9:03
the van just for a minute we'll get back to the slides here because I wanted to show you the reason
9:08
for that so if we look at our little model here we have the layers of the van floor
9:15
so this middle piece is a piece of a white lattice and it's a quarter inch
9:20
thick so the rib of the van
9:25
the thickness of the sounded material the thickness of the piece of lattice
9:30
mixed with the thickness of your adhesive that you're going to use so this Marine
9:36
adhesive what that's going to do is that is going to make up the space and the
9:42
corrugations so when I say corrugations it's this white raised piece of the van floor
9:50
and so what we want to do while we're putting this kill mat down is this space we're eventually going to
9:57
raise up with this piece of lattice and I go more in detail with this in the
10:04
playlist of the van floor install so make sure you reference that if you have any questions on what I'm talking about
10:10
but these pieces of lattice are really nice because they're giving us the ability to make up that difference and
10:17
it supports this foam that we'll talk about in a second from sagging
10:24
so this foam is good this is XPS foam and it has the ability to discuss
10:31
compressible strength so it's not going to squeeze out like normal phone it's actually pretty hard however
10:38
where these corrugations are in the van floor you can imagine that this wide part
10:43
would let the floor dip or it's possible for it to dip if there's a lot of weight
10:49
on it so what you want to do is build up that section with this piece of lattice
10:55
and this is just a vinyl piece of it's called lattice but this is available at
11:00
Lowe's Home Depot as well and you may notice this on screen porches this is the decorative piece that goes outside
11:07
of a screen porch covers the screen wire and yeah you can repurpose it for
11:12
underneath the floor what's nice is it's not wood it's a vinyl so you don't have to worry about it rotting or anything
11:18
like that all right let's go to the next slide
11:26
our next layer of the floor is our insulation and this is the first place that you can
11:33
add a lot of comfort to your van it's going to make sure it will help a little bit with the sound dampening of
11:39
the floor but it's also going to help you with your bare feet too because if you wake
11:44
up and you're up in the mountains and you get out of bed instead of having that cold sheet metal floor you're going
11:50
to have a little bit of a separation of that cold temperature because of the insulation you're going to put in the
11:56
floor itself and so the technical term is called decoupling so what we're doing is we're
12:01
separating the floor material from absorbing that cold
12:07
temperature of the metal and we're doing that by putting a piece of insulation in
12:12
the middle hot temperatures are good too the road
12:17
is extremely hot during the summer and to help that not come up through the
12:22
floor as much the insulation helps as well
12:29
I'm going to show you an example of what I put in the floor so this is XPS installation
12:38
the one that I'm using is from Owens Corning let's go formula 150. and it's an inch and a half thick I'm
12:45
sorry it's one inch thick we couple that one inch thick foam with our half inch flooring and that gives us
12:52
an inch and a half thickness for our flooring and then note over here on the right
12:57
hand side we're going to talk about this in the upcoming slide in just a second but the compressive strength is
13:03
important you can use many types of insulation but you need to make sure the one that you
13:09
choose is has the ability to be compressed
13:14
because if you use something like I have like wool or the 3M thinsulate what's
13:19
going to happen is it's going to smush and you're going to lose all that insulated Value Plus it's not going to
13:25
support your floor too well and we'll go over actually how you can still use that
13:31
if you want to but you're going to have to have a different building method in mind
13:37
let's go over types of insulation for all these examples we're using the standard one inch thickness
13:45
the first one we talked about XPS that stands for extruded polystyrene
13:50
that's that pink rigid foam board it's pink from Home Depot and there's a
13:58
company called Green guard and that is green it's from Lowe's but they're pretty much the exact same
14:04
thing so this one right here this is a four by eight sheet one inch
14:10
R5 is the insulative value so what we're talking about is this right here so
14:17
we're talking about this foam piece right here
14:26
so let me just hop on over to Lowe's
14:32
well we'll do Home Depot first
14:41
okay and then once you're there let's go to I'm going to type in XPS
14:47
insulation board and you say you see that's what we have
14:54
they do make different thicknesses if you're okay with going with a thicker floor now remember
15:01
the more that you add to your floor the lower your ceiling height gets but if
15:06
you're trying to make use of every inch of ceiling height you know that extra additional inch of
15:13
flooring insulation may not be that valuable to you just depends on kind of what you're
15:18
looking for and price wise there's not too much of a difference between a one inch and a two
15:24
inch sheet well if we click on the one inch we can go through here and
15:31
we can see what it looks like
15:36
and then if we go to specifications or product details you can actually see what it's all about
15:47
and for these reasons this is why a lot of people like to use it in a van because it's really resistance resistant
15:53
to moisture it's very durable it's not going to squeeze out when you put weight on it
15:58
because it does actually have a PSI rating right here let me see if I can zoom in
16:04
on this the 150 which is what I have in the van
16:10
has a compressive strength of 15 psi what that technically means is if you had a 1 by 1
16:17
inch square on the foam you can put 15 up to 15 psi or 15 pounds on that one
16:24
square inch and it's going to be able to hold it up that's why I was saying if you guys have
16:32
the planning part of the floor while you're doing your planning say for example you have a really heavy power
16:39
system and if you don't have something to support that power system then you know
16:45
your floor is going to Sag or smush if there's an area like that in your van what you may want to do is
16:53
if the weight is enough for this foam to hold it good but in a minute we're going to talk about 3M thinsulate have like
17:00
wool those type of materials and those compress we need to replace
17:07
the foam in those sections with a piece of either wood or like a one inch square
17:13
aluminum tubing something to for the weight to be distributed on the floor of
17:19
the van foreign
17:27
photo so you guys can understand that we'll come back right here you see these pieces of
17:34
aluminum right here in the van I have a very heavy slide out full extension slide out
17:41
tray that's very beefy and I want to make sure that when I compress my bolts I
17:48
don't squeeze the foam I have these pieces of one inch aluminum tubing
17:53
in the floor they're embedded in the floor and they're directly glued to the
17:59
metal of the van they're not sitting on top of the foam or anything like that when the wood goes
18:05
on top of it what you're going to have is something like this
18:12
and now anything I put on top of that area especially this slide out tray that's going to go right here
18:17
it's going to make sure it does not squish the foam down if you do get a chance to plan
18:22
ahead and know where things are going to go in your van it's good to reinforce certain areas like the kitchen Galley
18:28
especially the power system or the water system those are another two areas that I would recommend that you do that
18:36
this is how to read and understand that information we're going to hop on over to
18:43
Lowe's real quick
18:55
lows we got our green guard and let's see this is half inch let's go
19:01
to one inch XPS the same type and this one
19:10
has a minimum of 25 psi so this is a I guess can't see that hold on a second
19:19
so this one has 25 psi minimum compressive strength
19:31
I haven't used this one before but it has a little bit a little bit of a stronger one
19:37
all right moving right along that is the extruded polystyrene XPS
19:44
rigid foam board next let's talk about this next one which is additional options
19:52
we're going to talk about 3M thinsulate rockwool spray foam and the note that I wanted to make was
20:00
just like that aluminum tubing that goes across the floor you're going to make sure you want to have something supporting this product
20:07
because the only thing that's going to be supporting the floor is are those aluminum tubing or the one inch tubing
20:13
if you put them for or if you do wood but if you do that and that's what the
20:18
floor is sitting on what you can do is the gaps in between you can fill in with this compressible material for example
20:25
3M thinsulate which I have right behind me
20:31
you can see we've got good thickness good Loft to this material so it's going to insulate
20:36
really well 3M thinsulate is good for being hydrophobic it doesn't attract
20:42
water and but you can see if we use this for the floor we would completely smash it
20:49
we need to make sure that a product like this we have something and get a piece of tubing over here
20:57
if you're gonna wait make sure you have something like this a couple of behind beside it
21:03
that when you that when you put the floor down if you guys can see so then when you put
21:09
the floor down on top of this the weight of the floor is on this metal part but this is providing the insulative
21:16
your insulation same thing with Havelock a lot of people
21:23
like Havelock but the same thing you're gonna you can't set the floor directly on Havelock
21:28
you're going to have to have something supported you can use aluminum tubing
21:33
you can use wood now this is a two by four this is a bad example but like a
21:39
two by two if you had a two by two which is an inch and a half by an inch and a half
21:45
you could do something like this spanning the floor and that would be able to support
21:51
the insulation so you wouldn't crush it now there is a reason that people like
21:57
to use this material Rockwell is another one we'll talk about in a second but
22:04
this spray foam for example you notice the r value is 6.5 so it's much more than the fluorine
22:11
but it's pretty messy if you went this route it'd be the same method of having some type of
22:17
aluminum or like a a one by one piece of wood supporting
22:23
the floor but the foam
22:29
you're gonna have to spray it down on the floor it's going to expand and then
22:35
wherever it goes you're going to have to find a way to grind it off now I have
22:40
seen videos where they have a machine with a bunch of sanded rollers and they can lay it along
22:46
their strips and file down the foam but it looks like a lot of work that's something I wouldn't recommend
22:54
and another thing is the way that the foam expands like the expansion rate
23:00
if you spray that into some type of tight area between the sheet metal
23:06
it can actually expand so much that it'll it can possibly warp some piece of the sheet metal of your van just be
23:12
careful when you're spraying that practice on one area and see how much the foam expands before you put it in a
23:17
tight space
23:27
next we're getting into the subfloor so the sub subfloor is pretty much the strongest part of the floor
23:33
that's where you're going to be able to drill stuff into you can
23:38
Mount things in your van so that's the wood part
23:44
so we've gone from the sound deadening part we've gone to our spacer our
23:50
lattice piece is going to help us distribute the load so that our foam doesn't sag
23:55
on top of the foam is where we have our subfloor and it's traditionally about a half inch thick that's a good thickness
24:01
if you do a three quarters it's a little bit burlier but it's much heavier
24:07
cost also goes up and it's harder to work with because of the weight if you guys watch the live stream and see me
24:14
moving the three individual pieces of wood around the van it's hard to get it
24:19
into place and you can imagine if it was just another quarter inch thick it would be that much harder
24:25
this piece is what we're talking about right here the wood piece and this is essentially what our finished floor is
24:31
going to go on top of
24:40
like I said this is the top layer it's going to this is the layer that's going to support your top layer
24:46
and it's also going to be the surface that you're going to apply your adhesive or epoxy to
24:53
now depending on this wood material you have you may need to treat it with a bonding primer for example
25:01
in our last live stream we went through and talked to discussed about this floor
25:06
and you can see right here we have this white this is painted white
25:11
this is a bonding primer this is designed so that when we put our epoxy on it it's gonna the epoxy is going to
25:18
adhere to the floor correctly it is possible for the epoxy to be
25:23
applied directly to the wood floor but you can't guarantee that adhesion it
25:29
might not adhere too well if you do a bonding primer that ensures that you're going to have a good bond to the floor
25:38
just think about what material you're going to be using if you're going to need some type of primer for the adhesive to hear properly
25:45
and that's you can actually check out fluorine install video 13.
25:50
on the live stream that video under the flooring install playlist is going to
25:56
show you how we applied the bonding primer all right again we've got a couple
26:01
companies here no affiliation Baltic Birch is really popular that's a
26:09
type of plywood that's got a lot of Plies to it when you see all these
26:14
highlights of nine ply seven five ply that has to do with the amount of layers
26:19
of wood and it also translates to the strength of the floor like the stiffness
26:25
if we bring our get our model here one more time what I'm using is not Baltic Birch it's
26:30
the second one from loads it's called Revolution ply and so a Baltic perch is traditionally
26:37
going to have about nine Plies I do believe that includes the top and bottom like the veneer that's on it
26:44
this one is the second option that I'll show you it's it's from Lowe's it's a four bait sheet it's called white wood plywood the company is Revolution ply
26:52
and there's seven Plies in here and if you go to this last one this is
26:59
the one that Home Depot provides it is five ply
27:06
the easiest way is the fireplace is just it's a little bit more floppy as the the way to describe it
27:18
all right if we go to our next picture this is what we're talking about
27:25
this is the subfloor the subfloor that I have is in three sections
27:32
and these three sections are so that we can make the most of the sheet of plywood that we've purchased
27:40
I'm gonna pull up the drawing pad real quick so I can show you guys what I'm talking about
27:45
all right if we have the van like this and this is our this is the back of our
27:52
driver and our passenger seat what we want to have for the wood panels
27:58
is we're going to go like this we have three panels one two three
28:07
like I said it's so that we don't have this big seam right here if we had a four
28:14
by eight foot sheet you can see this would be our seam and
28:20
we don't want that because depending on the floor material you use you may see that seam after you put your Final
28:25
Flooring down and it just won't look like a professional job
28:31
what we do instead is break it into front middle and rear section
28:37
of plywood and so that gets our maximum width the van
28:42
and then these same then we only have those two seams to put together
28:57
now one cool question is how do we cut this out do we use a template so that
29:02
the answer is yes you can do this or you can make your own
29:09
template but to make things easier for you there are companies out there that you can
29:14
actually buy the templates from the one that I got mine from
29:22
is AVC rig again no affiliation just giving you guys some great information
29:28
if we go to Ford Transit and we look at this website we have two
29:34
options this video is focused on
29:39
a DIY install that's why we're showing you all the products and the steps however you can buy a all-in-one
29:47
flooring system that's been pre-cut to Ford Transit includes the insulation
29:52
however it just depends on the budget where you want to go with that
29:58
now a way to get this level of detail but do a DIY and stay within your budget
30:05
is actually go to this part where it says paper pattern floors
30:12
there we go so you can reuse it what's nice about that is not it's not a one-time use so
30:18
say you put your floor in the van and you mess something up and you need to recut it you could do that
30:24
but this is what it looks like I'm going to try not to rip mine up
30:40
as you can tell this piece right here is part of the wheel well
30:45
and then if I open it up if I can
30:59
[Applause] there you go
31:06
so you can see this is a full-size template
31:11
there you go so this is as big as one piece of the
31:16
floor [Applause]
31:25
you can see this just lays down on a piece of plywood you trace it out put in your van
31:30
now obviously you would have this on a table and do it but
31:36
that was just a quick example but yeah something if that's something that you want to do you can go here and
31:44
you can actually go this route and you can see it's budget friendly
31:51
all right next up let's go and talk about
31:56
the top layer the top layer is what you're going to see
32:02
you're going to see it every day this is what you want to do if you want more for budget
32:07
or you went more for Aesthetics doesn't matter this is what you're going to be walking on
32:15
you want to make sure that this whatever you buy is going to be able to protect
32:20
your subfloor from spills and it's watertight now an extra precaution that I did on
32:26
this floor was I sealed the subfloor so that half inch piece of
32:33
plywood I painted it with an exterior paint that actually has a mold inhibitor built into it
32:39
and that keeps my floor protected on the bottom side the top side we coated with the bonding
32:47
primer and so what that did is that not only protects but promotes adhesion
32:53
of the epoxy we checked off two boxes there but always think of water resistance
33:00
if you can imagine if you have a drink in the front of the van or say it's raining outside one day and the wind's
33:06
blowing in really bad and you're just in that situation where you can't close the doors you want to give your floor a chance to
33:13
get damp or wet but then still be protected whenever you get a chance to actually dry it out
33:20
it's going to be a very rare occurrence but it's just something to think about as you go forward
33:26
and just like I said make sure you know might be a good idea to seal your floor prior to finishing with the top layer
33:32
and we just went over a couple products one note that I have here is some of the
33:40
options below many of these flooring materials may need expansion gaps to be
33:46
added to allow for expansion and contraction your van goes through all kinds of
33:51
different temperature changes in the summer it might be well over 100 degrees on the inside and then in the winter it
33:58
can get down to below zero you have to think ahead of time what
34:03
material you're going to use over here on this bottom left lawn seal
34:09
is what I prefer to use in a van because it's extremely resilient fluorine
34:15
let's Show an example and let me I'm going to pull up Lonzo real quick
34:28
let's go to our example now we're on the top layer if you guys have seen this before this is the coin
34:35
flooring that it's pretty popular in the van world because it's extremely durable
34:42
it has this kind of like a fabric back that allows it to bond to the epoxy
34:48
really well and it's part of a whole system the lawn seal flooring they sell a product that is specifically designed
34:55
it's a two-part epoxy designed to install this floor they also have a trowel that has a
35:00
specific thickness that you're going to Trail it out almost like Lane tile
35:05
we'll talk about this really quick I'm gonna pick up a Lonzo binder and
35:12
then that way you guys can see just an example of
35:18
what they have
35:25
all right let's go to this camera there we go
35:32
right here got a lawn till book and there's all kinds of stuff that you
35:38
guys can check out they have they've got let me get the camera fixed there you go
35:45
they've got wood grain finishes they've got stuff like this
35:55
wood looks they actually have some materials that have some type of a like a softness to
36:01
the floor if you want something a little bit more comfortable and then we'll pull out the other book
36:06
real quick and show you
36:13
the stuff that I've chose from choose
36:18
here's this one and they've got some wild stuff in here
36:24
but there we go we got the black coin floor they also make it in Gray and they've got all kinds of different
36:30
colors they have these like speckled looking ones
36:35
they have some one that's called top seal there's an additional layer protection that goes on top
36:43
and then it gets into pretty wild stuff you get diamond plate
36:50
and then smaller dots and then you have this stuff this is more like has like a traction quality to
36:57
it almost if you know your Van's gonna be really muddy
37:03
that might be a good product to go with but it's all part of the lawn sill system
37:09
and if we go to the internet here and we're going to go to
37:16
we're actually going to go to perfectfit.com again no affiliation but this is where I get my material from
37:23
and so you can see long coin this is what is going in the van behind me
37:30
the roll width is a standard six feet for a van you're going to need 12 feet
37:39
that's going to give you a foot extra to work with
37:50
and then down here you see you have a u-nunch trowel which is specific to their install and then down here you have the epoxy
37:57
that you'll need to buy to adhere to the floor
38:02
if we back up there's all kinds of different products that you can use
38:12
all right so back to this next we have two Tech Two this is kind of like the new style
38:18
flooring it's a woven vinyl and let me see if I can pull this up
38:24
really quick
38:36
the two Tech two floor flooring is pretty cool they have looks like this you can get
38:41
colors like a woven vinyl it's pretty nice
38:48
it's good for like Sandy environments for example
38:55
then you can just go with like a budget vinyl sheet flooring if you go to Home Depot
39:01
you go to vinyl
39:06
vinyl sheet flooring
39:12
this stuff is it's good standard of people I've used a lot of this in their Vans the
39:17
application process is similar to lawn seal but it's more at a entry level price more of a budget price
39:25
and the nice thing is it's instantly available
39:31
you just go right to the store most of that is in stock
39:38
now we're going to get to the interlocking lvp or luxury vinyl plank
39:43
if you don't want to do an adhesive and you're more comfortable with doing like a luxury vinyl plank click lock
39:49
flooring or interlocking flooring this might be something for you
39:56
if we go to let's see just type in lvp
40:11
and then we want to look at one for example LifeProof now you might have to
40:16
have this color the reason I pick up LifeProof is let me back up here
40:28
this meets my checklist it's waterproof
40:34
acclimation required is zero sometimes it has to do with do you need
40:39
to set it inside and acclimate to the humidity and temperature this one you don't have to do that it has that
40:46
property of being able to withstand expansion contraction and it has an
40:51
underlayment attached so you don't have to worry about buying like a separate piece of like thin foam membrane to put
40:56
down before you put the flooring down scratch resistant and so just kind of
41:02
look for stuff like that when you're purchasing it would be my suggestion
41:08
Lowe's has the Smart Core Home Depot has LifeProof and I've just looked at those because they're
41:14
waterproof and so that's something I would suggest that you look at
41:20
this is the lawn seal flooring and it's not glued down but I just want to show you a photo of it
41:26
and how this method that I'm using or what I'm doing in this
41:31
photo and you guys can check it out on the past live streams is I've pre-cut out all of my edges both on the left and
41:39
right front and the back so that the lawn cell is labeled to lay flat
41:45
one thing you want to do during the installation process is if you do an adhesive you're going to
41:51
have to roll this down to make sure there's no bubbles or anything like that if you do that if you can imagine if
41:57
there's a big old if you don't cut it and you're trying to work with all this extra material around the wheel wells
42:02
makes it really difficult to get a good adhesion if all along the wheel well the door seams and
42:09
the sides of the van pre-cutting everything out allows you to work with this type of
42:16
floor material much easier
42:26
let's go to the next slide and these are campervan flooring
42:33
installation tips that I have for you number one is have a plan if in a
42:38
perfect world you'll have a plan before laying down your floor if possible just try to have some type of plan
42:45
what I was showing you earlier is this is a plan we know where for example in
42:51
the middle here we know where the shower pan goes we've got our seat area taped off
42:56
we've already cut out our wheel wells so we know where the power system is going on the left we know where the water
43:01
system is going on the right we've cut holes for our vent water drain by doing that we have a plan and it's
43:08
just gonna make the flooring install that much easier
43:14
and just like I said especially if you need to identify locations throughout the van we'll be drilling or cutting
43:19
through the van floor once you put this down it's extremely difficult to for example find those
43:26
holes where the pull out tray went we need to make sure that those are identified any place that needs to be
43:34
if you want to add something later you could see how much more difficult it would be to add it later versus being able to pull back the floor and do a
43:42
test drill find a place that you want to mount something and then continue
43:49
some examples will be a parking heater water tank vent line drain any electrical connections bolted out of
43:56
kitchen Galley heavy components such as inverters fridge interior seating or pull out loading trays which I was just
44:02
mentioning and will you need insta insulation help
44:09
is are you doing it by yourself or do you have people that can actually help you install it over a weekend are you
44:16
working inside or outside consider where you're going to do this is it going to be outside to where
44:22
temperature is going to be an issue with how the epoxy or adhesives need to set up in the van
44:27
are you doing it inside and last but not least on this example
44:33
is do you have the right tools available to complete the job and is it something that you have done before or maybe you
44:40
want to learn for example how to trowel out the epoxy before you actually commit
44:46
to it things like that are really good to think about for example the first time I did the
44:53
epoxy it was very stressful because it's there's a time limit when you take a two-part epoxy and you mix it together
45:00
the stopwatch starts for the lawn still in particular you have 30 minutes of working time
45:07
the moment those two combine the countdown starts
45:13
what makes it more challenging is that once you mix it you actually have to you Stir It Up and then you actually put
45:19
it aside for 15 minutes for it to start its curing process
45:25
then the last 15 minutes that you're working time what I did on the floor here
45:32
is that gives you seven and a half minutes on the left and
45:38
seven and a half minutes on the right a tip that I would give to you guys is
45:45
check out the flooring install videos but you can put if you're doing a sheet
45:52
vinyl or lawn seal flooring like this the screw in the front and the screw in
45:57
the back lining up your floor is going to allow everything to line up
46:02
when you get ready to put this your flooring in so you can peel it back
46:08
and now instead of having the stress of two sides at one time you can lay out your epoxy or adhesive on one side
46:16
start your countdown timer and now you have seven and a half minutes to do this one side you can roll it down nice and
46:22
neat peel the other side up and then go with the other side so
46:29
practice that do a dry run have people to help you if you need to but definitely try to do a dry run if you
46:35
just go at it and don't prep you can only do epoxy once that is my my recommendation to you for a successful
46:42
install all right let's go to
46:49
let's see this photo is about install tips okay
46:55
if there's any floor penetrations you need to make you need to do that before
47:00
you get started I talked again about having to plan for example right here
47:05
this was something that I needed to correct before going forward
47:11
I made the hole too small so if you make a hole saw hole too small
47:17
this is a neat little method that you can do take a bigger hole saw and cut it in a
47:23
board then screw the board over the hole where you want to enlarge it and then this
47:31
board will actually be your guide for your hole saw because you can't put the drill bit in there obviously
47:37
that's a cool way to enlarge a hole if you messed up this was because I had a
47:42
plan for my wiring and then I added much more wiring and so I needed to expand the hole but I needed to do this before
47:49
the whole flooring process happened now keep in mind I'd already planned that day to put the
47:55
floor in cut it to size but because of this it just takes longer
48:01
take your time don't rush the floor everything else you can usually change
48:06
or modify but once the floor is in it's probably in for the life of the van
48:12
over on the right hand side we've we're mocking up our heater over here we've got our aluminum
48:19
Truss are like Square Tubing so that we can support our
48:26
tray you guys can see where we have our lattice glued in the floor now we're
48:32
using Marine adhesive to adhere everything the epoxy is the only thing that's different as far as adhesion goes
48:39
but these strips are here to distribute the weight like we talked we got our kill
48:44
mat so that we can reduce the noise and we've already tested our first piece
48:50
over here so this is a good photo to represent if you took this photo it
48:55
would show that you are kind of planning your process out in different steps and you're double checking everything
49:04
camper van flooring mistakes again don't rush the process always allow for the recommended
49:11
manufacturers cure time for adhesives to be followed I know it's exciting to get the floor
49:16
down but a lot of people I've known
49:22
you may use caulk silicone you say I've used it before I know how it works
49:28
everything's different whatever this says temperature wise and cure time you gotta follow because think
49:35
about this if I take this product and I put it on the floor and it's thicker in some areas than
49:40
other areas and that area hasn't fully cured and then I go ahead and jump on my floor and
49:46
start working on it whereas if it had cured properly it would be hard and it wouldn't be spongy
49:53
but now I've rushed and my body weight or whatever on the floor it will smush it and now I
49:59
might have waves in my floor so make sure you take your time with the
50:05
Cure time I think the reason a lot of people Rush is because
50:11
all the Cure times say you need 24 hours to cure guess what that's how much it takes
50:19
the main reason is because it can be extremely difficult to go back and repair or adjust something
50:24
if you didn't take the proper cure time into consideration so just like I said you rushed and
50:32
now the floor is glued in and there's a spot that's going to be not cured
50:39
properly it's got to be there where forever not to stress you out just to think about just do things step by step
50:46
next wear proper PPE that's safety glasses gloves breathing
50:52
apparatus if necessary depending on what kind of what type of adhesives and stuff that you're using
50:59
this stuff can be pretty wild if you're doing it indoors and not outside and then also pay close attention when
51:06
cutting the vinyl the sheet vinyl not only for your safety with the razor
51:11
blades and stuff like that because they can get really dangerous but really to make sure that you're not removing
51:17
too much material because you spend all the time buying it researching it paying for the shipping
51:23
because that stuff's not cheap it could weigh up to 70 pounds for example for a van floor
51:31
you don't want to slip and make one cut and then now you've messed up your flooring
51:39
there we go let's talk about flooring mistakes now this photo may
51:45
look very professional but I'm going to show you some details inside on what I needed to
51:51
fix for example I was going to have bars go straight
51:58
across the whole entire floor and then before I went to cut I stopped uh
52:06
and I just did halfway and that made it very much easier not necessary mistake but taking my time
52:13
allowed me to adjust course a little bit the mistake I made here
52:19
you can't see it because it's fixed but I didn't allow enough space for my
52:25
wiring runs I needed the additional cables that I put in the floor
52:31
were much thicker because I upsized them and I needed to
52:36
enlarge this space the next thing was this wire cover that
52:42
I had I had to replace it because this one didn't really cover it was the additional this extra plastic cover
52:49
made my floor height too high this would be like a big speed bump in the board and that wasn't acceptable
52:55
that got fixed over here on the right side you can see there's two places cut out
53:01
those were after thoughts I thought that on my design I thought I
53:07
could come through here and then go that way but instead I had so much additional going up this pillar
53:14
that I had to cut into the floor here and then this one as well for the hot
53:20
water heater they were all fixed at the end of the day no problem this whole again we just
53:26
talked about it being enlarged but if you can think about it if you had planned on doing your floor
53:32
that day and you hadn't addressed these a one day install can turn to two three
53:39
four maybe a week but the reason I would say don't stress out about the van floor is because
53:47
usually it's a permanent install typically If You're Gonna Take Time on something take time on the floor
53:54
it'll make sure that you don't have squeaks it'll make sure that it feels good when you walk on it it's strong
54:00
because like I said the other stuff components are in Van if you need to modify a kitchen Galley you need to change something you can take it out of
54:06
the van work on the garage and then bring it back in stuff like that the floor is a one and done
54:12
so make sure if you're doing any type of wiring like this that you take your time
54:23
campervan flooring maintenance and repair make sure you take time to care for your
54:29
floor and you're cleaning it often now you're buying floor materials that are Brazen resistant don't take that for
54:36
granted any type of a Sharp rock or sand is not usually what the manufacturer
54:41
intended if you have big things like that your floor might not be able to handle it
54:49
to help this out you can use like a rug a floor mat or just take your shoes off before you go in the van will all help
54:55
extend the life of your new floor there are companies like inhabit and let
55:01
me back up here no affiliation but I just want to make sure that that's a company
55:08
inhabit that will make custom floor covers there's some there's actually some
55:14
vendors that will that sell the product they'll actually trace your floor out and you can think of this as almost like
55:19
a WeatherTech type mat but on a like a WeatherTech mad on steroids it's
55:25
going to go throughout your whole entire van and that'll also help protect your flooring
55:32
and last but not least again just keep it clean this photo on the left
55:38
it's just me working in the van now I don't have any rocks or stuff like that but
55:43
after I get the van floor put in I'm going to clean it I will put a protective plastic on it because then
55:49
when I bring my kitchen Galley in the flip and fold seat the power system what this is going to do is there's more
55:56
likelihood that I might drop something or something will shift as I'm putting
56:02
all the components in the van and the what I want is I want to keep my
56:07
floor looking like the picture on the right nice and clean
56:14
all right so we got a couple people in the live stream if you guys have any questions about what I went over today
56:19
happy to answer those really quick I'm just going to go over a few things
56:24
one thing I wanted you guys to do is make sure you check out vanbitterhq.com we have blog post on there we go through
56:32
in depth just like we talked about today on the flooring we've got a solar section as well
56:38
so don't forget to check that out the next thing I want you guys to check out is the DIY van build cheat sheet
56:46
so I've put together the DIY van build cheat sheet it's essentially an Excel document of the
56:53
last three years of all my Amazon purchases that pertain to Van Parts stuff that I've bought parts that I've
56:59
vetted and I put them all into a nice organized Excel sheet they go over goes
57:05
for electrical we have Fasteners Hardware HVAC components Roofing solar
57:11
which in the future we're going to have an awesome video on this van behind me but for example
57:17
if you hover over the link it's going to show you what that product looks like on Amazon and
57:24
you can go to Amazon to purchase that product definitely helps out the channel so we appreciate that but this list is
57:30
really to help you guys out it's I put it together it's a good place for me to reference when I need to repurchase
57:36
materials and I don't want to go look them up again I just go to the DIY van build cheat sheet I click on what I need
57:42
to I find it very quickly especially with tools if I have any of these tools here and I break one or I
57:49
need to buy another one they're right here they're easy to access currently the list has over 250
57:55
curated items for me all the stuff here is stuff I've actually used in the shop
58:01
and it's going to help you save time and money you're going to save time because the list is organized you'll save money
58:06
because you won't be having to repurchase products and kind of be let down you'll know that this is something
58:11
that I used I've used before and I'm it's made it onto the list
58:17
we've got more products coming onto the list one from the power system that I just built as well as some other ones
58:24
from a live stream that we talked about it's a growing list it's always being updated so if you want to get it it's
58:31
completely free type in your name and email address click download is going to go straight
58:37
to your inbox you can also check it out on Van builderhq.com or the link in the
58:42
video description below so once again make sure you're signed up for the DIY van build cheat sheet I
58:49
think it's really going to help you in this DIY van build process we'll be adding some links to some of the
58:54
products that may help you from Florida as well the next step just want to say any comments or welcome if you have any
59:01
questions throughout this video hopefully right now you can get a live stream really quick if you do
59:06
have a question if you missed this live don't worry put your question in the comments below I'd love to read through
59:12
those if I can answer it quickly I will but if I don't I'm probably looking up the answer for you and we'll put that
59:18
into a future video again don't forget to describe the channel
59:23
subscribe so that you guys can get all this updated information not only does it help the channel but
59:28
you'll be able to notified you'll be notified when the live streams come out the live streams were pretty random usually in the afternoons depending on
59:36
how I'm building the van out but if you're subscribed you're gonna get that notification and you'll get to see me live and that's a great time to ask me
59:43
any questions you have that are van related also don't forget to like this video share it with your friends if you find
59:49
it helpful or you have somebody that's building a van out and you think this video would help them with their process
59:55
and let's say do we have any more questions in the comments we're going to wait just about two minutes here I see
1:00:02
we have a couple people in the live stream you guys have a question about flooring I'm gonna show you this little model real quick and we'll be on here
1:00:08
about two more minutes and then we'll end the live stream
1:00:14
now the van floor is not in but the cool thing is when we put this into our blog
1:00:21
post going through this whole entire process we're going to have photos of the in process we'll do an update video
1:00:27
so definitely get subscribed so you can check out the live stream for the final videos coming out
1:00:33
and yeah last but not least I'll go over this one more time
1:00:39
we'll take a photo of this so you guys can see it when the post goes up but this is a good way to
1:00:44
understand why you need to pre-plan take your time on the flooring because it's a
1:00:50
bunch of layers each one has its job sound deadening floor support
1:00:57
insulation which is one of the most important you have your half inch plywood right
1:01:04
here which is your subfloor that gives it massive strength to your system
1:01:09
your floor system now between this layer the sound deadening the lattice the foam and the subfloor
1:01:18
we're using the locked out like tight Marine so this
1:01:23
is the pl Marine it sets in 30 minutes but it does a full
1:01:30
cure in 24 hours I would not after you set weight on it
1:01:35
I would wait a full 24 hours before you take that weight off I know it's a whole day but trust me you're going to really
1:01:41
enjoy how it holds your floor together and then last but not least we have the
1:01:47
lawn seal for our example I just did a recap we did an exterior paint on the
1:01:54
bottom of the wood that exterior paint had a mold preventative so that if we have any
1:01:59
moisture underneath the floor that we can't get to for an example we're not going to have that risk of mold
1:02:05
on top of it we used a bonding primer so that preps our wood surface so that
1:02:11
when we put our epoxy on for the top layer everything adheres very well and if you do those steps take your time you
1:02:17
do it right you're going to have an excellent floor package here and you'll be able to
1:02:22
really enjoy your floor for the life of your van all right that is it for
1:02:29
this video on the ultimate camper van flooring guide hope you guys enjoyed looking
1:02:35
forward to those comments and we'll see you guys in the next live stream [Music]
1:02:48
thank you
#Campers & RVs
#Motor Vehicles (By Type)
#Trucks, Vans & SUVs
#Flooring