Up next in 10


Live Build with Q&A on installing sound proofing material in your camper van floor, adding PVC support strips to strengthen floor where big gaps exist and applying R-5 1" Fomular 150 XPS (15 psi) Foam insulation. We will cover Plywood in a future livestream.
Whenever you’re ready, there are 2 ways we can help you:
1. If you need a vetted parts list, download our → FREE DIY Van Build Cheatsheet to help you save time and money on Van Parts and Gear: CLICK HERE:
https://van-builder-hq.ck.page/846c83ab54
2. If you want to get Done-For-You Van Build help, book a → FREE Consultation with my Calendly Link: CLICK HERE:
https://calendly.com/odysseycustomvans/intro-call?month=2023-07
Show More Show Less View Video Transcript
0:00
[Music] foreign [Music]
0:41
thank you [Music]
1:08
thank you foreign
1:15
[Music]
1:22
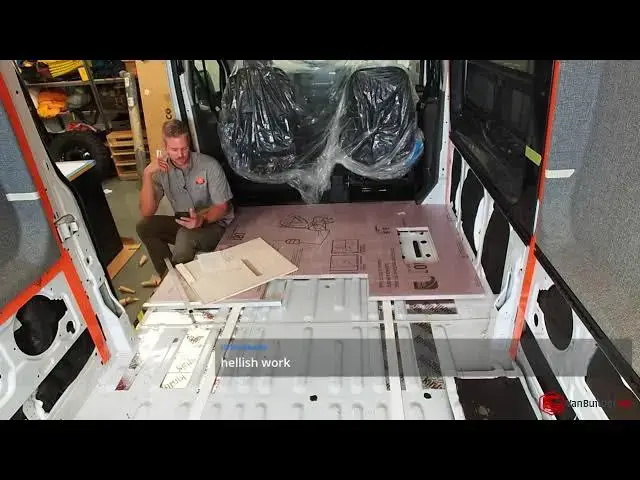
hey guys welcome to the van so we are inside the van and I'm going to be
1:28
showing you how to prep the van floor for the sound proofing that we're going to put in here which is uh kill mat
1:36
then we're going to put down uh our insulation and then our plywood uh We're
1:42
not gonna do all that in this live stream tonight we're just going to go ahead and start the process of teaching you guys how to do this and
1:50
uh because we had a countdown and we're getting this van done it's gonna be a lot of progress that's going to be happening throughout these live streams
1:56
so stuff will be happening pretty quick and uh what I really want to do with this live stream is invite you guys to
2:03
ask questions so whatever questions you have um it can be on the floor process or
2:09
whatever we're doing during the live stream or if you guys join in at any time during the live stream you can ask
2:15
any van question as long as it's van related and um yeah I'll hop on the
2:20
computer and uh see if I can answer it for you uh we've got one fixed camera tonight so if you got a question I'll be
2:28
running over the computer you won't see me but I'll be uh I'll be on the computer so I'm going to show you a couple of the
2:34
products that is going to go into here and then um yeah it's pretty much going
2:39
to be a just a long build process tonight nothing too fancy you'll just see me
2:45
putting in cutting the kill mat and then I'll show you uh what this PVC strip is
2:53
it's another part that I've used to um take care of the flex that happens in
3:00
Van floors and then we'll talk about this piece of aluminum as well
3:06
and uh real quick before we get into it let's talk about the van build cheat sheet
3:12
so if you guys are new to van Builder HQ uh we have a free product that I have
3:19
put together and developed and it's essentially an Excel sheet so it looks just like this but we call it the DIY
3:26
van build cheat sheet and essentially what this is this is the last three years of me building Vans these are all
3:33
the products that I've bought I've tested vetted and what I do is I put them on a Excel sheet you know mainly
3:41
for my reference so I can go back and find all the stuff that I've already used and that I like but I organize it in a way that anyone
3:50
can use it and it's a great reference for Van parts so you have electrical items
3:57
you have Fasteners HVAC components Hardware insulation Kitchen products
4:03
Roofing solar solar is nice because these are all the products I use on the Vans just for example like the 200 watt
4:11
panel system from renergie it gives you mc4 connectors Z brackets screws Branch
4:19
adapters stuff like this it just makes the install process very easy and then
4:26
last but not least and most important is the tools section the tool sections this is what I use in
4:32
the shop so if you guys see me using a hydraulic crimper or you've seen me using the propex expansion tool from
4:39
Milwaukee these products are on this list and it's just a great
4:46
way to reference it and over time this list builds so stuff that I find that I want to add to it
4:52
I'll add to it and so forth but if you're interested in picking up this list 100 free go to vanbuilderhq.com or
5:02
click on the link in the description below put your name and email address I'm going to send it right to your inbox again completely free great information
5:09
to help you out on your DIY van build Journey and all right let's get back to the
5:16
video so
5:23
yeah I can see the chat here so we're good my head's not chopped off in the video so we're gonna go ahead and get
5:28
started so first we're going to talk about uh
5:33
the starting point for a van floor and why you're probably going to be either
5:40
insulating it or putting wood on it uh what we want to do is the van floor is metal it's cold you
5:48
know if it's cold outside the van's going to get cold really fast if it's hot same thing I remember when I had my
5:54
first van and I was driving around in it I didn't insulate the ceiling the roof I
6:01
did the floor but into the roof and uh it just makes such a difference when you
6:07
insulate the inside of the van um but the van floor in particular is
6:14
really good because you can do there's a lot of benefits in treating the floor one is you can actually reduce the sound
6:23
and the noise inside your van when you're driving so the kilnet for example this is the
6:28
soundproof material we're going to be using today it's not really big for insulation
6:34
doesn't really have like a good insulated value but what it does do is
6:40
it deadens the noise the road noise that kind of droning you're going to have when you're taking those long trips
6:46
and if you're building a camper van you know nine times out of ten you're probably going to take a very long trip and if you have the inside your van is
6:54
as quiet as possible it's going to be a much more enjoyable trip and uh
7:00
yeah it's just you're gonna make your vacation or trip that much better because typically the rest of the van is
7:07
probably going to be insulated pretty well but we're just going to focus on the floor so what this uh product does is it
7:17
changes the uh this is a technical word here but it changes the resonant frequency of the floor
7:23
so this tempty sound it's like a high
7:30
frequency and so what we're going to do is we're adding this to it and it changes
7:38
lowers the frequency and gets rid of some of that noise so that's kind of like the technical part behind it
7:45
and there's kind of a cost benefit here uh our trade-off
7:51
makes my words up what I'm trying to say is there's thin
7:57
sound deadening and there's thick thicker is better but thicker weighs
8:02
more and it costs more the thin stuff is nice because you can kind of control
8:08
it's just easier to cut and uh you know it it still does a good job so
8:14
we're using this thinner material it's the 50 mil thickness
8:21
and the reason we're using it is because let me get back to my van floor Theory
8:28
but real quick we're going to be talking about uh floor height
8:33
and using this thickness of material or actually very thin it's going to allow
8:39
us to put in this PVC piece that I was talking to you guys about earlier
8:45
and it creates the it makes the floor level with the corrugations so we'll
8:51
we'll talk more about that in a second but getting back to the point of insulating your floor you're going to
8:57
remove the sound it's going to be more enjoyable when you're driving and then the next thing that's going to
9:03
happen is you have the ability to insulate it so we're going to be putting
9:08
the formula 150. this one I get from uh Home Depot
9:14
is that Pink Panther insulation it's xbs XPS so it's a it's a rigid foam
9:22
and what's nice about that is it has compressive strength it's not crazy compressive strength but it is uh
9:31
15 psi so if you can think about it if you have these ribs of the van
9:37
maybe have a one by one square you can put 15
9:44
pounds it'll support 15 pounds on that one square inch which is pretty good which
9:51
what that really means is the floor is not going to smush into the bottom of the van that bad now there's going to be a
9:59
little bit of deflection so now we're getting back to this piece of PVC and if you notice
10:05
these corrugations right here that are close together there's a gap here and then there's a
10:11
humongous Gap over here so what we want to do is so we don't
10:17
have these uh you know kind of bowing of the floor when we walk on it
10:22
it's not that noticeable but if you have a chance to really make it great that's what I like to do
10:29
so what I've done is I found this piece of PVC
10:34
um so what's nice about it is it's no it's not going to rot it's plastic and this is actually for screened porches
10:42
screened in porch so this is what you would actually cover uh this where the nails and everything
10:50
go and the screen on the screen and porch this is kind of the strip that goes in the outside to cover all that
10:56
but what it what I found that it makes a great spacer for your van floor so when
11:01
you couple it with this 50 mil thick kill mat and you have this PVC
11:08
what you have is you have a flat surface and
11:15
it allows for to absorb this deflection right here when you walk on it or say
11:20
you kind of load the van up the nice part is you don't have to put this everywhere it's cheap but you don't
11:26
have to put it everywhere so what we're going to do is we're not going to glue this in today but once we put the kill
11:32
mat down I'll show you where I put it it's pretty obvious where it goes it's
11:38
going to go in this middle Channel over here to the uh your right
11:43
we're going to put it here and then over here and then we'll uh
11:49
put a couple of strips over here and then what it's going to do is distribute the weight uh we don't have
11:56
heavy things on here but the aluminum cabinets will go over there so once you get the aluminum cabinet and the isotherm Cruise 130 it's a pretty good
12:03
amount of weight so it keeps it nice and stable same thing with the kitchen Galley over here but yeah these uh
12:09
little vinyl PVC strips do a pretty good job and this is just
12:15
going to be siliconed on top of the kill map so we'll be doing that
12:21
and then once that's all finished we have our foam
12:38
so we're going to go ahead and bring in a piece of foam here so you guys can see it hopefully it's on the uh I know we got a
12:45
glare so this is the formula 150 it's got the Pink Panther on it
12:52
Lowe's sells something like this it's like a light green color uh
12:59
but I I don't really like it um I don't think the compressive strength is the same so this stuff is
13:06
very you can actually fill it with your hands it's actually hard to kind of squeeze which actually makes it very easy to cut
13:13
now this does have it is insulation so it does have an R value and has a r
13:19
value of R5 and that's with the one inch uh version
13:26
so they make this I think get it in half inch maybe two inches
13:32
or inch and a half possibly we're using the one inch and I talked
13:37
about the size of this in the live stream previously because when you're working and you can use kind
13:45
of like conventional cuts of lumber so in a van you're prepping everything
13:50
if you use one inch of the foam and then you have half inch plywood you have an inch and a half
13:56
so if you bought a two by two you can kind of cut some two by twos and use them to play around with where you want
14:03
to install stuff and to keep it level with the floor if you guys have a question about that
14:09
just let me know um but that's the insulation
14:14
and then what we do is we have our Plywood And this is just a sample piece
14:19
that I have right here so this is a
14:25
sanded ply and it is let's see how many Plies are in here one two three four
14:30
five six seven seven ply it's very very very very very rigid
14:37
uh an extremely smooth uh you don't have to get the one that's
14:42
kind of pre-finished on both sides but it's very uh
14:47
it's good I mean you can actually you know build cabinets out of it if you needed to but this will obviously be the top layer
14:54
of the floor and then the final piece that we'll talk about is how we're going to prep this
15:01
for our lawn seal flooring so that's our
15:06
permanent flooring that's going to be epoxied on we don't want to put the epoxy on the
15:12
raw wood um in Thomas's van there was a special coating it's a waterproof coating on top
15:19
of the plywood so we did not have to put uh I guess special adhesive to get the contact uh
15:27
it made really good contact on the apply what that we used it was part of
15:33
the ABC rig floor system and so what they used they used a they
15:39
essentially are using a zip sheathing with integrated insulate foam insulation
15:44
kind of sandwiched together and then that zip sheathing has a green waterproof coating
15:51
and then that's what the epoxy went on top of but since we have raw plywood
15:58
I did some research and for epoxy you can go to uh
16:04
Sherman Williams and get this uh insole X so it's a waterborne bonding
16:12
primer it's very expensive it's about I think it's like 70 dollars for a
16:19
gallon but we want to make sure that we have good adhesion to the floor so that's why
16:26
we're buying it I just got it in white it just it's not mixed or anything like that
16:32
but the sticks bonding primer this is going to prep the floor so that when we
16:37
put the epoxy on it's going to work really well because this is specially formulated
16:43
to uh for epoxy and it is a urethane acrylic
16:50
if anybody is wanting to know so you'll see that in the future live stream
16:57
all right so let's go ahead and start prepping for
17:04
the kill mat again if you guys have any questions put those in the chat
17:11
when we do our kill mat we're going to want to set up a cutting station so I got this piece of plywood over here and
17:18
that's just going to allow us to get our razor and cut this stuff it's very thin
17:26
it cuts really easy what I like to do is just go through
17:33
get a width and then just kind of chop up a bunch of them don't go crazy but if you cut it wrong I
17:41
mean it's just sound dead material it's no big deal let me check the computer and then we'll
17:46
get started installing this see how everything's looking
17:54
all right looking good
17:59
foreign before we put this down what we did is
18:05
we went through and cleaned the whole entire van floor we went through with our rust preventative and we went over any uh you
18:13
know shiny spots that we roughed up by prepping for the flip and fold seat install
18:19
uh once we finish with that we made sure before we took our plywood and thumb away that we outlined where we do not
18:27
want any type of kill mat or sound dead material
18:34
so this is outlined the seat is outlined and that's pretty much it so let's get
18:40
rid of this foam and start putting some kilmette down and it's pretty much just gonna be a
18:47
chill live stream looking forward to answering your guys questions if you have any tonight
18:55
but other than that it is going to be me working on the van floor so
19:03
just want to let you guys know so that you're not you're not watching and wondering what what is going on in here
19:16
so first thing you want to do is we're just going to kind of work our way for the middle and go to the outside that way we can keep our Cuts pretty even
19:23
and we're only going to put kilnet here here we'll skip over the small sections
19:29
continue here and then go over there and then once I put this down you can
19:34
hear this so it's kind of a little sound like a
19:40
before and then I'll show you what it sounds like after that
19:47
and then one tool that I forgot to uh one I forgot to pick up and then show
19:53
you guys is the roller so there's a special
19:59
roller that you're going to need to uh use to install this
20:16
this is off of Amazon as well
20:23
all right foreign
20:31
forgetting that my camera is mounted to the van itself let me get it straightened up here
20:40
there we go excellent all right
20:47
let's get going here so this is the roller and uh
20:54
it's a rubber roller so that you can kind of go over joints but you really need
20:59
you need this type of roller because the pressure that you're going
21:07
to put down on this is really what's going to make this contact really well
21:14
if you just lay it on there you know it's possible that it can fall off but man once you roll this
21:20
it's not going anywhere so we just put down this little bit so
21:25
let's see what it sounds like after just this one piece
21:32
so this is kind of before this is after
21:37
before after
21:44
and we got the German Shepherd wondering what's going on all right so I'm just going to keep
21:49
going and you don't have to put these right against each other you know you can kind
21:55
of space it out so you're not wasting material and then when you're finished whatever
22:01
you have left you know just go crazy just take all the areas and uh
22:08
go ahead and soundproof them
22:14
we just rolled in the middle first and then make our way to the edges you kind of see this is kind of like uh
22:22
this material is kind of gummy
22:31
and then some of these Cuts may be wider so just you know just play around with what
22:36
you're picking up but it is important I went through here like I just said and I
22:45
did my rust preventative so I cleaned the surface and then I painted it let it dry
22:52
um is you're never coming back to this uh hopefully you never come back to this
22:57
but yeah once your floor is in it's in so
23:03
you want to do it the right way
23:12
once again if you guys have any questions put those in the chat
23:17
does not have to be related to this video
23:24
we will be having a future episode where we put in our swivel seats
23:29
so we got the two of the scopima swivel seats we also have the parking
23:36
brake lowering kit so from 2000
23:42
20 to 21 there was a change and I think 2021 and up
23:48
the parking brake has moved so it's electronic but this is a 2020
23:54
it's a new 2020 but it's a 2020 and it has the parking brake over here so we
24:01
will be installing the parking brake lowering kit so that's something that you can uh
24:07
purchase
24:19
and as you're going in and out of the van you might want to keep a broom handy because uh
24:25
somehow I brought a bunch of dust into the van after I just cleaned it out
24:43
foreign
24:53
let's leave that right there
24:59
he's going to do as much as possible so when you're finished with the big sections go through and
25:07
you know do those middle ones because the more sound dead and material that you have
25:12
the better it helps [Applause]
25:37
there's a comment earlier about do we have more videos on this build
25:42
we do but they're pretty much in live stream format so they're just updating on you know the Flatline vanco cabinets
25:49
that I got and that type of material we don't have any finished produced videos
25:56
the next finished produced video on this van is going to be the Dometic RTX 2000
26:03
AC install so the piece we've been waiting on to
26:09
finish that is coming in Monday
26:15
so as soon as it comes in we'll uh
26:21
make sure to get started on that
26:27
I spoke earlier about these these middle Channel pieces where there's no
26:32
corrugations uh this this these rows right here they're excellent for you know putting
26:38
wires across the van because you're gonna have this Gap
26:43
and you know low gauge wires can go right under the floor no problem
26:49
however we have an in-floor shower pan right here so we can't use that one
26:55
and then this one we also can't use because this is our two bolt holes for bolting in are
27:03
uh full drawer slide full extra I can't
27:09
talk we have a flatline vanco full extension drawer slide tray
27:15
and so this is to secure that so what we're doing is the very back one
27:21
we're going to use that to bring the wires left and right of the van
27:32
all right another thing you want to start thinking
27:37
about and this was a question that a viewer had was the L track that we have on the
27:43
adventure wagon system how do I know how high to cut off the L track so that it's not impeding the floor
27:51
so the easy answer would would be to say oh hey you know the floor is an inch and a half thick cut an inch and a half off
27:56
of it but it's not that simple once you use the glue and adhesive the foam more
28:02
adhesive the floor the epoxy and then the other floor it's best to do the
28:07
floor first get it completely done and then go through and just kind of chip away at your L track to get it
28:15
where you want it because what I did is I precisely measured and because of the
28:24
floor imperfections it was a little too tight or it was too perfect
28:31
so that's when sometimes when you know being too perfect actually
28:38
doesn't really get you anywhere so it was exact but I couldn't I couldn't
28:43
install the floor and put the the bar in I guess is what I'm saying
28:50
everything now one thing we're going to do as we
28:55
install the floor is once we get all this done we will
29:01
we did a rust preventative for all our holes but we will be scuffing up the top of this
29:06
just so that we can adhere the foam to the floor
29:14
and that adhesive is really just to kind of keep the foam in place
29:24
it's not really meant to be that much of a you know a structural thing
29:46
foreign so if you have any type of like
29:51
imperfections the floor like this little bubble cap you can just push your hand around
29:56
it and form it and then come through here and just go ahead and cut it out
30:12
uh following up on that answer that I just gave for the L track the same thing applies to
30:19
the wall panels so most pre-cut wall panels are going to
30:25
assume that you have some type of like Ford Transit van floor
30:31
and it's going to come down pretty far you're going to have to cut that off
30:37
but just do the same process you know get your get your floor finished and
30:42
done and then you know measure up
30:48
that difference and use that to cut it off as you guys can see if you've been
30:54
following along with the live stream and the videos of this build you notice uh in a way this builds kind of done
31:00
backwards you know we put the floor in temporarily then we put all of our
31:07
kitchen components kitchen Galley or seat and everything and that's because there's so many floor penetrations and
31:14
cuts and specifics on here it's not as easy as just putting a floor in and kind
31:20
of building up from that and I think it's the best way to do it because
31:28
uh when you're building a van you don't necessarily know where everything is going to perfectly fit for example this
31:35
seat there are one two there are three beams
31:42
that go through each of our bolt holes so I had to adjust it you know like in millimeters to be able
31:50
to get every single bolt to go through the van instead of being on top of a beam
31:56
and by doing that I needed to have the floor taken in and
32:02
out a couple times so now that I have everything drilled and laid out it's it's really easy because
32:10
all the holes are there they've all been rust prevented they all the heater Port has been cut
32:16
and it just makes everything it takes a long time to do it in the
32:23
beginning but that front end work makes the back end work really easy
32:28
is now I know where my shower is I know where my seat's at my heater I know
32:34
where my pull out tray is I know where to avoid putting sound deadening
32:39
I know where I can glue or I can't glue so I'm not kind of guessing
32:46
uh because you can imagine if you put your whole entire floor in and you're just kind of guessing where you drilled a hole and you mess up
32:53
you know you might have two or three holes in your floor that you didn't need to cut and
32:59
you know hopefully that's not a place where you can't undo it
33:13
just to remind everybody if you guys are watching make sure that you
33:18
ask questions in the chat happy to answer them tonight
33:27
[Music]
33:36
and if you guys are wondering what I'm using for rust preventative I'm just using uh fat uh
33:43
good Lord flat black Rust-Oleum
33:49
foreign
33:54
it is uh well I think it's made by Mr I'm just in Krylon Fusion
34:03
but the Krylon Fusion is it's incredible
34:11
it's definitely made for if you don't like the prep before you
34:17
paint that it's that's who it's made for I mean you can spray it on anything and
34:22
it adheres really well so I like it
34:33
so when you cut this out just use one as kind of like your template and then you can go through and just
34:39
copy that and again if you mess up on the sound
34:45
editing it's really no big deal because you know you can just put two pieces together
34:54
it's not like cutting out a roof fan you know you can mess up on the kill mat you're
35:01
gonna be fine
35:08
so this is our template I'm just going to keep it over here I used it over here so I didn't want to
35:14
do that but I did it anyway
35:26
I hope everybody that's watching got a chance to watch the uh Evergreen Colorado adventure van Expo
35:33
film that was a great trip going into Denver then heading on to
35:39
Evergreen evergreen's really nice the park where they had the event was excellent
35:48
and uh yeah a lot of great Vans there good to see a lot of builders that I
35:54
know yeah I think we got some really good content for you guys out there just to
36:02
you know see what products are available and talk to some better vendors you know one-on-one
36:08
one that I really enjoyed was the uh the lithionics foreign
36:16
so when we talk to them I really like how that product is coming along where
36:22
you have a ton of amp hours in a small area and
36:28
you know coupled with the internal BMS is really nice
36:52
so you guys can see how sticky this is and stringy
37:01
I forget what product it's made from it it's like a urethane or something like that
37:31
I was waiting for somebody to ask me why I put the heater over here instead of
37:36
you know underneath the seat um and if I can help it I like to put it
37:43
on the side with the fuel tank I don't like to if I can help it
37:49
have that fuel line cross over the exhaust system now there's a safe way to do that but if
37:57
you don't even have to do it from the beginning I think that's even better so
38:05
like I said there is a safe way to do it but if you put it on the driver's side of the Ford Transit you can tap the fuel
38:11
tank is right here so you can just do a short run there is an auxiliary fuel port on the
38:18
Ford factory tank it's just an additional port you can buy a
38:24
Ford factory coupler so that it's you know it's a forward part going to a Ford
38:29
fuel tank so that's what we'll do we'll have that in the future stream
38:34
or video but yeah if you put it on the driver's side you don't have to cross over that
38:41
exhaust now if you are in a spot where you have to do that
38:46
uh you can go to the race car industry
38:51
stock car industry and they have these uh like Aerospace grade
38:59
they're like these velcro jackets I get over lines and they're made to withstand you know hundreds of degrees and they
39:06
slip over fuel lines coolant lines stuff like that so that would be the solution
39:12
if you had to go over it um It's So Far Away under the van so
39:18
maybe it's going to be 10 inches or eight so very unlikely that anything
39:23
would happen but just let you guys know that product does exist it is out there
39:31
if you want to uh just add a little bit for more protection for yourself
39:43
so over here I have the outline of where the heater is so I'm not going to put that kill mat over there
39:53
[Music] foreign
40:31
[Music]
40:49
I could have just used a full sheet over there
40:55
oh well see it doesn't matter it's not that it doesn't have to be that
41:01
perfect
41:08
guys if you have any questions put that in the chat foreign
41:14
I think it's more for me because I'm doing a repetitive task tonight
41:57
[Music]
42:28
foreign
42:41
thank you
42:46
and also when you guys are doing this double check I see that I missed right here some Rust preventative
42:53
so just make notes as you're going through of stuff that you missed
42:58
and prepping the floor because you really want to make sure
43:03
anything you scratched up during you know moving stuff around that you take care of
43:12
[Music] thank you
43:19
[Music]
43:26
let's see these small pieces you can just use them for these little corners
43:36
keep in mind where you're going to be doing wire runs so for example we're going to have our charging wire from our
43:44
engine batteries come through here and go along this track underneath the floor
43:50
around back to the wheel well so we don't put anything in this channel we want to keep that open
43:56
we don't have a really big wire going there it's only six gauge but
44:02
you know we want to make sure it's just not something extra we have to work on
44:22
all right we're doing pretty good here so once I get this first section laid
44:29
out what I'm going to do is I'm going to show you guys where the strips go we'll do a kind of mock-up of the
44:37
insulation of the floor install we won't glue it but we will hop in the computer
44:44
we'll talk about the lawn seal adhesive stuff like that for just a second
44:50
and then that would kind of be it so yeah if you guys have any questions make sure you uh
44:56
put those in the chat in the next few minutes so I can definitely have time to answer your
45:03
question
45:35
and a pro tip is if you have this corner here cut it with the backer paper so this uh
45:42
paper still attached it just makes it easier
45:49
and then you can kind of just score it lightly so you don't scratch or paint
45:55
and then come back over here and just kind of finish it off
46:06
but really doing this a little bit of a kill mat it's going to make a big difference so you guys can tell I hope you can hear
46:14
that on the microphone and then this is what we started with
46:22
[Music] so hear that and it's going to turn into
46:27
this it's like more of a thud
47:08
so yeah you guys can see this over here this section right here is there's two
47:13
problematic sections and a Ford Transit it's over here where I put this
47:19
so this patch right here or this piece of soundary material this section has zero corrugations
47:26
from here all the way to here all the way here so this is always a trouble
47:32
spot because it's a low point where it'll Flex On You not in a good way
47:39
and then over here this side is also the problem area
47:45
typically in a van you come over this so that you have your kitchen galley
47:51
so if you can imagine from this piece of wood right here
47:59
from this piece of wood all the way back to here this area is completely unsupported with
48:05
a corrugation so that's why that those vinyl strips make a humongous difference in
48:13
not making the floor spongy
48:25
the way you can do this is just put a sheet in when these these wider spots and I like killmack because they have
48:32
these uh this grid on here so you can just fold it and just cut right on the grid
48:42
I'll show that to the camera real quick if you guys can see there's this grid to it
48:49
so you just kind of find your line and what I've been doing is you can actually almost like
48:55
you almost like draw on it you see that yeah I made that like a circle
49:31
so this guy somehow I don't know how but I cut it too big
49:38
somehow
49:45
but if again if you don't push it down you can uh reuse it
49:53
and actually take this off again so this section right here
50:01
this is where my wire is coming in so I actually need to score this
50:06
because it's going to mess up my wiring
50:20
so we took care of the wiring on this side but this side I missed up so
50:26
there we go [Music]
50:34
yeah we want to keep this open not that this is too high but it's good
50:41
to keep this nice painted surface so we can slide a cable in here if we need to
50:46
that way it doesn't get caught up on uh anything
50:58
all right guys I'm gonna put this last piece these last two pieces on then I'm going to show you this uh the
51:04
floor and then we will call it for the live stream tonight so if you guys have a
51:09
question make sure you answer in the next ask in the next five minutes
51:14
so I can get to it
52:09
okay
52:22
foreign
52:58
for the Ford Transit build and we are just working on this first
53:03
section we're doing the kill mat sound ending so that's our first step and then for the future live streams we're going
53:10
to continue and then we'll eventually get the whole entire floor in and then we will be doing the lawn seal
53:16
install which you know a lot of people are looking forward to it's a little technical but
53:24
we will be doing the full process so we'll be you know putting the epoxy down
53:31
all that good stuff
53:37
so we're just going to finish up doing a couple things here and then we're gonna do a mock install so essentially we're
53:42
going to do a dry fit and we're going to that actually right now
53:54
so as you can see we have we have our kill mat and all the locations we need uh
54:01
we're gonna go through and just because the length of live stream we're going to end here in just a little
54:06
bit we will go back and fill these in so next time you guys will probably see
54:12
the whole entire floor in uh and actually what we might do is hold
54:19
this so you guys can see the vinyl strips get installed
54:25
so first up we have our kill mat we're going to fill in these gaps like we just said
54:30
The Next Step what you want to do is the beginning of the live stream we talked about these
54:36
vinyl strips now what these vinyl strips do is they are creating a level surface to the van
54:45
floor so this is just for example purposes tonight
54:54
so for example on top of the kill mat we would put any of these where we have wider
55:00
corrugations where we have a dip so we'll have one here we'll want to have one here here
55:05
these smaller channels are okay the main one that you want to do is this
55:11
big gap Channel over here so you want to put a couple of them
55:16
but once all this is in place you've done your rust preventative you put your kill mat in
55:23
you're happy with the way everything looks you kill mat is working for you
55:30
then you're going to take your insulation now the step that's not covered in here
55:36
is the templating process so we have that in a different video the templing process is how I traced and
55:45
cut these pieces out so the template that I used is from a
55:50
company called AVC rig they were showcased in our Evergreen Colorado film
55:57
that just launched hope everybody gets a chance to watch that but that company makes the floor that we
56:04
use in Thomas's van like an insulated floor that you can just instantly take out the box and glue in you have a full
56:11
floor system now I was cutting a lot of holes in the floor so it didn't make sense for me to
56:18
buy that kit and then just cut all the floor away so what's nice is they have a template
56:24
kit that you can buy it's essentially big engineering drawings on paper
56:30
you lay it on your four bait sheet of plywood and then you go ahead and cut it out
56:37
it gives you three pieces of paper just like they're they're full floor system except you're doing it on your own wood
56:43
and your own insulation so we did it on this it cuts out a perfect template
56:50
I mean it's extremely precise they did a very good job on it and then what we do here is we'll go
56:58
ahead and we'll put our adhesive down so where they're going to use silicone
57:03
or you can also use the the Marine the Loctite PL premium Marine
57:11
Edition and that's going to have a good secure use
57:17
I don't use the 3M 90 and spray adhesives like that because I I want to
57:22
be able to move this into place and match up all my lines perfectly I don't want to just put it down and
57:28
then if I mess up I'm ripping up what I just cut out which would not be good
57:34
as you can see here this piece is supporting so once you get the adhesive and everything this will actually assist
57:41
the foam and not deflecting
57:46
as a bonus you can take this one inch aluminum
57:52
and for your joints we're not going to do one here obviously because we have the shower pan but for these floor joints
58:00
we'll do this in the back of the van but it's not necessary up here because we have kitchen galleys covering the seam
58:07
but sometimes when you do a van floor these two pieces of this transition is going to have a seam
58:15
and it over time is going to move and you'll see that seam line
58:21
um all right I'm pausing on the seam line what we have a question here from go and do
58:28
you find a big difference for sound deadening on the floor I chose to skip it and use one inch foam and three
58:34
quarter inch plywood um
58:39
I will say that the sound deading it does make a pretty good difference
58:46
um when you're doing this much surface area I would almost say it's substantial however
58:52
uh so go to used it you use a thicker plywood so I'm only using a half inch if
58:58
you use three quarter plywood the mass of that plywood is also going
59:04
to do uh a similar job as the kill mat
59:10
because the three quarters plywood that's pretty hefty you'd be a surprise
59:19
if you guys had a piece of half inch and a piece of three quarter three quarter is is much heavier
59:26
so a heavier plywood will also assist and um
59:32
just doing your insulation and the plywood is going to make your floor night and day if you didn't use the kill
59:38
mat the kill mat is just that little extra on top uh
59:43
that's going to uh you know bring that road noise down a little bit
59:48
more but the fact that you use three quarter inch plywood is very good
59:55
oh the van is looking good thank you very much I will tell you I took the kitchen
1:00:01
Galley out it's not a big deal because I have a way sliding it out but the flip and fold seat weighs so much
1:00:08
I mean that seat must weigh almost it almost weighs 100 pounds I swear
1:00:14
uh
1:00:20
so I hope that answer your question
1:00:56
hopefully I spelled denser right the denser
1:01:02
wood makes
1:01:09
two reduce uh
1:01:16
reduce sound as well
1:01:30
okay there we go
1:01:39
oh yeah I keep forgetting I'm I'm answering from my
1:01:45
I'm going to answer as the other one hold on here I'm still here I just need to uh
1:01:52
write that
1:02:12
and then I gotta remove that
1:02:26
I'm still here guys I'm over the computer typing
1:02:33
because I did it on my phone and I did not do it on the computer
1:02:39
the three quarter inch plywood works
1:02:44
here
1:02:52
due to its weight
1:03:04
helps to reduce
1:03:11
sound as well there we go all right that way I can get rid of that
1:03:17
comment
1:03:27
there we go okay
1:03:36
all right where were we we're talking about the floor so we have our floor down
1:03:43
and go and do them at a good point you don't have to use half Edge floor I mean you can use three quarter inch and you
1:03:49
don't have to use Baltic bird Birch or like the sanded ply like I'm using
1:03:54
um I mean if used like an oak or something like that like a hardwood it's really heavy you know that that would
1:04:01
help as well but it's all kind of a give and take um you know at the end of the day it still
1:04:07
is a van as much as you do to it so that's why every little bit helps
1:04:12
okay so over here we were talking about the insulation and the seams so what we're
1:04:19
going to do is we're going to take these pieces of aluminum and where we have seams in the back and
1:04:27
we have lots of compression we're going to use this to bridge our Gap so I'm going to get a second piece of aluminum
1:04:34
and hopefully you can see on the camera what I'm talking about
1:04:48
so right here what we have is uh two pieces of aluminum
1:04:54
so once you do your template what you can do is so that you can make sure you remove the
1:05:01
possibility of having that Gap in the floor over time
1:05:06
because it will be visible over time the van will be flexing and moving
1:05:11
you can take your piece of tubing score a line
1:05:16
that'll tell you you know to remove one inch of material you'll put the aluminum piece in place
1:05:22
and then you can use the Marine adhesive to you scuff this down use Marine
1:05:28
adhesive humble Road does this in his builds so he's a great resource as far
1:05:33
as learning how to do this is where I got it from and this aluminum piece right here
1:05:40
now is a sturdy piece and it's not going to flex it's kind of one with the van at
1:05:47
the moment not only does it do this but it holds insulation in and then when your second piece of aluminum that's where the magic
1:05:54
happens that second piece is bridging that gap for that seam so
1:06:00
what happens is when you go to put your wood on top of here you can countersink your screw into the
1:06:08
wood so you put your wood here
1:06:13
and so now the wood will be countersunk into the aluminum
1:06:20
so you countersink a hole that way the screw head goes below the surface
1:06:26
you drill it here and since both of these pieces of aluminum are bonded to the van floor
1:06:34
the next piece of wood that goes right here that Gap I actually have another piece of wood
1:06:46
over here there it is
1:06:52
so when you have your other piece of floor this is that transition so this is
1:06:57
your second piece so over time
1:07:03
is not a straight piece of wood over time this Gap seam is what's going to move this this the floor is going to be
1:07:09
flexing like this but if you countersink this piece and then you take this and you countersink
1:07:14
this piece now that seam is one so
1:07:19
you've taken two things and made them one that way you're not going to have that
1:07:25
difference in surface height and when you do the epoxy method the
1:07:30
epoxy one is going to fill in this crack so that we did it on Thomas's van when we put the two sides together I put a
1:07:37
lot of epoxy let it go down into the crack and then once that epoxy was there I put
1:07:44
the floor down and now that transition uh you can't even see it it's just like
1:07:51
it's not even there now a cheating method would be to get a thicker floor
1:07:58
but the beauty about lawn still is it's a very resilient product and it's thin
1:08:04
low profile easy to work with type of thing so again it's that kind of cost benefit you
1:08:12
know kind of back and forth um so this is how you get rid of the seams
1:08:17
in your floor but what so as amazing as I say that
1:08:24
this foam product is and it has a 15 psi strength
1:08:29
the pull out tray that I want to put in the van
1:08:36
is bolted through the chassis if anything explosive to the chassis
1:08:41
it's going to compress the foam the problem is when you compress the foam
1:08:47
there's nothing there's no there's not any kind of like meat behind
1:08:53
it's you know squishy right regardless of how rigid it is the problem when you put a tray in and you
1:08:59
do a bolt through the frame is you're going to tighten down that nut and you're going to think it's tight and
1:09:04
then the foam is going to squish and you're going to tighten it more and then the foam is going to squish and it's going to squish again and then what you're going to get is
1:09:11
you're going to get a bow in the floor because you've sandwiched the foam down on your what doesn't matter if it's a
1:09:18
bolt-in tray slide out tray you're going to squish so
1:09:24
that is why you'll see the seat over here it would be very unsafe if the seat was
1:09:31
on top of the foam and we just bolted the seat down because we can't torque
1:09:37
our bolts safely because it's just going to always compress the foam
1:09:43
same thing is going to happen in the back so how do we resolve that well let's get something like this that
1:09:49
you can't compress so this is going to go back there where the tray is
1:09:55
and when I put the wood over it and the tray goes on top the bolt
1:10:01
that goes through this and this is now going to be metal to metal to Wood and
1:10:07
I'll be able to bolt it down and it's going to stay where it needs to
1:10:12
be it's not going to keep compressing a piece of foam it's going to be compressing a piece of aluminum
1:10:20
so that's a long-winded way of saying you know
1:10:26
find out stuff in your stuff in a van I'm really big about safety so if
1:10:31
there's a safer way to do it that's the route I'm going to take um
1:10:36
you could just put everything down and not use this it's okay but for example the slide out tray
1:10:43
if you just say you have a Dometic cooler on it you have all your camping
1:10:48
gear but the tray is just bolted into this one piece of wood on your van right
1:10:56
so if you pull out the full extension there's a lot of Leverage on this wood you're wanting to rip it up off the
1:11:03
floor or the bolts out so I'm doing this so that
1:11:11
there's no way it's coming out we're using grade 8 bolts to bolt it in the
1:11:16
back so that Leverage is not there anymore uh or it's there but it's not it's held
1:11:23
down anyway so just kind of think about that if you're putting in a flip and fold seat or any type of seating you know be
1:11:30
wary when it's bolted directly to the wood because uh you know foam is
1:11:36
compressible and you want to make sure that it's
1:11:42
metal to metal that's that would be the the way you want it to uh in a perfect
1:11:47
world okay so uh
1:11:52
let's see here any questions it looks like we don't have any questions
1:11:59
all right guys this uh is pretty much these beginning
1:12:04
tutorial on this floor system I hope all the stuff made sense to you if it
1:12:09
doesn't put those questions in the comments I'll be happy to answer them we will be
1:12:16
continuing this process uh every night I will try to hop on here
1:12:22
get something prepped to where I have something kind of prepped to show you for a live stream
1:12:28
live streams are fun but I do need to make sure that I have all this stuff ready so that you know it's entertaining
1:12:34
for you guys it's not me running around the shop getting materials although that happens but
1:12:40
this is the first part we're gonna do the same thing three times so we got a second section back here that's going to
1:12:46
be killmat sound deadening we have a third we'll come back put our vinyl strips in and we'll just
1:12:52
kind of do start piece by piece this will be a time lapse to cover the
1:12:58
stuff that you guys aren't going to be able to see that way you can keep up with the whole process I know someone was asking in the comments where other
1:13:04
videos on this build and they are in the live streams if you go back
1:13:09
you know a couple weeks ago they're there they're just long format but we'll do shorter time lapse for the
1:13:16
main video so the floor will be in this week
1:13:22
Monday the one inch spacer from DIY van comes in that's going to allow us to complete
1:13:29
our Dometic RTX 2000 install which will be great
1:13:34
once we do that we got the floor in we're going to go to
1:13:41
we already did the we'll probably going over and getting that power system in because it's so beefy and so heavy
1:13:48
and we'll start running our lines to it and then we'll kind of just keep going from there we have to upholster this
1:13:55
window frame over here from Adventure wagon right behind me the marathon fabric
1:14:02
finally came in is on back order for uh four months if you can believe it
1:14:08
so yeah everything is uh going really well and I'm really excited to show you guys
1:14:14
the final product I know if you guys have been a long time before you're you've been wondering when this van is going to get done we've been traveling
1:14:21
to shows uh in the middle you know we worked on Thomas's van which was an incredible
1:14:26
build that van is decked out like crazy um
1:14:31
so that was a really fun way to uh kind of see the capabilities the amount of like Baja design lights the electric
1:14:38
awning that was self-supporting 550 watts of solar on the roof to Max fans
1:14:45
ARB air compressor uh pretty much the premise that works in
1:14:51
that van but this will be kind of the theme going
1:14:56
forward with the live stream so hope you guys enjoy it and uh I'm gonna be on here for just a couple more minutes let
1:15:02
me know if you guys have any questions I saw a couple more viewers come on for the live stream uh I'll just do a quick
1:15:08
recap for the the new guys that just came on the live stream
1:15:13
uh every night we're going to be doing a little update on this build we have a deadline we've got a three week deadline
1:15:19
we're gonna knock this build out finally right now it's just the detail stuff we
1:15:24
got the floor a little bit of wiring our power system has already been built off
1:15:30
on the bench it's just going to be disassembled and brought back in here yesterday we finished uh our final two
1:15:37
holes for our 40 gallon water system so those are last floor penetrations that
1:15:43
we needed to do today we went ahead and rust prevented everything we installed killmat on this first section kind of
1:15:49
showed you how to start that process why it's important some products little tips we have this
1:15:57
little PVC vinyl strips that help level the floor out
1:16:02
um we talked about the formula 150 R5 insulation that we're using here then we
1:16:09
have our half inch plywood and we're just kind of going from there
1:16:14
we're going to be using lawn seal for the flooring of this van extremely durable but we're going to use that has
1:16:21
an epoxy process so it's a little technical we already have a video
1:16:27
where we showed how to do that process on Thomas's van the challenge with that
1:16:34
epoxy process is you have 30 minutes from when you mix part A and B it needs to sit for 15 minutes and do
1:16:42
its little reaction and then you only have 15 minutes to coat the whole van
1:16:48
so I don't want to say I developed a process but I put together something that helped me get it done
1:16:55
one with a tip from somebody who put a screw in the top and a screw in the bottom right down the center
1:17:01
and that allowed them to fold it over do one side kind of peel it back over do
1:17:08
the other side and believe it or not I set a timer for seven minutes so
1:17:15
when the first timer went off I knew I had to get over here and I had seven more minutes
1:17:21
I know it's technically seven and a half but um seven minutes goes by very quickly so
1:17:28
you guys will get to see that as well I may even do that on a live stream that'll be pretty pretty fun to watch
1:17:35
uh but yeah once we get the floor in if you guys have seen previous stuff you know we have the kitchen guys already
1:17:40
been modified it's ready to go the flip and fold seats ready to go the isotherm Cruise 130 fridge the
1:17:49
aluminum shell for that it's already been modified and powder coated it's all
1:17:55
set to go so this stuff's just going to pop in overhead cabinets and shelves and stuff
1:18:00
like that so yep that's what we're doing let's see we got a question here from Edward
1:18:07
lap joint and glue for the ply seam metal sleeve thickness
1:18:14
of the foam on the bolt see here I'm trying to do this step by
1:18:21
step so lap joint and glue for the ply seam
1:18:27
um so right here uh yep so everybody if you just came on uh
1:18:33
the cool part is we did cover that so I'll tell you exactly what we did
1:18:40
what we're doing to take care of this seam so the glue for the seam
1:18:46
first what we're doing is we have our foam
1:18:51
we're just gonna you know straight up make a mark cut off the material we need
1:18:58
to remove from the foam put this in its place we're going to use Marine adhesive
1:19:04
to glue this to the body of the van that is going to give us our transition
1:19:11
seam we're going to do the same thing for our second piece of wood that goes right here
1:19:17
and now this two pieces of one inch aluminum is going to allow us to have
1:19:23
this flat median surface so that when we have our wood come over here we'll countersink that
1:19:30
wood uh we'll countersink it into one piece of the aluminum the second panel
1:19:35
will come here and that'll also be countersunk now that gets us like 99 of the way
1:19:42
because we have a solid surface both pieces of wood have a clean seam
1:19:49
yeah they're mounted super solid so they're not going to flex over time
1:19:55
and then the icing on the cake which I'm hoping this is going to answer your question is the glue for the pricing so
1:20:02
we're going to be using epoxy a two-part epoxy from lawn seal and that is what is
1:20:09
designed with the flooring to have it adhere to the wood
1:20:14
I did miss something before we do that we are going to treat the floor with
1:20:20
this stuff called sticks it's made by Benjamin Moore
1:20:25
and actually Sherwin-Williams I don't know why I said Benjamin Moore Sherwin-Williams
1:20:31
so this product right here is a urethane acrylic it's a bonding
1:20:36
primer it's specifically made for uh coating a wood surface
1:20:43
so that it can accept an epoxy adhesive
1:20:48
so this product right here I'll show it on the camera close up this
1:20:54
is what this is what I'm using it's expensive but it does the job I
1:21:00
think it's like 70 dollars a gallon 65 or something like that so that'll coat the wood first and then
1:21:10
we'll trowel after that you know cures we'll Trail on the epoxy put the epoxy nice and thick on the
1:21:16
joint and then that is what is going to kind of glue is the glue for the ply
1:21:23
seam technically um the metal sleeve thickness so I'm
1:21:29
assuming you're asking the gauge of this aluminum it's thin
1:21:35
um I think it's 16th of an inch it's you know from Lowe's
1:21:41
uh it's not like quarter inch or anything like that I would say that's Overkill just in my personal opinion
1:21:48
this is 16th of an inch and I think it is it's fine it's gonna work just good I actually use
1:21:55
the same wall thickness to make the solar frames up top and
1:22:01
they're extremely strong uh sleeve thickness of the foam
1:22:08
the foam is one inch um
1:22:14
on the bolt I'm not sure that last part of that question so
1:22:22
yeah let me know what you mean by thickness of the foam on the bolt
1:22:46
see any more questions yeah and I'll wait just a minute Edward to see if he can uh just give me a
1:22:52
little bit more info on what you mean by that last part
1:23:01
yeah so that is uh that's kind of the plan for this floor
1:23:06
and if you guys have any more questions put those through we're going to wrap it up here pretty shortly
1:23:16
the nice thing is uh what also adds to the speed is this is it's an adventure wagon interior conversion kit if you
1:23:22
guys are wondering why there's this Orange kind of Steel structure in here so that's what they call their A-frame
1:23:29
and that is what allows this kit to be installed so quickly
1:23:34
uh Now quickly is an interesting term because
1:23:40
it takes a while to install the A-frame there's tons of rivets the whole entire frame is riveted
1:23:47
with plus nuts into the frame or the walls of the van
1:23:55
but once you get that in all the panels are upholstered
1:24:01
except this one because traditionally there's not a window here
1:24:07
so this is something that I'll show you later I kind of did a modification too
1:24:13
but everything else is kind of plug and play Let's see what Edward said uh suggestion alternatives to join ply
1:24:22
seam and the bolt sleeve to stop foam compression
1:24:27
gotcha gotcha yes lab joint I know okay I know exactly
1:24:33
what you're talking about so uh and Cricket if I'm wrong Edward
1:24:38
but yeah leftjoin is also a good idea so and yeah correct me if you're I'm wrong
1:24:45
Edward but if you uh router down this half inch so let's say
1:24:52
you routed it down a quarter of an inch you did the same here but the opposite direction and you could
1:24:59
lap that joint that would be flush I do like I I was
1:25:05
considering doing that first but then I saw this aluminum method and
1:25:12
from Hummel Road and I wanted to try it out because uh I liked how I was grabbing going and
1:25:19
grabbing into metal but that lap joint
1:25:28
see here yeah but that lap joint is a good idea
1:25:34
let's see what else here bolt for the chair Etc
1:25:44
yes so uh a metal sleeve I've used that in some other applications
1:25:51
where yes so I have metal sleeves for
1:25:59
the seat because of that corrugation that will bump up so I have a
1:26:07
see how big is that I don't think it's 7 8 or something like that but it's a yes
1:26:13
it's like a collar that goes in the bolt to keep everything nice and level
1:26:19
um so you could do that too uh Home Depot actually makes them believe
1:26:25
it or not they make these Chrome uh sleeves these Chrome sleeves and I've
1:26:33
used them on when I needed to space bolts on the solar panel
1:26:38
as well as some other things but they're these Chrome sleeves so you can get them in quarter inch half inch three quarter
1:26:44
inch and you put that sleeve on there and then you get some uh you know greater surface area so stuff
1:26:51
is not plunging through so Edward that's a that's a good good point
1:26:56
uh yeah so sleeves for the chair I am using that so that is how that problem
1:27:01
is solved not because of the floor but because of that corrugation that bumps up and doesn't allow it to be perfectly
1:27:08
flat but it's definitely the same thing you're talking about the lap joint for the wood I like that
1:27:14
uh I think if I was more patient I would maybe do the router method but
1:27:22
um I'm already using the aluminum tubing for that back end
1:27:29
uh I I'm not going to use it for this seam and that seam because they're both
1:27:35
going to be underneath the kitchen galleys so they'll never be seen not that that's
1:27:43
not important but this this whole seam as it's really busy
1:27:48
over here so we have the fridge we have the in floor shower pan and then we have the other kitchen
1:27:55
gallium over over here so everything is just covering in on top of that seam so it's
1:28:01
um not an issue but going backwards we have three bars for our pull out slide out
1:28:09
straight and we'll definitely cover that as we get closer to finishing that up
1:28:20
and I just noticed one thing I think I'm going to have to use a Edward's method
1:28:26
on the back because I have a dip in the floor so even if I use this I'm still going to have to have
1:28:33
a spacer underneath it because the corrugation goes away so
1:28:39
yep that's why I love our subscribers and viewers because that this uh this is how we
1:28:45
solve problems so let's see
1:28:56
yeah yep so 80 20 has gotten so expensive two years
1:29:02
ago maybe three years ago I put an order in and it was reasonable
1:29:09
um and then it went up but now
1:29:15
I'm gonna have to go to a previous live stream there was a viewer
1:29:20
that told me about another website that makes 80 20
1:29:25
brackets or like angle brackets I completely forgot what it is
1:29:31
but it's almost half price have I found any cheaper cheaper
1:29:38
alternatives Okay so
1:29:44
this van um this is a really good topic to get on tonight
1:29:50
this van obviously is uh
1:29:55
it's a very high-end build you know you have the adventure wagon interior system you've got all the 80 20
1:30:02
components uh you know we've got 600 amp hours of battery we've got the Dometic
1:30:08
RTX 2000 40 gallon water tank so I completely understand especially with
1:30:13
the kitchen galleys you know this is uh you know more expensive so I'm glad that's being asked right now
1:30:19
because so this is a spec build for my van build
1:30:25
business so this is more of a Showcase of capabilities of the van so as far as the DIY part building it is
1:30:33
really good information from DIY um but uh
1:30:39
Drake just like you were saying you know completely understand that that stuff is out of price range very expensive
1:30:46
So my answer to that would be what I was thinking about doing uh
1:30:52
before this build and that is uh
1:30:58
Square aluminum tubing and there's a builder it's a off-grid
1:31:06
Solutions PDX you probably watched them Jared Tachi does uh has done some interviews with his shop
1:31:13
and he's an aluminum welder and he hand welds all his frames in the band so I'm
1:31:19
not saying you need to weld the frame but that's something I wanted to do that way I could kind of still get that
1:31:25
strength and structure but if you really are on a budget
1:31:31
and you want to build a van
1:31:39
you know you can build stuff out of plywood my my Mantra here at Odyssey custom vans uh
1:31:48
I don't want to use plywood for my customer builds but my personal van it's
1:31:53
all plywood the whole the whole entire van everything is made from Plywood And I love that van I've had it for almost
1:32:01
you know almost over three years and I've taken on trips I love there's nothing wrong with it
1:32:08
but when you do use plywood you really have to just keep safety top of mind I
1:32:14
have no problem with anyone building plywood builds because I built it because you know
1:32:21
I'm not going to buy all that 80 20 for my personal build and uh because it is expensive and it's
1:32:28
expensive if you cut it wrong too so I don't think there's anything wrong with plywood just make sure always keep
1:32:34
safety top of mind when you're building it always think of you know you know get
1:32:40
into an accident and you know something splintering that type of thing I know that's kind of a
1:32:47
a down note but you know you're driving a vehicle on the road on the highway
1:32:53
you can build a wood build safe you just got to make sure you think about you
1:32:59
know the cause and effect so when I was building my personal van
1:33:04
um I built everything in sections and I made sure that there was kind of like
1:33:09
intermediary things to keep things from shifting so for example I put a toolbox in the van but the
1:33:17
toolbox is bolted in rivnut into the frame of the van
1:33:22
and that protects me the driver from the rest of the build in the event of an
1:33:28
accident then I have a partition that's bolted to the toolbox and that protects me protects my
1:33:35
head if anything happens and then everything throughout the build
1:33:41
has little angle brackets bolted into the structure of the van so if I hid something
1:33:46
's really going to move or if something does break and fail there's something else that's going to allow it to absorb
1:33:52
it or protect me so that just me personally that if you
1:34:00
want to do a build from wood wood cabinets would would structure
1:34:06
as long as you're doing it safely and you're thinking about vehicle driving 75 miles an hour on the
1:34:12
highway always kind of think of that in mind don't think of you're at a campsite and
1:34:19
hanging out think of the the to and from because I want everybody to be as safe
1:34:26
as possible
1:34:37
you see here I looked at aluminum roof rack mount kit
1:34:48
yeah I mean some sometimes I I think about you know
1:34:55
what if I just built roof racks and sold them because it's not it's not like a Cost Plus
1:35:01
materials type of thing these days it's uh it's like a Cost Plus materials plus 50
1:35:08
markup or something like that it's it is it's very expensive so
1:35:14
oh if you guys want a DIY roof rack on my personal build
1:35:21
I need to bring the personal Bill back on the channel um I've been doing all this and I've just kind of
1:35:26
you guys haven't even seen it the one of the First videos that I did on this channel
1:35:32
was uh the tour of my van and uh maybe I need to bring it back
1:35:38
because it's it's really good it's it's stuff that I needed to find at Lowe's to make my van work so the top of
1:35:45
my van what I did is I used two uh pieces of Unistrut
1:35:51
our super strut and Unistrut if you guys know that's just what they mount
1:35:56
electrical boxes to on warehouses but if you do it horizontal you can use all the
1:36:03
spring couplings and stuff and it makes a really awesome roof rack it's very heavy but it's extremely cheap
1:36:10
so two pieces of Unistrut for half size unit struts across and boom
1:36:18
you gotta you got a roof rack
1:36:28
oh welded yeah yeah
1:36:35
so Drake welded everything to the floor okay you have surpassed me I've I've not
1:36:42
I don't think I'll weld stuff to the floor but if it's welded to the floor you've got my stamp of approval it's not
1:36:48
going anywhere
1:36:58
so the rivets uh that I use their Riv
1:37:04
nuts or plus nuts so I actually have like a hydraulic
1:37:10
drill attachment and when it goes in it mushrooms on the back
1:37:16
and then you unscrew it and it the threads remain so that's how this whole entire Adventure wagon build is is done
1:37:24
and uh it's pretty impressive because I didn't mess up on any of them I had to
1:37:31
chase the threads on a couple but I don't ever see how those those things are coming out if you do them right
1:37:39
um so Riv nuts I think are really I think that's a really good
1:37:44
um rev nuts are good
1:37:50
but regular rivets uh no so any like aluminum rivet
1:37:55
so these rivets that I use they're they're Steel steel rivets
1:38:11
yeah but it's I mean if you're using wood for the build just just be smart just always consider that
1:38:18
you know you're driving the van on the highway and if somebody cuts you off you know
1:38:23
how is your van going to react um same thing on the roof
1:38:29
there is a limit to there's a static load for the roof
1:38:34
uh then there's a dynamic load for the roof so static is if you park your van it's
1:38:41
not moving you know you can put 400 pounds up there but a dynamic load for the Ford transits
1:38:48
I actually looked this up the other day let me get that number
1:38:54
let's see here
1:39:00
where is that Dynamic load actually the dynamic load for
1:39:11
the Ford Transit is 220 pounds so when I when I get uh
1:39:19
when I get the roof all finished up then it's going to be
1:39:25
214 .6 pounds so I'm right at just almost
1:39:31
right under the limit about six I got five pounds to spare
1:39:37
when I get this roof done and so my roof is uh
1:39:43
it is the RTX 2000 Dometic RTX 2000
1:39:50
Max fan uh do we have the Flatline vanco roof rack
1:39:57
then we have we just got ordered the 220
1:40:03
220 Watt solar panel for the middle and then we got two additional 100 watt panels and
1:40:10
so all that together uh is a lot
1:40:19
yeah rivnuts I I really like Riv nuts um there's a thing called a rivnut
1:40:24
adapter and that thing is really really cool so it's on the DIY checklist
1:40:32
um so check out that checklist it is I mean uh the DIY van build cheat sheet it's on
1:40:38
the DIY van build cheat sheet that rivnut gun
1:40:43
but yeah solar panels are 66 pounds roof rack is 64 pounds the Dometic AC is 64
1:40:49
pounds and the max fan believe it or not it's 20 pounds so
1:40:56
yeah really you know just think just think safety
1:41:13
that's awesome yeah I uh back in the day I had a Chevy S10 Blazer
1:41:21
that I shaved the roof rack um it was a custom car but I shave the
1:41:27
roof rack and I didn't have a welder to weld in those holes so I bonded it and obviously
1:41:34
cracked a little ring but yeah there's a
1:41:42
it sounds like there's nothing getting in that that roof not coming off
1:41:47
if you welded all that that's pretty awesome
1:41:54
yeah in the future I do want to use one inch tubing to weld
1:42:00
kitchen galleys and stuff together because uh I like doing the spec build as far as
1:42:06
pre-made cabinets that go in because the speed is really quick but
1:42:12
uh the dimensions are not what I would like so I have to kind of
1:42:18
so it's like a little it's a give and take
1:42:23
yeah I bet it took a long time
1:42:30
see here
1:42:52
damn what kind of van do you have Drake
1:43:06
if you say gutter I'm guessing it's like a E350 or something like that
1:43:35
oh Sprinter okay oh yeah that has the gutter yeah I got you I got you
1:43:50
see 2008.
1:44:04
nice
1:44:22
so I'm assuming you painted it is uh does it rust really bad or did you just kind of like forget it and just let it
1:44:27
do its thing because angle iron is really good to
1:44:33
weld and it's easy to weld and work with but I know the elements don't don't like it too much
1:45:00
oh poor 15 yeah yeah I was thinking about using that uh I
1:45:06
think I watched a video I've got a 1999 KLR 650 motorcycle
1:45:12
and I've got to redo the inside of the tank and I think I saw a YouTube video where somebody did the the poor 15 method on
1:45:19
the inside we've got some pretty good results
1:46:04
yeah that's the thing is prepping any type of metal that's that's where that's where all the work is
1:46:11
can't have any rust on there just messes it up
1:46:18
yeah that's why I do that's why I do like using the aluminum for all the roof racks and stuff like that
1:46:24
but I completely get it you know if you got to go to the angle iron it does
1:46:30
it does add a a bunch of work to get it nice and weatherproofed
1:46:42
all right guys it's getting late here on the East Coast so uh got time for like one more question here
1:46:49
and then we are going to uh drop off and uh we'll be back tomorrow we'll we'll
1:46:54
see how much we can get done uh tomorrow at in the shop uh before the live stream
1:47:03
and then we'll just keep on trucking but um you guys wanted to uh
1:47:10
well thank you guys for sticking around for the live stream tonight um again we'll finish this floor up we
1:47:15
got some more stuff coming through tomorrow and uh yeah hopefully throughout the weekend we'll go ahead
1:47:20
and get this uh floor system put in because yep clock's ticking we got to get this system in the
1:47:27
power system the water system and then we'll start all the other fun stuff so uh yeah
1:47:35
Drake appreciate all the questions and uh guys if you have any future
1:47:41
questions or you have somebody that might made this video share it to them make
1:47:47
sure you guys are subscribed to the channel give us a big like here and uh we look forward to uh or I look forward
1:47:53
to seeing you guys and the next live stream
1:48:01
[Music]