Up next in 10

Learn how to create an amazing domino run with Spiral shape form, along with tips and tricks which can help you in learning Blender. This is a step by step tutorial which will guide you in detail. You will also learn which mistakes to avoid. This tutorial is easy and quick to learn.
No prior experience required! Follow along, and you'll be mastering the art of domino animations in no time. Don't forget to like, share, and subscribe for more Blender tutorials!
🔔 Subscribe for more Blender tips and tricks: https://www.youtube.com/@usamababar4522
#BlenderTutorial #DominoRun #3DAnimation #BlenderBeginner #DominoEffect"
Show More Show Less View Video Transcript
0:00
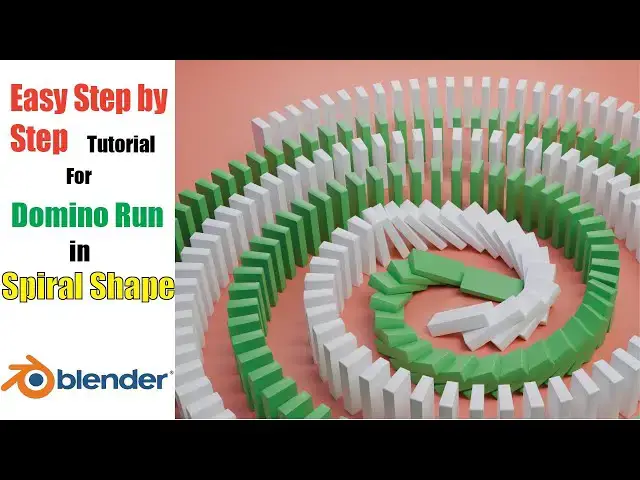
we will be making a domino run just like
0:03
this
0:04
one we will be using rigid body physics
0:07
to run this simulation open blender and
0:10
delete
0:13
everything next add a plane and make it
0:16
big by pressing s key while selecting
0:18
the
0:20
object we will start by making a single
0:22
Domino by using a cube add a cube by
0:25
clicking add mesh Cube scale the cube
0:28
using S key and then pressing X Y or Z
0:31
key to scale them in respective axis
0:35
press numpad dot to focus on the
0:37
selected object go to edit mode select
0:40
all the vertices by pressing the a key
0:43
and bevel the Domino using control plus
0:45
b Keys use Mouse scroll to adjust number
0:48
of Loops in the bevel this will help us
0:50
give a smoother shape to the Domino then
0:53
in the object mode press right Mouse
0:55
button and click shade smooth for a
0:57
smoother look we will be making our
0:59
Domino r using a helical curve and array
1:02
modifier we see that in the curve menu
1:04
we don't have many options we can
1:07
install an extension for adding extra
1:09
curve options by going to edit
1:11
preferences in the get extension section
1:13
we can install extra curve by searching
1:16
and clicking
1:18
install now click add mesh curve curve
1:23
profiles and select
1:27
Helix we need a 2d spiral make the
1:30
changes by expanding curve profile
1:32
option in the bottom
1:34
left change the height to zero it
1:37
becomes a 2d Circle we can expand it by
1:40
changing the
1:42
width to make a spiral form we can play
1:45
the variables in the menu to further
1:47
enhance it we can even change the end
1:51
angle spread The Dominoes along the
1:53
curve first add a curve modifier by
1:56
going to modifiers Tab and select add
1:58
modifier generate
2:02
array change the count to have multiple
2:04
dominoes and change the distance between
2:10
them add a curve modifier by clicking
2:13
add modifier to form curve select the
2:16
curve that we just made so that the
2:18
dominoes follow the spiral curve The
2:20
Dominoes follow the curve but they don't
2:22
fill it to fix this in the array
2:25
modifier you need to change the fit type
2:27
to fit curve and then select the curve
2:29
you want
2:30
this still doesn't solve our problem
2:33
scaling of dominoes is not accurate
2:35
because scaling the object in object
2:37
mode affects the scale press n key and
2:41
check the scaling it should be one for
2:43
all
2:44
axes to fix this press contrl a and
2:47
apply
2:50
scale this fixes the problem and now we
2:53
have multiple domino in the shape of a
2:55
spiral add rigid bodies for Domino
2:58
simulation go to physic Tab while the
3:01
Domino run is selected click rigid body
3:03
to add and change the
3:07
mass just for fun we're going to add
3:09
another Domino run that will run by its
3:11
side just repeat all the steps you did
3:14
before duplicate the curve and rotate by
3:17
180° on the
3:24
z-axis similarly duplicate The Dominoes
3:27
and change the curve and modifiers to
3:29
the duplicate one the duplicated
3:31
Dominoes on the duplicated curve are on
3:33
the opposite
3:35
side we need to fix the rotation by
3:38
selecting the curve press CR a and apply
3:42
rotation some of the dominoes are too
3:44
close to each other adjust the curve to
3:47
maintain distance you can select the
3:49
curve from outliner on the right
3:52
side we have perfectly placed the Domino
3:55
run with each
3:57
other apply material from the materials
4:02
tab as you can green and white
4:05
combination is used for the Domino run
4:08
since we have successfully applied rigid
4:10
bodies we can try to run the simulation
4:12
and see what happens simply press
4:14
spacebar key to run the animation we
4:17
seem to get a weird animation because
4:19
blender is treating the Domino run as a
4:22
single object when there are multiple
4:24
dominoes there we need to separate each
4:26
Domino from the both runs first apply
4:30
all the modifiers on both objects then
4:33
select the object and switch to edit
4:35
mode by pressing Tab
4:37
Key make sure to select everything by
4:40
pressing the a
4:41
key now press the P key and choose by
4:45
loose parts now all the dominoes are
4:48
single objects do the same with the
4:50
other
4:51
run right now all the dominoes have a
4:54
single origin point which is not optimal
4:56
for the animation select all the
4:58
dominoes press right Mouse button and
5:01
click set origin origin to Geometry this
5:04
way each Domino will have its own origin
5:08
Point as you can see from the orange
5:10
points that each Domino has its own
5:13
origin
5:14
point to initiate the rigid body
5:16
animation we're going to manually tilt
5:19
one of the Domino so that Domino run
5:21
starts this will be done on both Domino
5:24
runs zoom in on the Domino you want to
5:26
tilt and press the AR key from different
5:28
angles and viewport to tilt the block
5:31
you can expand the plane so that
5:33
rendered video can capture all of the
5:36
floor make sure you timeline cursor is
5:38
at frame zero press space bar key to run
5:42
the
5:43
simulation we see that dominoes have
5:45
passed through the ground this is
5:47
because the ground is not a rigid body
5:50
select the floor go to physics Tab and a
5:52
rigid body change the type to passive
5:55
since it's going to be stationary and
5:57
will be acting as a ground go go to
5:59
frame zero press the space bar key again
6:02
to run the simulation again the
6:05
simulation will run correctly if you
6:07
have followed all the steps
6:10
carefully you see that the animation
6:12
ends at frame 250 because that's the end
6:15
limit for the timeline animation you can
6:18
extend it to your
6:19
requirement you see that timeline keeps
6:22
going but the simulation ends at 250
6:25
this is because in the rigid body
6:26
settings the cache limit is 250 you can
6:29
change it to your requirement go to
6:31
scene settings rigid body World
6:35
cache the animation can now run beyond
6:38
the 250 frame limit remember you need to
6:41
change in frame limit in the timeline
6:44
and rigid body cache for this to work
6:46
you don't necessarily to go to an
6:48
extreme for the end limit as from this
6:50
scene we can see we only need the end
6:52
limit of 450 frames so adjust
6:55
accordingly otherwise the rigid body
6:57
scenes can be heavy on your system
7:01
next we will render the scene for that
7:03
we need a camera and a light I will not
7:05
go into details on how did I set up my
7:07
lighting for this scene it is just a
7:09
simple three-point lighting system that
7:11
illuminates the scene well in my opinion
7:14
before rendering make sure that lighting
7:16
is proper and The Dominoes in your
7:17
scenes are not exploding if they're
7:20
exploding or not behaving properly you
7:22
might have scaled them too small make
7:23
sure they're big blender doesn't do well
7:25
with small objects when it comes to
7:27
rigid bodies for rendering go to Output
7:30
properties in the right side you can
7:31
change the output form of your render in
7:33
my case I am rendering an MKV file you
7:37
can also render an image sequence and
7:39
then composite it into a video finally
7:43
click render and then render animation
7:45
to render your scene thanks for watching