live_tv
Livestream Starting Soon
00
Hours
:
00
Minutes
:
00
Seconds
Up next in 10

Installation of Eclipse IDE
Show More Show Less View Video Transcript
0:00
in this video we are discussing
0:01
installation of Eclipse ID
0:04
so we shall show you that how to
0:06
download how to install this Eclipse ID
0:09
and not only that our video will be
0:12
associated with one practical
0:14
demonstration so that you can feel
0:16
better and do the same on your system
0:19
also Eclipse IDE download visit this
0:23
link and download the Eclipse IDE for
0:25
the Linux version so the link is given
0:29
in front of you we are supposed to
0:30
select the respective linux version and
0:32
here you can select this 64 bit also and
0:35
then download the tar dot G jet file so
0:39
file you will get downloaded onto the
0:41
default download folder so now Eclipse
0:46
IDE installation so only do you have
0:49
downloaded but we are starting with the
0:50
installation process extract the
0:52
downloaded dot dot G jet file so now you
0:55
can do that r dot G jet file is there in
0:58
the download folder go for the right
1:00
click and then go for extract here go to
1:06
the eclipse directory after after
1:09
extraction go to the Eclipse directory
1:11
and then Eclipse Installer open it and
1:15
rhonda eclipse - i n st this is the name
1:20
of the file eclipse - i n st file so you
1:22
should click on that Eclipse - - T file
1:26
to start the installation process
1:30
eclipse ID installation next step so now
1:34
download the Eclipse IDE for Java
1:36
developer because in our coding we'll be
1:39
using the language Java so select this
1:41
option that is Eclipse IDE for Java
1:44
developer so Eclipse IDE for Java
1:46
developer and then install it into the
1:49
default location and it will ask you to
1:52
accept the License Agreement accept it
1:55
and continue with the installation
1:57
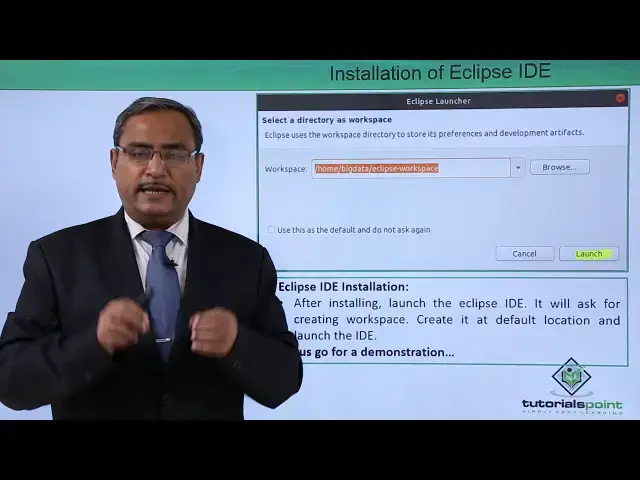
process Eclipse IDE installation next
2:03
step so after installing launch the
2:06
Eclipse IDE and it will ask for creating
2:09
walk stress where the our respective
2:12
Java projects will be safe
2:14
so create it at the default location or
2:16
you can give some other locations also
2:18
and launch the ID as well so in this way
2:22
these are the steps you see it is asking
2:24
for the workspace and then you can
2:26
browse it you can go for other locations
2:28
otherwise you can select this default
2:30
workspace and that that I have done and
2:33
now the installation process will be
2:35
completed so let us go for one practical
2:37
demonstration to give you the idea that
2:39
how this installation will be doing in
2:42
practice in actual in this video we are
2:45
going to discuss that how to load
2:47
eclipse in our system so at first we are
2:50
going for that URL that is a w double
2:54
double dot eclipse.org war G and here
2:57
you are selecting the option download
3:01
select in 64-bit version then Eclipse I
3:07
NSD Linux 64 that respective file is
3:11
getting loaded we are going to for the
3:13
saving and then we are going for this
3:16
okay and here you can find that the file
3:20
is getting downloaded the respective
3:22
progress is being shown and to see the
3:25
status also you can click on this
3:27
download icon you can see the respective
3:30
status Eclipse I in St Elena's 64 dot
3:34
dot dot G jet is the name of the file is
3:37
getting downloaded the file has got
3:40
downloaded in the download folder so
3:42
these are respective folder we have got
3:45
it now let me create one target folder
3:48
here so under this home we are going to
3:50
go for new folder giving the name as say
3:53
Eclipse and then from here we are going
3:57
for ctrl a and then we are dragging it
4:01
to the target folder so all files have
4:05
got copied now you are executing the
4:08
executable one Eclipse - i NSD the
4:12
respective file is getting executed
4:14
which is nothing but eclipse installer
4:17
here
4:23
so Eclipse IDE for Java developer is
4:26
option which we are going to select now
4:29
now she'll click on the install and the
4:31
default folder is there we are sticking
4:33
with the default folder otherwise we can
4:35
change the respective folder here so now
4:38
it is in installation
4:41
now remember accepted licenses and then
4:47
you shall go for the accept installation
4:51
is now in progress you can easily view
4:53
on the screen now the installation has
4:59
got completed we are going for this
5:00
launch option so eclipse photon is
5:03
getting loaded the version is for June
5:06
2018 so let us execute one HelloWorld
5:09
program to show you that my clips
5:11
installation has got done successfully
5:13
here you see this is a default workspace
5:15
I can change it but I can stick with
5:17
this default workspace here going for
5:19
this launch option
5:31
minimizing that welcome page is the
5:35
welcome page is there so let us create
5:43
one Java project
5:51
so demo project the name of the Java
5:54
project we have given in for next going
5:59
for finish under this demo project we
6:04
are going for the SRC folder that is a
6:06
source folder there we are going for the
6:08
right click and we shall select the Java
6:10
class new Java class giving the class
6:16
name say demo class going for finish
6:22
making that main function to come
6:25
automatically it will get written by the
6:27
Eclipse IDE so demo class dot Java so
6:31
let us just put one sis out and then we
6:35
shall go for control space going for
6:39
this HelloWorld running the code now and
6:42
she'll get the HelloWorld get imprinted
6:44
indicates that successful installation
6:47
and running of the Eclipse IDE
6:49
so that is output we have got thanks for
6:52
watching this video
#Programming
#Java (Programming Language)
#Software
#Development Tools