live_tv
Livestream Starting Soon
00
Hours
:
00
Minutes
:
00
Seconds
Up next in 10

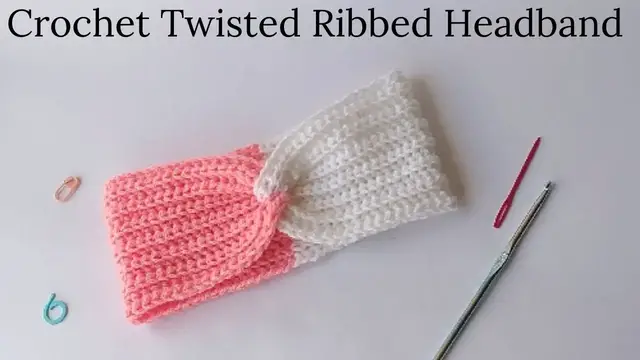
Crochet Twisted Headband - Knit Look Crochet Ribbed Headband
Oct 25, 2022

This easy crochet twisted headband looks knitted. It uses the Yo-slst to achieve the knit look. The headband fits size small adult. The headband has an X twist.
Materials
Worsted weight yarn in two complementary colors
5.0 mm crochet hook
Yarn needle
Stitch markers
The free written pattern is available on my blog at
https://toyslabcreations.com/2021/10/11/crochet-twisted-headband/
You can find the written pattern in my Ravelry and Etsy stores via the links below
https://www.ravelry.com/patterns/library/twisted-ribbed-headband
https://www.etsy.com/listing/1100434133/crochet-pattern-pdf-crochet-twisted?ref=shop_home_active_1
I would ❤️ to see your makes using this tutorial , you can tag me on my social media accounts
Show More Show Less View Video Transcript
0:00
hi everyone this is toyba from toy slab creations today i'm going to be making a twisted headband
0:17
the headband is going to be ribbed so for these projects i'm going to be needing 5.0 mm oak
0:22
and worsted with yarn in two colors so i'm going to be using pink and white i'm going
0:28
to start with my pink yarn so to start i'm going to make a slip knot and then make a chain of 37
0:39
so go ahead and chain 37 and i will join you at the end of my 37 chains
0:46
so i've made my 37 chains so now i'm going to attach my new
0:52
um yarn you know that the um the loop on the hook does not count as a stitch
0:59
so i'm going to continue my chains with the new color pooch so i'm going to be making
1:12
i'm going to be making 38 chains now now you can view the free written pattern on my blog or you
1:24
can purchase the pdf version just to support my work so the description the links will be in the
1:31
description box below so just guide and make it it change and i will join you at the end of my
1:35
38 chains so i've made my 38 chains you can see what my chain look like so if you if you like to
1:42
make any project i want to use multiple colors from the beginning so these are just how to
1:48
make your chains we are using multiple color now if you want to make this headband in just one color
1:52
just go ahead and chain 75 so now that i'm through with my 38 chains in white i'm going to skip
1:59
the first first chain from the hook and into the second chain from the hook i'm going to start my
2:05
yarn over slip stitch now to do this stitch against yarn over and set into the chain yarn over pull
2:12
through we have three loops on our hook then I'm going to put the we are going to pull the first
2:18
loop through the remaining two on the loop so it's as simple as that let me do some more time
2:24
yarn over go into the the next chain yarn over pull through we have three loops on our hook
2:32
pull the first loop through the remaining two So just keep doing that And I will join you when I about to finish with the white chains
2:45
Made 36 yarn over slip stitches. So to make the last one now
2:48
I'm going to yarn over, I'm going to insert my hook. So instead of yarn over, I'm pulling through this white yarn
2:57
I'm going to drop it and pull it forward because that's where I'm going to be knitting
3:01
the next, in the next row. i'll just drop it and pull it forward then i'll pick up my pink yarn and then i'll yarn over and
3:11
pull through i have three loops on my hook and i'll pull the first loop through the remaining two
3:19
so that i will do the last one i won't change color that i will change the color so then i'll
3:25
continue then yarn over again going to the first pink stitch from here
3:36
yarn over pull through three loops on my hook then pull the first loop through the remaining two
3:44
so just keep doing that till the end of the row and we also have 37 and was left just so
3:50
37 for pink 37 for white that's a total of 74 stitches so just go ahead and finish your yarn
3:56
over slip stitches with the pink yarn and i'll join you at the end of the row i'm about to end
4:04
the row i'm going to yarn over set my hook into the last chain yarn over which we have three loops
4:10
on our hook pull the first loop through the remaining two so that now we have 74 stitches
4:17
in total so moving on to row two chain one turn the channel does not count as a stitch now i'm
4:24
going to be working into the back loops only so yarn over and set your hook into the back
4:30
loop only of the first stitch yarn over pull through we have three loops on our hook pull the
4:37
first loop through the remaining two and we keep doing that to get to the point we are going to
4:44
change the color so keep working the yarn over slip stitches into the back loops only
4:51
and i will join you when i'm through with the pink yarn so i'm about to finish with the pink yarn i'm going to make the last stitch now so yarn over
5:02
and search your hook so i'm not going to be pulling through with this pink and i'm going to drop it
5:08
pass it on that hook and pull it forward that's why i'm going to be needing it on my next row so i going to take take the white yarn from the previous row now yarn over and pull through i have three loops on my hook now i going to pull the first
5:23
loop through the remaining two so then i'll continue with my white stitches
5:32
making yarn over slip stitches into the back loop only all the way across and i'll join you
5:40
at the end of the row. I'm through this row 2 now so moving on to row 3 chain one turn. Row 3 is basically the same thing as
5:52
yarn over insert your hook into the first stitch into the back loops only
5:57
Yarn over pull through after you pull the first loop through the remaining two. Just keep repeating
6:04
the yarn over slip stitches into the back loops only. So row 3 is basically the same thing as row 2
6:10
The only difference is that we started row 2 with pink yarn and we are starting our row
6:16
3 with the white yarn. So just go ahead with your yarn over and lift it until you get to the end of the white yarn
6:23
and I will join you at that point. When I am about to end the white yarn yarn over, insert your hook into the last stitch
6:34
Then pull this yarn under the hook and drop it at the front here
6:39
then pick up the pink yarn yarn over and pull through we have three lips on our hook
6:46
pull the first loop through the remaining two then we're going to continue with our yarn over
6:53
sleeve stitches and the pick in the pink yarn so basically i'm just going to keep
6:59
repeating rows two and three just changing colors is a one row repeat pattern it's just that we started row two with the pink yarn ended with
7:13
white then you would three with white yarn ending with pink so just keep repeating your yarn over
7:18
slip stitches in the back loops only till you get to row 14 so row 14 is going to be ending with
7:24
white yarn so just keep doing that and i will join you at the end of row 14
7:28
I made it to row 14 and this is what we have. I changed one and then cut my yarn and left a very long tail
7:36
I've attached my tapestry needle. This headband measures 4 inches. And then 19 inches across
7:48
so now if you if you like to make yours longer you can just add maybe two more rows to make like 4 inches but it going to be stretching so i don think that really necessary now to finish
8:07
up this headband this is the right side this is where i started my first row so i'm going to
8:12
be using this side as the right side so now i'm going to fold it in half with the right side facing
8:19
fold it this way i'm going to put this white in between the pink just about halfway
8:29
just like this and then i'm going to sew sew it up so pass my tapestry ninja
8:39
through the four of them and then i'm going to sew so i just got it and do that off camera just just to this point now
8:52
join you and i'm through with that now i've sewn it up we have this point and this point open
8:58
so i'm going to fold it and i need to make sure that it's facing like this i need to sew that part
9:06
option so this is where i left off so i just need to start joining from this end to this end
9:36
so i'm just going to sew this part up i'm going to sew it up to this end here just go ahead and do that and i'll come back to show you
9:59
what the final piece looks like i'm just sewing it up this is what it looks like so let me turn it
10:05
inside out i'm sorry let me turn to the right side so this is what the final piece looks like
10:12
so i hope you enjoyed this tutorial please remake this pattern tag me on instagram at
10:16
toyslove underscore creations i have to see my next tutorial thanks for watching bye
#Crafts
#Fiber & Textile Arts