Up next in 10


In this video, I unbox and do a quick test of the Satechi Pro SSD Enclosure & WD_Black SSD.
Check it out here
Satechi M.2 Enclosure - https://amzn.to/3QQTxYf
WD_BLACK SSD - https://amzn.to/3QVpWgi
Want FREE Shipping With Amazon Prime? Get a 30-DAY FREE TRIAL by signing up here http://www.amazon.com/tryprimefree?tag=chrisbarros-20
DISCLAIMER: This video and description contains affiliate links, which means that if you click on one of the product links, I’ll receive a small commission. This helps support the channel and allows us to continue to make videos like this. Thank you for the support!
Show More Show Less View Video Transcript
0:00
So I've been using the Samsung T7 Shields for a few years now and although they have pretty good
0:04
capacity I want even more capacity and that can get pricey so I invested in this SSD and SSD
0:11
enclosure this way I can upgrade it if I ever need more storage and this is going to be eight
0:17
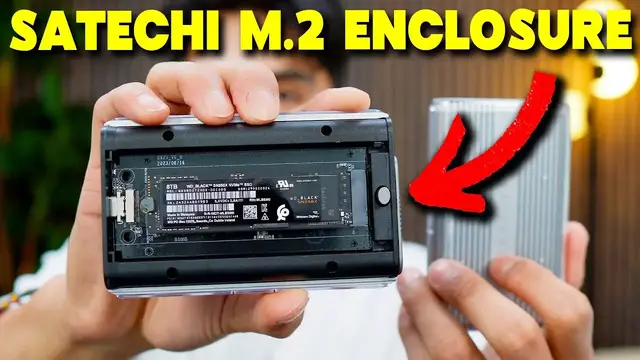
terabytes by WD and this is the Satechi SSD enclosure so I just want to do a quick unboxing
0:23
and give my first impressions of it. So here's the Satechi SSD enclosure and here's the USB-C cable it comes with
0:34
And right off the bat, I'm noticing that it does have this plastic enclosure all around it
0:38
followed by like the metal frame on the inside. And to open this up, it looks like I just have
0:42
to push this in like this and it reveals the inside. And this is where I can put my SSD
0:48
And then inside, actually there's already something in here. And that's the soft pad
0:52
which I'm not sure what this is for. But now let's move on to the actual SSD so I can put it in here
1:00
And here it is you got the manual and 8 terabytes of storage right in this little thing and to install this in the enclosure and to do so
1:10
Simply grab the enclosure and then put it like at a 45 degree angle shows like so and
1:18
Then give this a push down and Then there now you can see that the pins are fully inside here and then this can push just like so and
1:28
And now there this rubber piece and then I can rotate this just to lock it in place Just like so And before closing this up it time to grab that other piece that turns out this is thermal tape and this can be attached on the back like so So this is going to be the sticky side
1:50
It comes right off. And give it a good push. And there, now it's ready to close up
1:54
So right here you can see it's a techie and with this little thing here, that's where the slider should go
1:59
So I'm first going to start by closing it from the back side like so
2:03
inserting the hooks in the back like that and then giving it a push and there it'll lock into place
2:11
now this is ready to start using so i have my macbook crow and i want to attach it here to see
2:15
how fast the files transfer so there's like a little glue blowing indicator right here i'm not
2:23
sure if you can see that and then right here allow accessory to connect allow and let's see if
2:30
if something shows up. The disk you attached was not readable by this. All right, let me
2:34
check it. All right, so for some reason, it's not readable. So let me just try restarting
2:38
my MacBook to see if that helps. All right, so I'm not sure what's going on. But this
2:42
might have to do with the formatting. So I opened disk utility up. And here's what I
2:46
currently see. We can see that the capacity is currently eight terabytes. So it is a reading
2:51
it, I'm just not able to use it. So I want to go to first aid up top here. Run first
2:57
aid and then run it. And then basically see what happens there. Alright, so that's done
3:07
Now let me show the details. Alright, so it says operation successful. It still doesn't show up
3:14
over here though So let me go back and let me try something again So let see if I press erase format Alright so apparently with formatting if I go APFS this is only going to be for Apple But if I want Mac OS and Windows then EXFAT
3:33
And I want to be able to do both. So I'll keep it as that format. And I'll just label it as Chris AT for now
3:41
And I also have the scheme. So GUID partition map, master boot record, and Apple partition map
3:47
and it says GID partition map is best for Apple so I'll leave it as is and for most optimal
3:54
I should probably click APFS but because I also do want cross-platform compatibility
4:01
I'll leave it as XFAT so hopefully that won't slow things down too much and then click erase
4:06
all right done and let's see if this finally shows up yeah there it is so there it is chris 8t then we can double click this and then get info
4:22
and yep eight terabytes eight terabytes that's all good so now i want to see how long it takes
4:29
just to uh transfer over a file so my biggest file on my desktop would be this here
4:35
it's going to be 63.91 gigabytes again that's because most of my files is are already transferred
4:42
to some of these and let's see how long it takes to transfer 63 gigabytes
4:47
Hold it, drag it right here and ready, set, go. All right, it took 51.82 seconds
4:58
And now what I want to try doing is actually reformatting this again and seeing if I choose the other option if it going to be any faster than this So again let me go back to this utility Let me go to erase
5:12
All right, let me click Chris AT, then click erase. And then I'm going to format this to APFS
5:21
Erase. all right that's done and then going back over here you can see chris at is there
5:35
on get info and then i have the full eight terabytes again so now let me go to desktop
5:43
and then let me move over the file again and see how long it takes this time so again as a reminder it took 51.82 seconds last time
5:51
all right and it took 21.2 seconds this time so it's definitely a lot more faster a lot more
6:03
efficient again because that's made for mac so honestly i'll just keep it as this one i like the
6:10
fast and odds are i'm probably not going to be using this on a on windows because i just have
6:15
mac os so uh yeah i'll keep it as that and one more thing about this techie enclosure is that
6:19
the plastic part can come out pretty easily if I just put my nail right here and then pull it up
6:24
there it is so we get the full metal frame but I guess this provides a little bit more of a layer
6:31
of protection so I'll honestly just keep that there although just note because this is plastic
6:35
it definitely will scratch up I mean that really doesn't matter as long as everything inside is
6:41
safe but again yeah that's a quick look at the Satechi SSD Pro and the WD8 terabyte SSD
#Computers & Electronics
#Computer Drives & Storage