Up next in 10


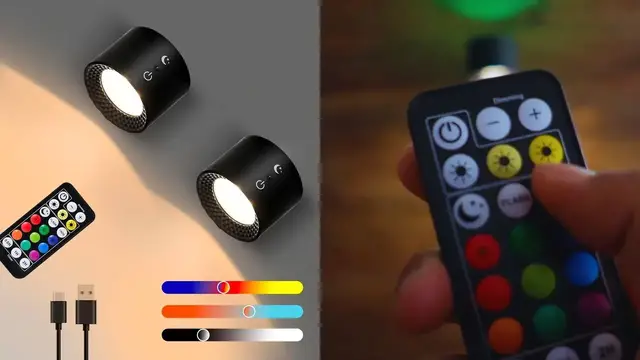
In this video, I review the DI MORE 2 Pcs UP&Down Battery Operated Wall Sconces — Magnetic Wall Lights with Remote Control, Wall Mounted Colors RGB Ambient Sconce, Dimming & Removable, Wireless Wall Lamp for Bedroom, Reading.
Check it out here: https://amzn.to/414tj8D
DISCLAIMER: This video and description contains affiliate links, which means that if you click on one of the product links, I’ll receive a small commission. This helps support the channel and allows us to continue to make videos like this. Thank you for the support!
Show More Show Less View Video Transcript
0:00
So, D-more sent me these LED wall scones
0:02
So, I just want to do a quick unboxing. Actually, go ahead and install these to see how well they work over here
0:08
Now, just taking a look at the box, they do say they're going to be magnetic, high capacity, and best of all, they are going to be USB-C
0:14
So, it's going to be real easy to go ahead and actually plug these in and charge them. Right here, you can see multifunctional magnetic LED wall lamp
0:21
And then just some other specs on this itself. So, this goes ahead and opens up real easy, just like that
0:27
And the first thing I see is going to be this user manual. We're also going to have a box that comes right off and it's going to have two remote controls
0:34
We're going to have some hardware, double-sided adhesive, two USB-C charging cables, the wall mounts, and finally the lights themselves
0:40
Now take a look at the bottom of the light. We're going to have this opening here and this isn't where you go ahead and screw something in
0:46
This is where we go ahead and just stick this in. And that's because this is of course going to be magnetic
0:50
So it just stays in place. So it's going to be really easy to go ahead and move around if you want to go ahead and twist it or move it like a different way
0:57
if you want to face it downwards or upwards. So I really do like this feature
1:00
And then, oh yeah, it definitely does have some good strength. Now taking a look at the side, right over here
1:05
we're going to have the plug for the USB-C to go ahead and charge it. Now if we look over here in the center
1:10
this looks like a button, but it's not. It's just going to be like a little bead over here
1:14
And one cool thing is that you can go ahead and turn both of these on at the same time So right here we can have red light on the bottom and then yellow light on top Now taking a look at the bottom side where the RGB lights come from we going to have this nice diamond shaped pattern that is going to be chamfered towards the inside And in the center we going
1:30
to have this glass bulb and right in here is going to be the electronic parts. And now the other side
1:34
is going to be pretty similar. We're still going to have the diamond pattern, although they are going to be slightly smaller diamonds. And this part here for the light, it's going to be like a flush
1:41
one. And so here's what the remote goes ahead and looks like. It does have this tab at the bottom
1:45
so I could just take it right off, and now I can go ahead and control it. So if I press the power
1:50
button, let's see which one lights up. All right, so it controls this one. So I press the power
1:54
turns on, press it again, turns off. So to install this, you are going to have two options. It's
1:58
either going to be screwed into the wall, or just go ahead and use the double-sided adhesive
2:03
And since this is the easiest option, I'm just going to go ahead and use this one and just put it right on the corners or on the sides over here on the left side, and all the way down there on
2:12
the right side. So to start, I'm just taking off the white side first of the adhesive and it goes
2:16
ahead and reveals the sticky part. Now I'll go ahead and just place it right on the back of this
2:20
just like so. And I go ahead and lift the yellow part up and then just stick it to the wall here
2:32
Just like that. Now I can go ahead and just attach the lamp right over here and it stays nice in
2:37
place and I go ahead and face the RGB up I do the same thing for the other side over there So now I can go ahead and control the lights individually So I can just power it on right there and the white light turns on
2:50
And if I want to go ahead and switch the mode, I can switch it to yellow light or somewhere in between
2:55
And I can also go ahead and adjust the brightness with this over here
2:59
So right now it's as bright as it gets. And right here this is as dim as it gets
3:04
And it basically just shuts off. But I'll go ahead and keep it bright for now
3:07
And to go ahead and turn on the RGB colors, we just have to press this night light
3:13
And right there, so red turns on, and I can individually just adjust all the different colors manually here
3:17
Or if I want, I can go ahead and set it in one of the two modes. So I'll go ahead and set it to flash
3:23
So right here, you can see it's just going to change each of the color every like half a second or so
3:28
And the second mode is going to be fade. So right here, it's just going to slowly start to fade to a different color
3:33
So right now it's red and it really fades slowly. So right now it's turning orange, kind of yellowish, and then like a green, a darker green, like a turquoise
3:47
and just keeps going and cycling through all these different colors over here. And one thing to note is when you do adjust the brightness, it's going to adjust the brightness of both of these
3:55
So right now it's as bright as possible. But when I decrease it here you can see both of the lights the RGB and the regular lights are going to go ahead and dim And at the bottom of the control we going to have a timer for 30 minutes one hour and two hours Now when it comes time to shut off We can just go ahead and press the power button and the bottom light will shut off
4:11
And then we can press this night button and the top RGB light will shut off
4:15
Now one thing worth noting is that this control one of the controls goes ahead and controls both of these
4:20
So I can power this one on just like that And then I can power my other light on the other side on like that
4:26
And now both of them are gonna go ahead and be on and if I want I can adjust this one
4:29
individually so if I just want this one to be yellow light instead we can keep this one at yellow
4:34
and this one at white light and then I can of course also go ahead and turn on the RGB
4:39
so right there I want that one red and I want this one blue so here we could see you can definitely
4:46
go ahead and mess with all the combos so overall I'm really impressed with these wall lights they're
4:50
really easy to go ahead and use and set up and you can control each of them individually which
4:54
is real nice and I think the coolest part is going to be the magnetic portion just because you could
4:58
easily just go ahead and swivel it around. So if you want it to face a different way, you can
5:03
If you want to go ahead and just take it off the charge, you can go ahead and just pull it right off. And now one thing to note, as you saw right here
5:08
it is, since it is touch capacitive, it is very sensitive. So if you accidentally just like brush your finger around it
5:14
it's going to go ahead and turn on the light. So that's worth noting. But yeah, if you're looking for a set of like dual lights
5:19
to go ahead and put in your room, your bathroom, on the stairs, on a random wall over here
5:24
then yeah, definitely check out these wall lights
#Computers & Electronics
#Lamps & Lighting
#Shopping