Up next in 10


In this video, I test out the One Fire Galaxy Night Light Projector
Check it out here https://geni.us/0wNJBBU
DISCLAIMER: This video and description contains affiliate links, which means that if you click on one of the product links, I’ll receive a small commission. This helps support the channel and allows us to continue to make videos like this. Thank you for the support!
Show More Show Less View Video Transcript
0:00
Welcome back to the Cursive View. Today I'm taking a look at this star projector by OneFire
0:04
So I want to do a quick unboxing and give my first impressions of this. So up top, first thing we see is going to be this cable and this is going to be USB-A to USB-C
0:15
And then there's also going to be this remote control and at the bottom we're going to have this tab
0:19
So now it's going to be functioning and there's going to be a bunch of different buttons over here
0:23
and I'll get to that in a little bit. On the side there's going to be this instruction manual followed by the star projector itself
0:30
now this thing isn't going to be too big not too small it fits in my hands kind of like a small ball
0:35
there's going to be these two angles so we can set it down flat either like this or like this
0:41
then here's a closer look at the centerpiece the speaker and then all the different buttons so
0:49
there's going to be a bunch here and then on the back side is the usb-c to plug it in so this
0:54
projector does a lot of things and one of them is going to be a bluetooth speaker so to connect it
0:58
to your phone, start by plugging it in and then either pressing the power button on the projector
1:03
itself or on the remote control. And then once that's all plugged in, go to the phone and then
1:10
all the way at the bottom under other devices, this should show up, which is going to be WH-E14A
1:15
and that's going to be this projector itself and there now it's connected. So I can play some music
1:21
or play a video and it comes out right at the speaker at the bottom
1:28
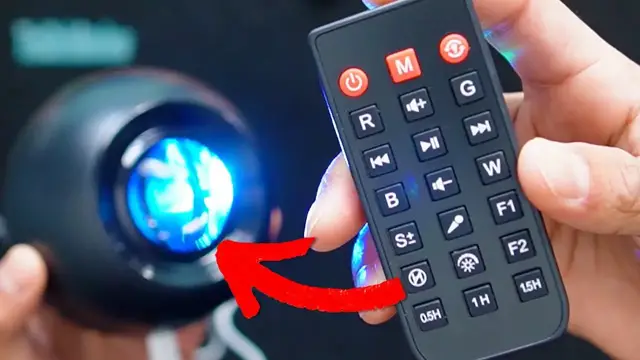
Now let's take a look at the control because there's going to be a bunch of different buttons
1:34
here Now starting in the upper left hand corner this is the power button so I click it it turns off I click it again it turns back on The M button is going to switch between Bluetooth mode and then the white noise
1:46
So right now, right now what was playing was going to be one of the white noises and there's going to be a bunch of different noises
1:54
So let me just play them all for you so you can get a better listen to them. now the next button is going to be the light effect mode so this will just basically switch
3:04
between the different modes it has. And there's a bunch of different ones
3:07
from solid colors to two colors, to three colors, and then so on and so forth
3:13
So it gonna be a big mesh of different ones Or we can change the color manually with R G B or W So pressing R once we turn on the red color press it again turn it off G green G off W white W off B blue B off And of course
3:33
you can mix and match these different colors. So if I have red on and I turn green on, there'll be
3:38
a red and green. I can put blue in there too, and I can even put white. So we can have all the colors
3:43
at once and it's going to be just a big mesh of colors. And now these five buttons in the center
3:47
here are going to have to do with audio. So I can play, pause, go to the next track, the previous
3:52
track, volume up and volume down. And this is going to be with the sounds it already comes with
3:57
or if you connect it to bluetooth whatever music you have playing. Now this microphone button is
4:01
going to be light rhythm mode and when there's music playing and you turn it on the colors are
4:05
going to change depending on the type of music that's playing. It'll get brighter, it'll get
4:09
dimmer and this is how it basically looks like. There's also going to be S and this is going to
4:14
control the speed. Speed 0, speed 1, speed 2, speed 3. Done. We also have F1 and F2 and this is going
4:34
to be different light modes. So if I press F1, this is going to be this mode where basically the
4:55
F2 is going to be a different light mode
5:07
So this one's going to be more of a simple transition. It's not going to be a hard one where the color shift
5:13
but it's just slowly going to fade into one color, into another, and so on and so forth
5:18
And if you want something more relaxing, I'd probably recommend using this mode instead of the harsh F1 color changing mode
5:25
and this button here is going to be for brightness so it's going to have several different brightness
5:50
options so if you want you can keep it really dim somewhere in the middle or all the way as
5:55
bright as possible. One, two, three, four, five, six, zero. Now the bottom three buttons are going to deal
6:12
with timers so I can have it on for half an hour, an hour, or an hour and a half. And when I press it
6:18
it's going to blink twice red no matter which one I press. It'll blink two times red either way
6:23
and if I want to shut off the timer simply press this button over here and then it'll blink again
6:28
but this time it'll blink green. And taking a look at the projector itself there's going to be a few
6:32
controls we can change but of course to customize it even more just use the remote control. So that's
6:37
a quick look at the one fire star projector
#Online Video
#Computers & Electronics
#TV & Video Equipment
#Gadgets & Portable Electronics
#Media Streaming Devices
#Virtual Reality Devices