Up next in 10



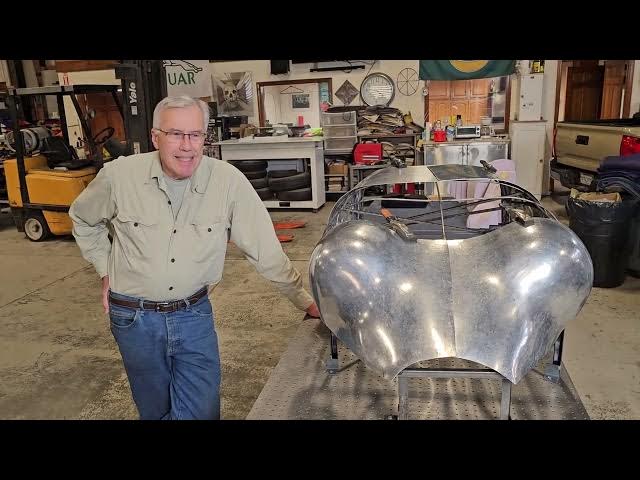
Shaping an aluminum engine cowling for a 1929 bi-plane
Show More Show Less View Video Transcript
0:01
all right it's Ray from Pro shaper
0:03
Workshop in Charlton Massachusetts what
0:06
you're looking at is not a big bra but a
0:09
cowling for a
0:11
1929 oneoff bip plane it was restored by
0:15
marck who's from uh the Chicago area
0:18
west of Chicago and uh he's been working
0:22
on this project there a Total
0:23
Restoration of this plane which was made
0:26
in
0:27
Delaware
0:28
and it's been a a long
0:31
haul he's done other jobs too he's not
0:34
been working on this for eight years but
0:36
this is one of the final pieces he had
0:38
to do was to make this cowling that fits
0:41
over
0:43
ox5 uh V8 aircraft motor uh it's a
0:47
Curtis ox5 it's a famous aircraft motor
0:53
and it has U stagged heads on it and uh
0:57
these is the this is the cowling that
0:59
allows the Airstream to run over it and
1:03
Mark designed this by using a wireform
1:07
he watched my videos previously he had
1:09
made a wood buck and tried an attempt at
1:13
it and he didn't like the the other
1:15
result so he used the wireform to
1:18
wireform with plenty of clearance around
1:21
all the cylinder heads and everything
1:24
and this is the shape that evolved it
1:27
form follows function and and this front
1:31
has got some incredible reverse curves
1:33
on it and Mark had never done anything
1:36
like this before and he's learned the
1:38
new the process that I taught them and
1:41
these are two left and right side and
1:46
um they're all shrunk into place
1:49
essentially and he's done a superb job
1:52
there is a stagger on the head there's a
1:54
little asymmetry because one head's
1:56
further forward than the other and then
1:59
another another uh student John from
2:01
Pennsylvania helped Mark with these
2:04
front pieces here well actually the're
2:06
the rear pieces and these have uh some
2:09
really complex comp reverse curve
2:12
complexity as well and these are going
2:14
to need a little more attention but uh
2:17
Mark is now uh up to speed on all the
2:21
techniques to be able to make really
2:23
complicated pieces like this so he's
2:25
going back to his shop in
2:27
Illinois and he's going to make this
2:30
Center section which will be two pieces
2:33
so all total there'll be six pieces in
2:35
this
2:36
cowling and uh he'll weld it together at
2:39
his shop and I'll bring Mark in just for
2:42
a second let him make a few comments
2:44
Mark you want to come in and say he's
2:47
been here eight days to do this and uh
2:51
he he did I think quite an achievement
2:53
in eight days so go ahead Mark um yeah
2:57
so the eight days were really good at a
2:59
lot of new techniques um shrinking
3:01
aluminum was something that I didn't
3:03
think to do I've done it on steel but um
3:06
yeah pretty much the whole front of that
3:07
is shrunk which and we didn't anal it as
3:10
well either yeah it wasn't analed it's
3:13
050 um
3:14
50,000 3003 was what we used he go ahead
3:19
so uh yeah so the uh there's really not
3:21
any thin spots in it uh it's basically
3:23
shrinking makes the metal thicker so uh
3:26
it's pretty amazing um yeah started on
3:30
this airplane uh for a customer about
3:33
eight years ago as a as a fill in
3:35
project for the shop and the last two
3:37
years um worked on it pretty extensively
3:41
so it was kind of a groundup restoration
3:43
for a gentleman out in California that
3:45
has a pretty big airplane collection and
3:48
likes um the uh old airplanes to be
3:53
looking like they did when they came out
3:56
of the factory or when they were built
3:58
back in the 20s and 30s so all my
4:00
techniques are 20s and 30s type stuff so
4:04
um yeah that's about it and you had to
4:07
build the wings all brand new and the um
4:10
I got a uh a Fus Lodge tubing I got an
4:15
upper Wing that needed to be reworked
4:17
and I had lower wings that were original
4:20
and were in really bad shape and um uh
4:24
they asked me to save as much of the
4:26
wood as possible so I rebuilt the bottom
4:29
WI
4:30
um he gave me he gave me that those
4:33
parts and he gave me three pictures and
4:35
he said make it look like the picture so
4:38
the airplane had flown and what's the
4:40
manufacturer's name now the the uh Sano
4:43
sarapin Sano okay built the airplane in
4:47
about 1929 I think it was finished in
4:50
1930 and he was a um he worked I believe
4:53
for Curtis in the very beginning and
4:56
then he was a an engineer for Blanka and
5:00
he built the airplane and he was going
5:01
to certify the airplane and never did um
5:04
1929 with the depression and all that
5:06
stuff I think everything just kind of
5:08
fell apart so it was a oneoff
5:10
airplane and when he um he built it with
5:15
the with the ox5 and then it was
5:17
modified to a u Continental a radial
5:21
engine for a little while and then it
5:23
kind of
5:24
disappeared
5:26
and excuse me got highly ified uh it had
5:31
a uh spring landing gear on it it had a
5:34
160 or 145 or 165 Warner which is a
5:37
radial engine more modern engine uh
5:39
modern from the 40s um and it flew all
5:43
the way into the mid
5:45
1980s and when uh the customer that I'm
5:49
working for um bought it he wanted to
5:52
put it back to the original ox5 1929
5:56
configuration so that's what I ended up
5:58
doing
6:01
and it's been a really interesting
6:02
project too um there's just so many
6:05
aspects to it yeah it's I I built the
6:08
whole airplane off of the three pictures
6:09
that he gave me yeah and did did you
6:11
have to replace most of the fuselage too
6:14
which is no the fuselage was in really
6:16
good shape the only thing I had to
6:17
replace was a little bit of tubing in
6:19
the tail the tail post okay and a couple
6:22
of luns in the back um and the Fus the
6:26
Fus Lodge was in really good shape but
6:28
there was another inside the fuse Sledge
6:30
there were no seats scoreboards controls
6:32
all that kind of stuff so I had to
6:33
fabricate all that stuff from the
6:35
picture that he sent me fortunately the
6:37
one of the pictures was um the airplane
6:40
completely uncovered so I could see what
6:42
was inside the airplane and I scaled
6:45
everything off that picture and built
6:47
the parts for it okay now in the in the
6:51
future if you have to do something like
6:53
this you feel that you have now got the
6:55
skills that you can tackle just about
6:57
anything I would believe right I yeah I
7:00
mean a lot more than I did eight eight
7:03
days ago um I still you know have to
7:06
think through the process but I have a
7:08
really good background now and
7:10
understanding of you got to internalize
7:12
it yeah yeah kind of stand back and look
7:14
at it but U yeah one of the big things
7:16
on this calling was I think I probably
7:18
could have done it on my own I would
7:21
have made a lot of scrap and um so
7:24
that's why I've been watching race
7:26
videos for a long time and I wanted to
7:28
come out there and I thought this would
7:29
be the perfect project for it to um you
7:32
know build up my skill set and it seemed
7:35
to work because uh it's pretty amazing
7:38
how all this stuff came out yeah and
7:39
this was the first wire form you've ever
7:41
made this was the first wire form yeah
7:43
and that was a big eye opener right back
7:45
it was uh and what I did was uh I I
7:49
built the perimeter
7:51
structure um on the airplane so just the
7:55
perimeter and then these shapes here um
8:00
so I could clear all the cylinders and
8:01
clear all the internal parts and then to
8:04
get this shape and the back shape I
8:07
couldn't quite visualize how it was
8:08
going to look so I put foam in there uh
8:12
foam core from I bought it from Home
8:14
Depot uh I hot glued it together in
8:17
sections and formed it with u a saw and
8:22
uh and a die grinder and that was just
8:25
to give you the visual to give me the
8:26
shape and then the wires that I made for
8:29
the front of this came off of the off
8:32
yeah we'll show that styrofoam over here
8:36
he made one for the back and one for the
8:41
front so this is the way he worked out
8:45
the actual surface
8:47
flows and then took the uh bent the
8:50
wires as you can see he's got like
8:52
stations there and he made templates and
8:55
bent the wires to all the templates off
8:57
of that want take just
9:06
off there's the wireform and uh we uh
9:10
strengthened up the wire form quite a
9:12
bit and put some legs on it we're
9:14
running adjustable height table here so
9:16
it was really user friendly and one of
9:19
the best things about the wire form is
9:21
you can actually see how the panels are
9:23
fitting and uh you can't do that with
9:26
the one of the Wood Station bucks which
9:28
are it seems that everybody makes Wood
9:31
Station bucks and the wireform is the
9:34
way to go if you haven't tried making a
9:35
wire form make a wire for I think I've
9:38
got a sold customer in Mark he'll be
9:41
doing it again I'm sure so I think
9:45
that's all for today thanks for
9:48
watching uh this is that's mark saying
9:51
goodbye and Ray from Pro shaper
9:54
Workshop see you soon thank you
9:57
bye good deal
Autos & Vehicles