Up next in 10


https://www.proshaper.com
Our Amazon Storefront: https://www.amazon.com/shop/proshaper
Rust Removal Classic Car Restoration
This video goes over and shows the rust removal process on classic cars during the restoration process. Wray is anti sand blasting because it will warp the metal, and sand gets everywhere and you'll be sucking it out for weeks.
Since we have a lot of rust on our Scout 800 and the 1952 Cadillac Convertible we decided to show how quick and effective removing rust with simple solutions found at home depot.
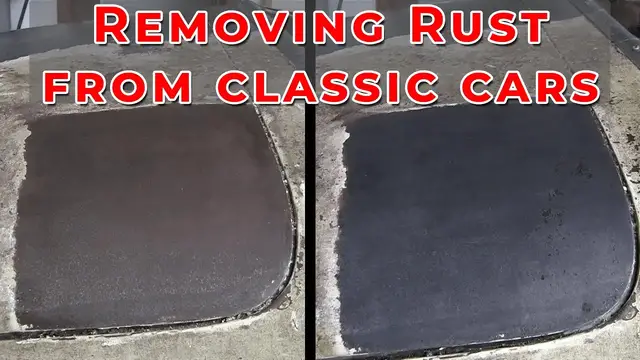
We start by removing the paint with Klean Strip Premium Stripper paint remover. Once the surface is clean and we spot rust we dose the rust with naval jelly, dabbing it on with a brush. It's best to let it sit for a few hours until you see the jelly turn black. Take a putty knife and start scraping the rust off. It should remove most if not all the rust with the first application. If there is any rust left just apply another dose. Once the naval jelly is off we use concrete & metal prep from home depot with a coarse steel wool. When the surface is free of rust and paint, we typically use soapy water to remove the film left behind from the naval jelly. Now the surface is all set for you to start your restoration project.
Email: [email protected]
Website: https://www.proshaper.com
Facebook: https://www.facebook.com/ProShaper/
Instagram: https://www.instagram.com/proshaper/
Twitter: https://twitter.com/ProshaperM
Linkedin: https://www.linkedin.com/company/proshaper
Show More Show Less View Video Transcript
0:00
Hi, it's Ray from ProShape-It Workshop in Charlton, Massachusetts, and today I'm going to talk
0:29
about rust in regards to collector cars. Now we did an earlier video on rust and I think it got
0:34
interpreted as a general rust statement and there is some general aspects to it but I'm going to be
0:42
specific about collector cars today. How to take rust off, different methods and how not to take
0:49
rust off. So if you've been watching my channel I'm doing a scout restoration series, a 1966 Scout 800
0:58
and it was a pretty good rust bucket and we'll throw some of the pictures in of what this hood
1:04
looked like and what that fender looked like before we did the rust treatment on it. So let's
1:10
we're doing a bunch on the fender repair and this had some paint on both sides. We stripped the paint
1:19
off first and this was the way the rust was up the top here. This is just too far gone so you can't
1:26
save that. So that has to get cut off so there's no need to remove rust there. So we made this patch
1:32
panel. But the inside was undercoated and we took all the undercoat off and paint off with rust
1:41
remover. And we've got a little bit of residue. There was really heavy rust right there but the
1:47
steel is still good. We're going to put a new patch on here. We're going to do a little touch
1:51
up here with the for the rust and we got to put a new patch on here before we can weld that new patch on
1:57
and there'll be a little bit of rust there too so that was the condition of the fender
2:06
and here's the hood this thing was just absolutely loaded with a really long-term
2:11
heavy surface rust but nothing uh super pitted or anything but it was a pretty
2:18
strong rust that was on there. Inside wasn't too bad. It had some paint
2:24
but underneath the paint the rust had migrated. So we've got all the paint off on the inside now and there's still a few little spots that we have to touch up and
2:35
we'll have that totally rust removed. Now, this is a good situation here as you can see
2:42
and with this hood we can't get in this channel and there's rust in this channel it's probably not
2:50
life-threatening to the quality of the hood or anything same up here and it's
2:56
almost it's not practical to remove these pieces which are all spot welded
3:02
in to rust remove both sides so we have a solution for that too on this case I
3:08
don't know if I'm gonna do it or not yet I might but I'll talk about it anyways
3:13
and show you what we use. So when you talk anything about rust on YouTube
3:19
everybody brings out their favorite rust removal procedure. And a lot of guys like molasses dipping
3:27
And that's one I haven't ever tried is molasses dipping. And depending on how big the part is
3:34
you need a bigger and bigger tank for the molasses dipping. You have to totally immerse it in the molasses
3:40
and I've heard that it's a real bubbly and a lot of foam and all kinds of debris that you've got to throw away later
3:49
What we do if we're going to be doing dipping is we use this product called Rust 911
3:55
which is similar to a VapoRust. A VapoRust has much wider distribution, but this is the same thing
4:04
Evapor rust is sold already cut with water so you're buying mostly just water
4:10
When you buy rust 911 you have the option of buying it in the concentrated form
4:16
gets shipped to you and all you do is add water. So my personal use I buy five gallons of the concentrate and add
4:25
I get up to 80 gallons with that five gallons by the time I add my water to it
4:30
So you can dip some pretty good sized things. But, in this situation where you need just this front little piece here underneath, that
4:43
strengthener piece dipped, you can make a little small tank. And I make them with plastic or with metal
4:51
I weld them all up and just immerse that in there for two or three days
4:56
And that'll clean all the rust out from the inside. Same way on the back
5:01
So you have to make a little bit of a tank. What we did on this one is we haven't done that yet
5:06
We might do these two sections later, but what we did on this one is first we use paint remover
5:13
So we use clean strip paint remover to take all the paint off first because the rust removers rust 911 or other favorite is just standard little navel jelly That won take paint off so you have to get the paint off first So we use this and we tried just about
5:35
half a dozen different types of paint removers and on the modern paints, the urethanes and
5:44
epoxies and stuff, this stuff really struggles to take it off. You have to put five or six
5:49
applications before it really starts to soften it up. On this case here, this was probably enamel that was painted with and it stripped it off
6:00
pretty good. It took probably at least two, maybe three applications to get it all the primer and everything
6:07
So you take that paint off, you scrape it with a putty knife and then hit it another
6:12
time and then use a coarse steel wool with lacquer thinner. that reveals the surface and often times underneath that paint on all these collector cars you
6:23
are going to find that the rust has started to migrate across the surface and there is
6:28
a little bit of a haze of rust even though the paint might have been showing ok. It has
6:35
basically little micro checks that allow the rust to grow. So once you get the paint off
6:40
then you daub it up with this Loctite navel jelly, and we do a little section at a time
6:47
Same thing with the paint remover. I wouldn't paint remove the whole thing all in one go
6:52
You do a little section, a little section, a little section, and it's almost a passive thing
6:57
It takes a minute to put it on. You walk away. You're doing something else
7:02
Let it do its job. You come back. You scrape it a little bit. clean it up with the coarse steel wool and lacquer thinner in the case of the paint remover
7:12
In the case of the navel jelly, you clean up with this, with a sprayer. We use a phosphoric
7:21
acid that we get from Home Depot. This is $18 a gallon. Now a lot of people like Osfo
7:28
I've tried Osfo. Osfo, I found, is a lot more expensive than this and it's basically you
7:34
get the same exact result. So at 18 bucks a gallon, it's a no-brainer to me that I buy
7:39
this stuff. Spritz it on with the spritzer, coarse steel wool, this will take off any
7:45
humidity rust and it will also clean very well after you use the navel jelly with, you
7:52
gotta use coarse steel wool. And they're a real mild bite to them so that, you know
7:58
they might hurt a cut or something, don't want to get in your eyes, but wash your hands
8:03
good you can use protective gloves if you want generally I don't even use gloves I just make
8:07
sure I don't get lathered all up with it a little bit on my fingers that's it I'm usually insulated
8:13
by the steel wool so now the common practice on a lot of this now this does take probably more time
8:24
than a lot of people have used to to strip but that's initial time when you're doing restoration
8:30
you're talking about a 1500 to 2000 hour process to restore a car and if it's really rusty it can
8:39
be 3000 hours so a little bit more time here or there it doesn't make much difference in the big
8:45
picture but what a lot of people commonly do is first thing they do is blow the whole car apart
8:51
and they send it off to the sandblaster and this will have the paint on it and the sandblaster will
8:58
take the paint off easy and you have all kinds of different sandblasters they use black beauty
9:05
they use number two sand they use soda blasting they have wet blasting oh they got every type of
9:13
blasting you can imagine and one always says it's better than the other and every blaster doesn't do
9:19
any damage to the metal but that's not the case if you brought this this is a really flat panel
9:27
hood. If you brought this to the sand blaster and he blasted on this side to get this side clean
9:34
then tips it over and blasted on the other side, you're going to come back with a hood that's going
9:39
to have a lot of damage. It's going to take weeks to finish to get that back to its factory smoothness
9:45
again. So I think the price to pay for a little more time to get the paint off and to do the rush
9:52
removal in a slow incremental method. It pays a big premium in the long run that you don't
9:59
have this sandblasted surface that is all wavy now and also it leaves a really textured
10:07
surface. And this way here you reveal the whole history of the metal. You see all the
10:15
repairs that were done and you get to know what happened to that fender or that hood
10:21
in its lifetime. So that's what I recommend is using these products. Now I know I've tried
10:30
vinegar for dipping small tools and stuff and it works really good and vinegar is a light acid and
10:38
vinegar will take rust off the tools Not as good as the Rust 911 dip The Rust 911 dip is not an acid I don know how it works In fact one of my comments on my YouTube channel somebody figured it out and they told me the formula how to make it We going to experiment with that
10:59
and I would love to have a, not only can you dip this, but with Rust 911
11:07
which is a chelated, concentrated system for de-rusting, you just add water and it's biodegradable
11:19
You can throw it on the ground. There's no issues with the EPA on it or anything
11:24
You can put your hand right in and it doesn't do anything. I wouldn't recommend it getting in your eye
11:30
but it's not dangerous of any way that I can see so if you were dipping this whole hood
11:39
you would need quite a large container to be able to which isn't that hard to make with plastic
11:46
you could make some 2x6 sides and actually dip this thing in the whole deal
11:52
but you would have to have probably 50 or 60 gallons of solution
11:56
Now, the solution only has a lifespan of about 24 hours with really heavy rust
12:02
Then you have to re-up it again. You've got to make another batch
12:06
But another option you have, a lot of, say you have like a, and the way I learned about this is one of my students about 15 years ago
12:16
took my class, told me about Rust 911, and he had a Volvo 1800 that he showed me
12:24
And I said, where did you get that dipped? He says, no, I dipped it myself
12:28
I said, what do you mean you dipped it yourself? He said, well, it wasn't a dip. He sprayed, immersed it
12:33
So what he did was put a plastic underneath a chassis rotator
12:39
and then he had all these pumps pumping all this solution through all the frame rail
12:46
the heavy-duty sheet metal frame rails that are in a unibody. That you're not going to get cleaned out by a sandblaster
12:54
so he got that thing totally de-rusted like it had been put in a tank and years ago we used to
13:02
have a dip tank in Worcester and Worcester Mass and they would have an enormous tank and put a
13:09
whole car in there that's not available generally anymore so you have to do it yourself so you have
13:16
the option of making your own little smaller dip tanks and also spraying it on. And it's
13:24
just a continuous spray so you need a pump. And one of the things I'm thinking of doing
13:29
is because I'm going to keep this restoration series going on the Scout and now we've added
13:35
a 52 Cadillac which I'm going to show you what we're going to do with that. Alright
13:38
this is the 52 Caddy convertible we just pulled out of a garage, we just made a video on it
13:43
And it's very popular. If you haven't seen my other videos, watch that. And this has been sitting in a garage since 1965
13:52
And it was well protected except for the front. A little bit of the door, the garage door was open
13:59
So a lot of humidity came in here, bugged up some of that chrome there
14:04
It wiped out the chrome and down to the rusty metal right there
14:09
But even after all that years of exposure, some of that chrome is still amazingly still good
14:14
The body panels on it are really good, but they have that situation where the paint film cracked through the years
14:23
And this is probably acrylic lacquer, which is known for micro-checking. And then what happens is it rusts underneath, and we've done a little bit of rust removal here
14:33
That was just the overflow from this spot here. This spot here was the worst spot on the car and apparently raccoons came in and you can see the little paw prints here on the windshield
14:49
And they were taking a leak on the hood here for many, many times I guess
14:54
There might have been a rag or a cushion or something that kept the urine always on the surface
15:02
So, when I first got to it, this was a real thick, flaky scum that's on the top
15:12
And you take a putty knife and you can crack it off. And that's how it was right here
15:17
Of course, you can see it went through over here. It took all the heavy stuff on the fender off, but there's a hole here
15:24
But here, it was just as bad as what you see right here
15:28
And I just wanted to see how that would clean up. Now there's still a few little residue spots that need to be cleaned up but the metal is a little thinner and I just wanted to do an experiment
15:39
This was all with navel jelly here. I'll probably cut this piece out and make a new piece and I'll probably cut this piece out and make a new piece here
15:49
So that's what we do, we do coach building and metal shaping at ProShaper Workshop
15:54
So that's not a problem, but I just wanted to use that as an experiment
15:58
The rest of the panels are really good and we did, over on the trunk, we did this here
16:07
So you can see the sheet metal is actually really nice on this car and it had this patina of rust where the paint had chipped away and that was exactly what was
16:21
over here. So first we did a paint remove one square foot at a time, got it stripped and then
16:29
we used the navel jelly. So this is, you know, you don't want to get sand and sandblast this thing
16:35
and you know, you're going to do so much damage plus you're going to have sand everywhere
16:40
and our intent on this is we're going to paint remove this entire car
16:45
and we're going to navel jelly this entire car. Well, what's navel jelly cost
16:50
We buy it from McMaster.com. It's, I think, $8.68 for a 16-ounce bottle
16:56
and a 16-ounce bottle goes a long way. So I figure I might spend $200, $300 in navel jelly to do the whole car
17:05
and probably $200 or $300 in paint remover. And a lot of it's passive
17:10
If you put it on, you walk away. And it doesn't do any damage whatsoever
17:15
And we still have to reveal the floorboards and everything. I think all the floorboards and trunk boards are all intact in this
17:24
It's really good. The seat was out of it and was in the yard for a while, and it's a disaster
17:29
We don't have a rear seat. We need a rear seat. Anybody who knows a rear seat, get in touch with me
17:34
So, to see how this works, this system works, I'm going to have Mark strip a square foot of the paint off over here, and then he'll video that showing how that navel jelly will clean that spot up
17:52
We'll have to push it back inside. You can't paint remove or navel jelly out in the sun because it's just too strong and it dries it up
18:02
You have to be in the shade in order to do it. It should be well ventilated. We do it right in the open door
18:08
All right, so mark is putting the paint remover on first and like I mentioned the paint removers are all seem to be the like
18:15
They've stripped out that methyl chloride. That's the secret ingredient. It really works
18:20
This is a paint that won't give us too much trouble. You'll see there's a lot of checking in it
18:25
That's why it rusted so this will come off fairly easy. Mark's going to do about one square foot right here and then after
18:35
it's paint removed he's going to put the navel jelly on there, let it do his job
18:39
and if you leave it overnight it turns to a black scum and hardens right up and
18:45
you scrape it off with a putty knife. Sometimes if the rust isn't too deep it'll
18:49
come right off pretty easy. A deeper spot you got to have three four or five
18:53
applications sometimes. So in a one square foot area like this you might get 80% of the rust come
19:00
off in the first go and then you have that 20% that you might have two or three or four times
19:06
to finally get it. But you'd get this one done and then you're doing another square foot and
19:11
then another square foot and you're doing another job because most of the time the material is doing
19:17
the work. Okay, so then Mark's got it all navel jelly. Now he's going to take the coarse steel wool
19:24
and really wash it really good with the phosphoric acid solution that we get from Home Depot
19:31
It's a clean strip product, I believe, and that will take a lot of the little stuff that was
19:38
mixed by the putty knife, and you can see how clean that is, and then it's a matter of just
19:43
wiping it dry. Sometimes you can throw soapy water on it and neutralize it. Sometimes you'll
19:49
get a white film over it if you don't use soapy water. But it's no big deal. Everything
19:57
comes off clean with Scotch-Brite too. Now here's a spot here. You can see it's all surface
20:05
rusted. And a lot of people will try to sand that off or grind it off. That's one of the
20:11
worst things you can do. You never grind or sand or do anything that will change the nature
20:20
of the skin of the metal. You want the metal coming out just like it did back in 1952 or
20:27
in case of the Scout 1966. You don't see all scratches and all that stuff in this factory
20:35
original metal. You don't want to put those scratches in. A lot of people say, well you
20:40
They need to be all scratched up for the paint to have tooth and to bite onto the surface
20:46
The paints they have today will stick to butter. You don't need all that stuff
20:51
Sanding with 320 is good enough. Throw the epoxy primer on that, it'll never come off
20:56
The paints are absolutely amazing. Well, I hope that rust removal information is really helpful to you
21:01
It's Ray from ProShaper Workshop. And thanks for tuning in. Remember that we don't deal with just rust
21:08
We deal with metal shaping and coach building. We have 207 videos in our YouTube library
21:15
So if you discovered this from these rust videos and you're into collector cars, go back
21:21
to my homepage and check it out. There's a lot of good information in there
21:25
So please subscribe. Give us the comments. Give us the likes. Tell your friends
21:30
And thanks for watching. It's Ray from ProShaper. And remember, metal is clay
21:38
Thank you
#Classic Vehicles
#Vehicle Repair & Maintenance
#Vehicle Modification & Tuning