Up next in 10



Fullscale drawing and wireforming
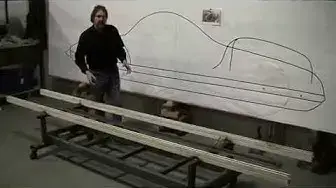
Here is a new video we just finished which explains how we make a fullscale drawing and how it will then be turned into a fullscale handbent wireform buck. We also showcase in the video the platform the wireform buck will be constructed on, and how the system all works together to insure accuracy and symmetry. We are evolving this system with each wireform we construct. We believe this method takes the mystery out of the buck building problem and our goal is to help shapers everywhere unlock their creativity. Check out http://www.proshaper.com for information about the current sale on our coachbuilding classes that is available for a limited time only.
Show More Show Less View Video Transcript
0:00
Hi, this is Ray Shalene from Pro Shaper Sheet Metal in Charlton, Massachusetts
0:09
And what you're looking at here is a drawing that we did on our special drawing board
0:15
It's a drawing of a 1948 Studebaker Futuristic car that was done originally by Virgil Exner
0:23
And it's the only drawing that exists as far as I know
0:28
there's a lot of problems in the drawing it's a Sort of an idealization so to make it into a practical car. We've got to make a bunch of little changes and
0:38
First off we want to be able to make a buck for this project because we're going to use this project in our coach building class as
0:46
a learning platform for the students so We got to get a wire form together within two weeks time and
0:55
And the first step of doing the wire forms we've been making a bunch of them and we're evolving the process and
1:03
The traditional way is to do a drawing like this on a big board
1:09
this is going back to the 20s and 30s and Then translating that into a buck of some sort it could have been wood
1:19
the Italians used a lot of wire form I I prefer the wire form over a wooden buck because of
1:28
You can get a good view ability from the backside of the buck versus on a wire form buck versus a wood buck
1:37
so One of the first steps is getting this full-scale drawing and that's an impediment to a lot of people a lot of people now
1:45
We're trying to adopt the CAD method and you can do drawings in CAD
1:50
and then you can slice up the CAD drawing and have a
1:55
Wood buck made with all the this just wood stations and stuff
1:59
But as I said, those are very difficult to to use as opposed to a wire form
2:05
So the wire form has to be bent by hand and you need lines in order to bend the wire form
2:12
So we have a system here that we developed and it a very simple system It accessible to everybody this board I made about five years ago I had to have my other shop in Connecticut and brought it up here to my shop in Charlton and
2:27
it's a Just a half inch square tubing steel tubing framework and then it has I think like
2:36
30 thousandths galvanized steel on it, so it's a steel board. It's five feet tall
2:42
20 feet long and I had found this material here, which is basically refrigerator magnet
2:48
It's a plastic with some kind of iron embedded into it and then they magnetize it and
2:56
In one side of it is pretty good. It'll hold onto the steel so
3:04
When you're doing your lines, this is very similar to a CAD program
3:08
Where you can put a line on and then you can adjust the line any way you want it
3:14
It's like infinitely adjustable in this quarter inch width Is very user friendly for making pretty tight curves and everything so
3:25
This is a real quick system that you can use To develop a full-scale drawing once you get the magnets where you need them
3:34
then you can take a magic marker and Run the magic marker on both sides of this quarter inch magnet strip and then you have a nice
3:45
Landing so to speak for the wire when you bend the wires. So this is the side view has
3:53
This this is the most important line here your top side view line and that's where the whole wire form is going to start from that point
4:02
So we'll bend this quarter inch wire to fit this and then we're going to fit it on to this platform here
4:09
This platform again is an evolution that it's a system that we've been evolving into a nice little design
4:17
Now the problem when you do a freeform wire form like this
4:22
But and well, it's not really freeform you're bending into the lines
4:25
But there's a lot of potential for error to creep in so this is the error corrector
4:31
System so to speak so we've got a real stable Platform that we built up this is unistrut which is a very common material and We put a little slider Bolt boss in there and we will put angle line pieces
4:50
Inch-and-a-half by inch-and-a-half by eighth-inch wall angle line pieces at assorted spots along here
4:57
now those angle ions became come the base for Rectangle boxes that we will make out of angle line and the size of the boxes will be determined by the
5:09
drawing so Right here. We could have a really big box That would support the the top of that
5:18
Roof structure, which is plexiglass in this case, but we still need that line there
5:23
So we'll we've got to do this is our side view drawing next
5:29
We're going to do the top view drawing and between the side view and top view drawings
5:34
will be able to determine how big the box structures will be and the box
5:39
structures all get put in exact same place that they will be noted on in the
5:44
drawing and they will all be symmetrical and we have a center line here that
5:50
we've developed so this first wire has got to be lined up with that center line
5:55
and as you build the the the wire form structure you have the potential of
6:04
measuring your symmetry from left to right using those box structures as you
6:09
construct them that's a big problem is making ensuring in the symmetry when you
6:16
do a wire form now as I mentioned if you if you did a CNC router operation on
6:24
Wood stations then yeah, you can make them so they all interlock and they're all going to be symmetrical and everything
6:30
But you have this big matrix and you're fitting panels over that
6:34
It's very difficult to see the backside of the panel how it's fitting and it's almost impossible to clamp to them
6:41
The wire form has no problem being able to view and no problem being able to clamp the big major
6:49
Stumbling block of using a wire form is ensuring symmetry and that's what we're doing by using this platform
6:57
with the boxes we will Ensure that symmetry so the next step will be like I said earlier is making this top view drawing and all the lines will be projected off what we got here as far as where the wheels go and everything and
7:15
we'll probably have to refine these lines a little bit and Eventually, we'll have all the lines these side view lines are going to be done in a black pen and
7:25
Then we do the top you will do them in a red pen. We do the end view
7:31
rear view and the front view we can do those in another color pen and
7:36
all those lines will be on this one piece of paper what this paper is is is
7:41
common Tyvek that's used to wrap a house with and it's a great
7:46
medium to do these drawings on because it's so strong and It's pretty accessible. We get it at Home Depot and and
7:56
We'll get these wires bent up the next week and we'll start assembling this and
8:02
We'll keep putting out Some progress pictures of how this wire form is coming together and this wire form is going to be used in my December coach building class and
8:13
That's going to be the precursor for what we're doing in 2018 in
8:19
2018 we're going to be building a lot of these cars built by from wire form
8:24
If you go on my website pro shaper calm, you'll see what my intent is and
8:32
We're going to continue to knock these out probably like I said in the in my website
8:38
Seven of them totally by the end of next year and the students will be able to
8:44
Utilize these as learning experiences this one here is just an Outstanding design. I think it's going to be pretty inspiring and challenging for the students
8:54
So right now I have a special on it my class where you get two classes for the price of one is a window
9:01
The the dates for the window the the expiration is I think November
9:06
24th, I believe it's on my website and if you buy the class now, these would be for
9:13
2018 classes you get actually two classes you get my four-day coach building class and you also get a three-day finishing class
9:22
So hope to see you at the class soon racially in Charlton, Massachusetts. Thank you
#Autos & Vehicles
#Automotive Industry
#People & Society
#Custom & Performance Vehicles