Up next in 10


https://www.proshaper.com
Our Amazon Storefront: https://www.amazon.com/shop/proshaper
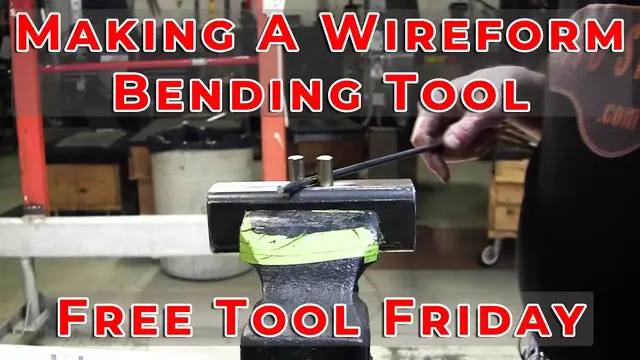
Making a wireform bending tool
We make a lot of wireforms in the shop and have several students ask what tools we use to make them. In this free tool friday we show how to make a very simple bending tool for wireforms. You can you any piece of scrap metal for the base, and a couple of bolts for the bending portion of the tool. Wray uses the drillpress to drill a couple holes in this piece of 2" square stock to fit the bolts. He cleans the edges up and welds it all together. Then Wray shows how effective the tool is and challenges you to try a wireform for yourself. It is kind of relaxing and if Mark can do it then anyone can do it!
Email: [email protected]
Website: https://www.proshaper.com
Facebook: https://www.facebook.com/ProShaper/
Instagram: https://www.instagram.com/proshaper/
Twitter: https://twitter.com/ProshaperM
Linkedin: https://www.linkedin.com/company/proshaper
Show More Show Less View Video Transcript
0:00
Music
0:17
Hi, it's Ray from Pro Shaper Workshop in Child, Massachusetts And today we're going to do the wire form challenge and it's free tool Friday
0:26
We're going to show you how to make a little bender for making wire forms
0:31
So remember also that we have a channel with about a hundred and eighty five videos total now and
0:37
The deal keep expanding and it's a lot of great free information So if you see if you discover one of my videos
0:44
That's not the only thing we have Go to Pro Shaper on YouTube search Pro Shaper or just click the little link that brings you right to the
0:52
YouTube homepage and You'll see a wealth of information there and thanks for all the support we've been getting
1:00
so let's talk about this little wire form bending jig. It's as simple as that and
1:07
This is the first one. Well, actually I had one that was a predecessor to this
1:12
I might have told this story once before is that I'd made a crude little one
1:19
By drilling some holes and putting some pins in it and then welding it and stuff and
1:24
Actually my first student was Tom Lipton back in 2000 at my house garage
1:31
my house shop at my two car garage attached to my house and
1:36
We made a wire form it was him and George King The wire form was of a grill that we'd seen a picture of maybe I might have designed it. It's like a
1:47
late 30s Be like an alpha grill or something like that or a French
1:53
Coach work type grill was pretty pretty curvy So I think I drew it up and then we did a wire form of one side of it
2:01
And then we made a flexible shape patent and started making the other side. We never got the other side finished, but
2:07
We use this little bending jig that I had made Tom's a full-time machinist and
2:13
In the mail, you know probably about a couple three weeks later. He sent me this now Tom
2:19
It's Tom Lipton. He runs the website or the YouTube channel called aux tools if you're into machining
2:26
He's got like a hundred and thirty five thousand or hundred forty thousand subscribers now always can use more
2:31
I mean, he's got a great Library of unbelievably good information on machining there and he's a really nice guy and you'll learn a lot from Tom too
2:42
So Tom made this out of some 5-H dowel pins These are hardened dowel pins and a little block of aluminum. He milled it out and stuff and
2:51
It's a nice job But it's not something that the average person might not have a bridgeport mill or a CNC mill to do this
2:58
I think he did this all on a CNC so we Got a whole lot of these from a friend of mine
3:07
It's is a scrounger and he got a whole bunch of this steel
3:11
It's three inch by one inch and I also have some two inch by one inch and
3:17
These weldments were on it and they were kind of in the way So we chopped all these off and we ended up with all these little remnants and they turned out to be
3:26
nice little tools to hold in The vise here on that little stem and then we drill the two holes and we put a couple half-inch bolts in here
3:36
These are grade 8 bolts. So we've made a bunch of different ones. We tried
3:42
Larger diameter with a smaller diameter and this one's got a little wider gap in it
3:47
And actually the gap that Tom put in was probably the most
3:52
Favorable gap for doing the bending because it doesn't slip so much
3:57
It's about a 3 8 gap between them. So I'm gonna go with that We'd like I said we've tried different gaps. They work fine
4:04
But the the the thing that works good on this is the wire won't slip when you go back in there
4:11
And you want to do a little minor revision So the average person might have some chunk of steel around I found this in my scrap bin
4:20
It's a two by two piece of tubing with a quarter inch wall and we'll use this to make the
4:28
The little bender and what you see here some of the student made
4:34
Wire forms that come to my classes. I have a whole bunch of them I just grabbed a couple here. This one was made by
4:41
Jack who was helping me out with some videos and there's a video on how she made this one
4:47
and then I after we had the The wire form made I had a class make these really nice
4:56
aluminum Panels that fit over the wire form and then you weld the two together in this case here. It's symmetrical
5:03
So all you need it is actually only have to be detailed out
5:08
So these will have to be fit together and welded and they'll make a nice headlight pod the intent here was
5:15
To make these pods for my studebaker truck project That was a really good class project everybody enjoyed making those and
5:26
This was a motorcycle tank that one of the students made it's a pretty big tank
5:31
but it's a challenging first-time project and this was a wheel pan for a plane that
5:39
Student from Long Island made he had some he had to do the drawings first and made that and
5:46
Made aluminum panels for it also, but these are nice little examples of wire forms that you can make up relatively quickly and
5:55
If you haven't made a wire form now first thing you have to do is make this little tool and we'll make the tool and just show you the the real simple
6:05
process of making a wire form or bending the wire to make one component of the wire form and
6:13
So we'll start out By taking this piece of metal, which is the tubing the two by two tubing quarter inch wall
6:20
And anything with a little substance who will do a piece of one-inch stock or something
6:26
It can't be a thin wall tubing. I don't think it will probably work, but not as good
6:31
I would recommend at least like a 3 16th wall or so something has a little substance and
6:37
I have half inch stock in stock just regular cold world will work
6:42
Because these are hardened dowel pins which you can get from McMaster car
6:48
These are grade 8 bolts which you can get from master McMaster car
6:52
These I bought real long ones or I had these and I'm gonna cut them off after I put them in there because you only need it
6:58
About an inch high or so that's more than enough and then we have a few other little tools. This is a little assist bender
7:07
They're actually one of my students made this one for me at Jim from
7:12
Ohio he sent it After he took my class we had one already
7:18
This one I forget other I made this or mark made it or somebody but it's widely spaced
7:24
He made his a little closer And that will allow you after you make the wire form and then you find out you have to do a little tweak to it
7:33
Or something this allows you it adds that leverage everything we do is all about leverage and
7:40
And these are both nice little tools and then we have this tool here Which is when you bending in the little wire bending jig which you hold in the vise
7:53
Say you have only a little End left like this now you can grab this with this piece of seamless tubing and
8:01
And now you have the extra leverage. So we use that quite a bit and that's just a piece of tubing
8:07
It's got a three three-eighths ID on it and a half or 5 8 OD. So it's pretty heavy wall
8:14
So it won't break when you bend it. So let's start off by laying this thing out and
8:21
We're just gonna eyeball it here We're gonna put the two pins somewhere in the middle here about here, and I'm trying to eyeball
8:30
Center of it and I'm gonna put my first punch right here
8:37
So just a prick punch and I got that located pretty much in the center
8:42
I might be favorable that way just a tiny bit. That's all right And I'm gonna grind this it's got a burr on the end. We'll grind this all up after we get it drilled
8:50
So then we're gonna take a pair of dividers if you don't have a pair of dividers. It's the best measuring tool
8:57
There is never use a tape measure. I hate tape measures tape measures are good for carpentry
9:03
But not for machining work or a precise work of any type so you take up and make sure you get a USA
9:11
scale stainless ones are really nice and We'll take this we're going to set this at seven eighths of an inch and that will yield our
9:23
Three-eighths spacing that we want and we'll double check here You know Tom's got it a little wider. So let's see
9:32
What does he got it at? He has it at oh Those are 5 8 pins though. That's why okay
9:43
So he's got it set at 1 inch. That's because they're 5 8 pins. We got we got half-inch pins
9:49
So we're gonna set it at 7 8 So we're set at 7 8 we're gonna put that in our prick punch mark here and then scratch the surface
9:59
That gives us our 7 8 and then approximate where the center is and
10:05
If we're off a few thousands is not going to matter at all So there's our piece now the next step we got to do is drill it out and
10:12
Then we'll bring it over to the welding bench after we drill it We'll put these pins in and we'll weld the nuts on the backs. I have three drill presses. This is my
10:23
Faster speed smaller drills faster speed this one slower speed Bigger diameter drills and then I this one is
10:37
Even slower for bigger drills, so I got them all set up here and
10:42
We're going to put a little cutting oil on the drill And
10:49
Never do this where you hold this like this I use these water pump plies. There's all kinds of ways to hold down the the piece
10:59
But the water pump pliers isolate you from it because if that thing starts spinning around it gets a little little hairy
11:12
So this hole number one You can do this with a handheld drill will just take you a lot longer
11:24
the drill press is an amazing tool it'll just do so much work for you and
11:29
They're relatively inexpensive these are I think these were Taiwan made deltas and
11:36
You can buy them pretty cheap this one actually know this one I bought brand new
11:41
And the guy had it on Craigslist and it was I think like a hundred bucks or something like that
11:45
But I don't know how much they paid new is probably $300 new or so which is still pretty pretty cheap
11:51
And this one I bought years ago From a company that had a whole bunch of them and I got it for like $35
11:59
So I've already probably got about 25 years use out of it, and it's still in good shape
12:21
And one thing you should learn is how to shop and hand shop and a drill with a grinder a bench grind it
12:31
Maybe I'll do a video on that That should be a good video
12:38
It's really easy to do once you learn it. You're really feel empowered because you never have to worry about
12:43
having a dull drill ever again and you can get so much life out of drills and people buy drills and
12:52
never use them and Then they throw them in a yard sale or a flea market or something
12:57
And you buy all these drills for really cheap money and oftentimes you just need to de-rust them or
13:03
Work or sharpen them a little bit. So I've got literally thousands of drills different sizes all the way up to
13:10
inch and a half or so Now this is a harbour freight drill press. It's actually a pretty nice drill press. We put a nicer chuck on it
13:22
We got a three-quarter chuck on it Think I'm going into the weld scene. Yeah, the weld seams in there. I guess I didn't plan that out too well
13:45
It's okay, though That's why I was jumping a little bit So then we have it got the drill holes all drilled
13:56
They wand it a little bit, but that's no big deal. So that's going to be the bottom that wanded because it hit the I
14:05
Should have had that as a Beware of the weld seam. We should have went through this way
14:10
So they hit the weld seam caused the drill to go sideways, but it's not gonna have any impact at all in the tool
14:17
next thing we do we'll go over to the weld bench and Clean this up a little bit with a grinder and we'll weld those bolts in I say I changed the plan a little bit
14:28
Before I weld them in I'm gonna pre-cut these So I'm just gonna eyeball this about an inch over
14:35
Get this one about the same And we'll pre-cut these with a hacksaw
14:44
We do have power cutoff saws or cutoff wheels I suppose but I'll just hacks arm
14:49
I'ma I like the old old-school way of hacks are So I'm gonna cut these off and the reason I did that is
14:55
It'll be easier to chamfer these edges a little bit so they're not sharp and if you bump into something
15:01
It's always cut and I get more cuts and as you get older your thin gets really
15:06
Skin gets really thin and so I try to keep everything grounded. So if you bump into it, you don't get a nasty little
15:15
Bloodletting situation. Alright, so now we're gonna chamfer this up and clean this up a little bit Oh
15:34
All cleaned up wrong place for that that goes right there in the tool holder That was another video we made for free tools is to check that video how to make those air tool holders They really nice
15:47
boom One
16:24
It's almost a press fit so that's pretty good Then we got that nice 3 8 clearance in there. So that should work really nice now
16:32
We don't want to put any weld up here. We'll put the weld down here
16:36
We don't have to go crazy with it. Just a couple little daubs on weld there and
16:40
We'll be good So let's stabilize this a little bit Always keep a couple little blocks of steel around
16:49
Like that and that'll stabilize it and fire up dead Miller my wonderful
16:55
1985 synchro wave which still works perfect knock on steel We'll use a 3 32nds rod
17:17
The coating on there should of why I brushed them the coating spit
17:22
So it spit right on the tungsten so I'll get the tungsten cleaned up maybe get another one that's really small
17:34
Oversight on my part. I didn't think it was going to spit like that, but it did so if you got any zinc coating or anything
17:40
I think that's that gold cadmium or something All right, we can make it a little lesson here on how to grind the tungsten proper too
17:57
So I gotta get it tungsten ground up. We got that big blobberoonie on there. So
18:02
Let me get a new tungsten There's a simple little bench grinder and these are tungsten's are 3 32nds and 2
18:09
Lanthinate is what I use across the board for both steel and aluminum
18:13
And I'm going to cut it in half with the grinder just by
18:18
Estimating where the center is You Break it like that goes off a little bit now put this one in this one identifies it, but
18:31
This one doesn't have the band the blue band so but we'll use this now
18:36
Use that one later so They're shopping these tungsten proper. All you need is a little bench grinder
18:43
Dust fills up here. I wipe the dust off This is the way I do it. I there's a my spinners. You can use just these two three fingers
18:51
The thumb and the two fingers or this one like that that spins it
18:56
This guy's it so you put it on the wheel You just let the grinder do its job. This is a coarse stone. I believe it's a
19:09
It might be a 60 60 grit stone If you do it in one spot you wear a little groove in there and that irritates me when that happens
19:19
So you move it around you have a little quench bucket if it gets hot so you
19:25
And you're just spinning it like this and guiding it with your thumb The both aluminum and steel I grind it basically the same now, so I
19:37
Like to go about a quarter of an inch back With a super sharp point when it's aluminum. It'll ball up on the end. You'll get a little
19:47
spontaneous Micro sphere right on the end With steel That nice little point gives you a really clean point of welding
20:00
You'll get a nice heat right coming right off that sharp point so that's
20:05
Welded ready to weld I have a gas lens in here with a gas lens you can actually have the
20:11
Tungsten out an inch or so and it'll still work fine, but generally I put them out about a quarter of an inch to three-eighths or so
20:18
That's a little that's probably seven sixteenths there, but it'll work fine
20:23
It might still spit at us. It might block it up again, but we'll see
20:27
It's not the end of the world I wire brush some of it off, but I don't think I got it all it would have been
20:36
Better practice the wire brush at first before I welded it. So
20:41
Or ground it clean metal welds a lot better I And if you don't have a TIG welder I
21:09
Strongly suggest that you Invest in a TIG welder. It's just so much better than any other process pretty much
21:18
He allows you to just get exactly where you want all the time. It's just a really nice way of welding
21:28
So here we go. I just Secured those in with a couple tax on or a couple wells on both sides. I got about a half inch on both sides
21:37
I'll give that a little wire brush And now we'll go over and try it out that two by two tubing
21:49
Nice and substantial that'll hold in the vice really nice Now it's home
21:56
Make sure this is not going to rotate. We got a piece of quarter inch rod. This is the raw material you make all your wire forms for
22:05
Generally I use exclusively this quarter-inch hot rolled wire this might be
22:12
That might be cold roll. I'm not sure Because usually the hot roll is a little darker. I just pulled this out of the scrap in let me see if I can get another piece
22:21
All right So I found some hot roll that other piece was definitely cold roll was in the scrap and I didn't check
22:28
See this is doesn't have that really shiny finish to it. The hot roll will bend sometimes
22:34
kinky so you got to watch it and The cold rolled will bend nicer, but it's a lot harder to bend because it's cold rolled. It's a little
22:45
Stronger so here's the whole deal right here is Making sure enough say we want to make an arc in this thing
22:53
It's all about doing a little bit a little bit a little bit so a
22:57
Little bit a little bit a little bit and you don't want to turn this you want to keep this on level
23:03
If you do turn it's not the end of the world, but see these little increments
23:09
Make that nice little arc and all these lines You can Interpret the line after if you have any spots that are over bent and other spots that are under bent and If it under bent then you just go in there and you got to pull tight like this
23:29
And you give it a little umph like that And if it's over bent then you reverse it like that and then pull the out under bent over bent out
23:38
So but the most important thing is that you Keep this level at all times
23:45
so it's all flat on a plane now if it does get a twist in it you can put it in a vice and
23:52
You know oftentimes you can twist it It's it's got enough malleability so you can take that twist back out with a vice grip or something
24:00
so Let's just make a Typical line here It'll be Used somewhere. Alright, so
24:11
That's not really what I wanted. I'm gonna unbend it. So it's infinitely correctable very easily correctable
24:21
So So say I was making the top of a 50s sports car fender or something and then it will come into a reverse curve over on this side
24:31
so Now usually I've been to a drawing I have a drawing and I bend very carefully to make it fit that drawing
24:41
So this is the challenge is to now you see I have screwed up see how I've got that and that's good
24:49
So I can show you how to fix it so Now let's take this
24:56
And we'll reverse the direction here a little bit Let's try the this is where this can come in handy
25:07
We'll get a little more leverage now on that And bend this up
25:20
So that's and over did that one will bring this one back
25:27
That's a typical line on a top of a say a front fender on a
25:33
fifties Italian sports car and And there's the fender hump and then it goes into where the hood would be and it goes up and then reverses itself over there
25:42
And this would come down straight like that then a smaller radius down here. So that would be one little station in
25:50
the The buck that you were making if you were making That type of buck
26:00
So now I have a little twist in there see it's not sitting flat is only because I'm
26:08
Talking and not concentrating enough so now I put this in the vice like this
26:19
And we'll give this a little twist we'll get That looks good there
26:27
We'll get probably a vice grip or something or actually My dolly would do it, but I got this big piece of metal right here. I got to get that tighter
26:49
Anything with some mass here fulcrum lever, it's always fulcrum and lever
27:00
I See how that did All right, so that straightened it out pretty good
27:10
It's still got a tiny little bit in here, but you get the idea. So that's the beginning of a whole car buck
27:18
You would need a drawing to work with you can eyeball this stuff to
27:25
Sometimes just do a simple buck like a gas tank or whatever and just eyeball the whole thing. So
27:34
The way you do it is what I call the primary line So if you're doing this motorcycle tank, you will do this
27:41
primary line right here and The other primary line is the base now the base can be made in two pieces
27:49
this would be the bottom view and the side view and This would be the front view and this is the widest point here
28:00
So you could do those actually free form By no drawing whatsoever. Just make sure the line is nice and clean like that and now you have a distance for the
28:12
side profile your primary line and then you want it to make the
28:18
the bottom line here and you'd make that and You come and connect to here and now you can just take a piece of cardboard
28:26
trace it and then you flip it over so that you can get an opposite symmetrical size and
28:35
Then you got that so now you have the primary line of the bottom and the primary line of the profile
28:42
And then this is one of the most important primary lines. This would be the front view line
28:47
That's your widest point that you would see So you put that in and again, that's to make it symmetrical
28:54
You just copy that curve and you're connecting these points from here to here
28:59
And you can measure up so that you're always at the same points
29:03
When you do it this one's off a little bit and you get that in then you can do a
29:10
A primary line down here showing the taper of what you want to do with the taper
29:15
You put that in there and then all the other lines all have to follow suit and you can do it
29:21
I use a 316 stainless wire that I run like this I'm using a stainless
29:29
Ruler right now, but that's just to show the continuity of the line
29:33
So as you make these they all have to be touching and if they aren't touching
29:38
Then then you have a problem the problem would be one of these would be proud going out or weak going in
29:46
So it's a really fun process to do it You can modify it really easy if you wanted to make a cove in here or something you could now
29:57
Make the cove and weld it on the inside then cut these out and you can define that cove
30:03
It just the possibilities are endless alright So I hope you accept the challenge of making a wire form
30:11
It's a really cool process and once you make one you be
30:16
Totally addicted to the process it just it's a creative outlet that
30:20
It just keeps giving dividends and and you'll just love it. So give it a shot
30:25
It's super inexpensive all the materials here are probably like five dollars to make this and
30:32
It'll literally last well after you're dead. You're good. You're a great great grandson might find this hanging in your barn or something
30:39
Say wow, look at that grandpa did that, you know, so It's an awesome piece. They don't rust they'll last forever. Give it a shot. Try it out
30:50
I hope you learned something from this video. It's ray from pro shaper and please like subscribe
30:57
Give us the comments and remember metal is clay. This is free tool Friday at Pro Shaper Workshop racially
31:04
Thanks for watching spread the word
#Crafts
#Home Improvement
#Construction & Power Tools