Up next in 10

In this video I will show you how to set up a tarp Ridgeline quick and easy! Tangle-free too! New product from Onewind!!
See the Products in My Amazon Store:
https://www.amazon.com/shop/influencer20170928757?listId=G2KB0QXOLW6D
ORDER Prepared Wanderer Patches and Stickers Here:
https://thepreparedwanderer.bigcartel.com
5Col Survival Supply:
http://www.5col.com?rfsn=504688.49256
Prepared Wanderer FACEBOOK GROUP:
https://www.facebook.com/groups/1835005976546722
Prepared Wanderer INSTAGRAM:
prepared_wanderer
Blog
https://wanderingoutdoors.com
Show More Show Less View Video Transcript
0:00
What the heck is this thing
0:09
What does it do? Well, I'm going to show you what it is and what it does, so stick around
0:20
All right, not that long ago I did a video review of some One Wind hammock gear that
0:34
I've been starting to use. I think this was like November of last year, so there'll be a link at the end of this video
0:40
to that video if you want to check it out. Well, One Wind sent me this thing, and what is this thing
0:51
Well, it's pretty interesting. If you are a tarp camper or a hammock camper and you use tarps, one thing that you may
1:01
or may not struggle with, especially if you're new to the whole tarp thing, is setting up
1:07
a ridge line. This is a Quick Deploy Ridge Line Reel, and I'm going to show you how this thing sets up
1:16
It's kind of innovative, something different, and I think some people will find benefit
1:23
in it. So let's take a look and see what this thing does and how you use it
1:27
All right, so when you're setting up a ridge line for a tarp, if you're not familiar with
1:35
knots, it can be kind of a daunting task, especially if you're just getting into setting
1:40
up tarps and doing hammock camping and things like that. And I understand that
1:45
We all kind of go through that phase of learning, and I certainly recommend that
1:50
I think you need to know some of those things because devices and gear fail, and it's good
1:56
to have backups, and it's good to know how to do things. But also, there are times when I want to set something up really quick
2:04
Now, for my gear, I use a continuous ridge line for all my tarps and hammock camping setups
2:12
I've found that that is the best pre-made ridge line method for me
2:19
Works really well. Go out on YouTube, do some searches on continuous ridge lines
2:23
There's a lot of different videos on how to make those and how to use those
2:27
They're very quick. They're lightweight. But one thing that always happens with cordage is there's always a possibility of tangling
2:34
it, of it getting messed up in your pack or your gear
2:39
And, you know, if you're pulling into camp and it's starting to get dark and you're tired
2:46
you may want to set up your ridge line pretty quick and get your shelter going
2:50
And this may be the answer. I don't know. So it certainly is interesting
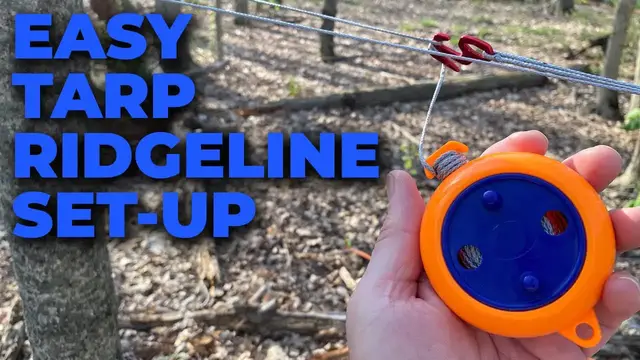
2:56
So we've got this bright orange plastic housing, and this is the actual reel
3:01
You can see that this thing turns, and that reels the cordage back up into the device
3:11
Now, the cordage that they're using on this is very similar to Amsteel
3:17
I don't think it is real Amsteel. It may be something a little bit different, but it's very close
3:21
I believe the specs are a 250-pound working load on this. So that should be plenty for a tarp setup
3:31
So how do you use it? Well, first thing you want to do is you're going to want to take off the provided carabiner, okay
3:41
And you're going to put that on the very end of the ridge line
3:52
There's a loop already tied into it, okay? So that's your first step
3:57
Step two, you're going to pull out some cordage. You're going to wrap around the tree, and then you're going to clip that carabiner onto
4:14
the cord. So what we're doing is we're creating an anchor point
4:19
Everything's going to anchor off of this. So you don't need really much more as far as knots or anything like that
4:24
That's pretty standard. That's the way a continuous ridge line works, kind of the same way
4:29
You clip it to the string that goes around the tree, and that's your second step
4:35
Next step is we're going to reel this out to the next tree over that I've already picked up
4:40
I'm going to start reeling this out. I'm going to move these prussics down with me
4:48
I'm going to move... There's three prussic knots on here, prussic loops
4:53
There's one, two, three. I'm going to take these two, the one with this little gizmo, and I'm going to move these
5:01
with me as I go down that way. It'll follow me that way
5:18
All right, so here I am. I've went around the tree, and what I've done is I'm putting this reel on here temporarily
5:27
This has a cleat built into it. You see that? So when I pull that around the tree, and I just want to store this while I'm working
5:38
with those other pieces. So I'm just going to wrap it around the cleat
5:49
Pull this in a little bit so it's kind of out of the way
5:54
You don't have to worry about it getting super tight right now. That's not the purpose
5:59
Okay, so that's just holding it temporarily while I figure out what I'm going to do next
6:05
So come over here. We're going to undo that. Now I've got the prusik loop with this little gizmo
6:27
So what are we going to do with that? We're going to come around with the ridge line
6:38
Now what you can do is you can actually pull this tight, as tight as you need it to be
6:50
Because with the prusik loop, when it's going a certain way, it will tighten on itself and hold
6:57
When it's being pulled the opposite way, it loosens and then it slides freely along the line
7:03
That's why it's able to slide it down. When there's no tension being put on it, it slides down easily
7:08
But as soon as you put tension on it, the prusik actually constricts and turns a little
7:14
bit and that creates pressure and then it tightens and it doesn't allow it to slide anymore
7:20
So I'm going to go around again on that U-shape. You want to make sure your ridge line is level
7:47
Now I'm going to come back down and I'm going to go in the V
7:52
The V portion has teeth and that is going to lock the string
8:01
I'm going to do it twice. Then I'm going to come back up and I'm going to go back over that U again, just as a safety precaution
8:11
Bring my reel around with me. Now if I want to tighten, I can pull on the prusik but I really don't need to because
8:22
now it is locked. So now I have the reel. What do I do with this
8:27
Well, you could let it hit the ground but that's silly because what's going to happen
8:32
is you're going to get grime and stuff inside of it and you really don't want to do that
8:36
So what I'm going to do is I'm going to reel up the excess like this
8:47
I've got these cleats so I'm going to take advantage of those
8:51
So I've got the cleat at the top. What I'm going to do is I'm going to take the string that's coming out of the reel
8:55
I'm going to wrap around that cleat a couple of times. What that is going to do, it's going to stop the reel from unwinding
9:07
Do that a couple of times and then I can just hang this like that and that is out of the way
9:16
It's safe and it's not in the dirt
9:28
There you can see it. You can see where the cord went around the U-shape, came back around, did a tightening
9:36
then went down into that V and that V have teeth and they're just enough to grab the
9:44
cord and then I went through that a couple times just as a safety measure and then now
9:52
my reel is hanging. There's the cleat holding the string so it doesn't come out of the reel anymore
9:59
Okay, so now we have the ridge line complete. Pressick, we got one of these
10:10
Come down here to this end, we got one of these. So like I was saying before with pressicks, see how they slide
10:21
If you're not familiar with how to do a pressick, learn how to set up a pressick
10:26
They're one of the most invaluable knots out there and I really enjoy using them
10:32
They're very handy, especially when setting up and building ridge lines, but this thing
10:36
will slide either way because there's no pressure on it, but if you put load on it, it constricts
10:44
and it puts pressure and actually starts to kind of kink the knot a little bit and then
10:50
now it holds. It can hold weight. Alright, I've actually got two products here from One Wind
10:59
This is their Rain Poncho. It's still nylon, but it's set up to actually use like a tarp
11:07
This is their, what they call kind of like an emergency tarp or it can be even used as
11:12
a footprint. These are both small in size, both very lightweight, but perfect for a day pack as like an emergency shelter
11:24
I'm going to try and set up the poncho version and see what that's like
11:28
I haven't set it up as a tarp yet, so I'm curious how that's going to work and we're
11:32
going to use that with the new ridge line from One Wind
11:37
So still nylon, very lightweight, and we've got a tab in the center because what I want
11:51
to do is I want to set this up as an A-frame. So how am I going to hook this tab to that prusik loop
11:58
Well, there's two ways. The easiest way is to get yourself a couple of decent carabiners, small ones
12:14
These are, they're not bad. I would try to find something that has maybe a little bit more of a load rated
12:22
These are more of the garden variety dime store kind, but they will work for this demonstration
12:28
So with this carabiner, we're going to hook it into the loop
12:36
Like that. What I want to do is I want to put this over my ridge line
12:49
Put that in. All right, so there's the poncho across the ridge line
12:59
Now it's loose. So what I want to do is I want to take these prusiks and I'm going to start pulling them
13:07
out until I get it tight
13:19
Yeah, I've moved the poncho from the center tabs to the end tabs because the poncho is
13:29
just a little too short or not wide enough to actually do a good A-frame
13:35
You're not going to get a lot of coverage. So this is probably going to work better as a lean-to style
13:41
So I reclipped to the end. So now same deal. Nice and floppy, right
13:45
So you're going to start pulling the prusiks until they're nice and tight
14:01
And then what you can do is you can center, that helps you center it on the ridge line
14:06
You can move those prusiks and adjust how centered you want it
14:12
Okay, so I've got a line set up, a guy line for my tarp
14:25
Now with this guy line, I'm sure you've all seen these. These come on or with most tents these days, a very common tensioner
14:34
There's the loop that's going to go around the stake. On this end, I've tied a loop
14:45
See if I can make that behave
14:55
So what you're going to do is you're going to run your loop through the webbing loop
15:01
on the tarp. You're going to pull that through just a little bit
15:07
Okay, then you're going to take this end of the line and you're going to come back through
15:14
And you're going to pull that line all the way through. And then what's going to happen is as you pull that, it's going to tighten on itself
15:32
and now it's attached. So what I'm going to do to adjust these tensioners, I just pull the top loop either through or
15:50
the other way. So I'm going to lengthen this a little bit. I don't need that much line for this tarp
15:56
It doesn't have to be quite that long. Get my stake out
16:06
These are the Walmart brand Kuglin stakes. I replaced mine with a Hi-Viz cord so I can see it a little bit easier
16:17
I like these because they're inexpensive. They're just as good as the MSR Groundhog stakes and they're way cheaper
16:24
And if I lose one, it's not a big deal. I go to Walmart and buy a new one
16:29
So not a bad little setup for case of an emergency. You've got something you can set up really quickly in your day pack to keep you dry
16:40
get the rain off of you, block the wind when you're having your lunch, whatever
16:45
And that reel just made it so easy. So now I want to pull out that other tarp that I was showing you
16:50
And there'll be set up specs going down below with all of these setups so you can compare
16:57
and see the differences. I want to look at that other tarp and see how much bigger it is or maybe it's the same size
17:05
I can't remember. But we'll take a look at that one next
17:09
Really small package. I love Silnylon for lightweight day kits
17:21
They just make a lot of sense. All right, it's kind of what I thought. These are the same size. Exactly the same size
17:34
So if you're interested in the tarps, you've got two options. You've got a poncho version or you've got just a regular tarp version
17:43
Now the tarp version is cheaper than the poncho. But here is what I'm thinking
17:52
With these two together, you've got more of a shelter system now because you can hook
18:01
these up on the same ridgeline. You can overlap one of these with a clip to prevent rain coming in
18:11
Do it that way, a couple of clips, and now you've got an actual large A-frame
18:23
So maybe you're hiking with your wife, your girlfriend, a buddy. One person could be carrying the poncho or maybe both of each carrying a poncho or whatever
18:35
But now if you combine those two, you can make a bigger shelter
18:38
If you noticed, I said there are two methods for hooking this to the presser clip
18:42
You can either do it with the carabiner that you bring and provide with you, or you can
18:47
use another method which is using stuff that we find along the way, and that is the stick method
18:57
Now I've seen people suggest this, use the stick method. One thing to note, and sometimes they fail to mention this, you really want to use a
19:07
green stick. You can use dry sticks, but they tend to break
19:11
So a green stick is going to have a little bit more give and strength to it, and it's
19:18
not going to snap under the weight. So how do we do that
19:22
Well, it's pretty simple. You run your stick through your webbing loop like that, and you take your presser, you
19:34
go down one side, down the other. And now, just like with the carabiner, you can pull nice and tight, and now you don't
19:52
have to bring a carabiner. Pretty simple. So, overall, I like the system
20:08
I think it's pretty cool. It's pretty neat. You know, the orange reel is interesting
20:16
You're certainly not going to lose it when you drop it, and I'm sure that's the intention of it
20:20
It'd be kind of cool if they had a couple of versions maybe that were in subdued colors
20:24
as well, because I do like subdued stuff when I'm doing some other types of camping
20:30
All right, guys, thanks for watching the video. I appreciate it. As always, please like and subscribe and hit the bell icon for notifications if you are
20:42
so inclined. Please check out the affiliate links down below to the Amazon store
20:49
That will be in here, in the Amazon store, so you can check it out there
20:54
Also, make sure you check out the Facebook group that is getting bigger and bigger all
21:00
the time, and Instagram. And then if you're interested in any of the Prepared Wanderer swag like patches and stickers
21:08
those are on the Big Cartel site, all links down below. And I'm going to get out of here, and I will see you next time on the Prepared Wanderer
21:14
Thanks for watching
#Outdoors
#Hiking & Camping