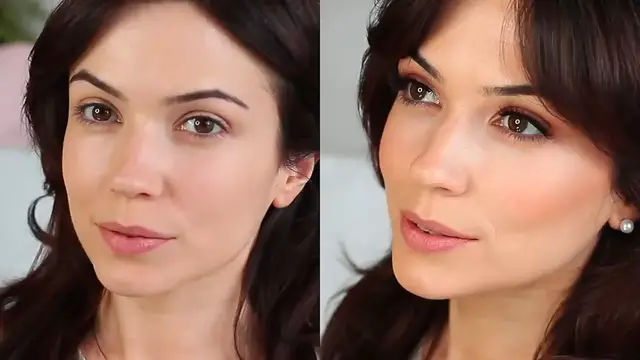

Classic Makeup Tutorial | Sheer Beige Pink Soft Glam | Makeup for Cool Skin Tones
//Creative Commons Attribution Licence video (Reuse allowed)
Show More Show Less View Video Transcript
0:00
For today's handy makeup lesson, I'm going to show you how to recreate this classic spherical makeup look
0:08
This look is incredibly easy to recreate, using very few products that you already own
0:15
Before we get started, if you're new to the Makeup Gear channel, hit the subscribe button below
0:19
and let's start by talking about the type of products that we'll be using today
0:23
So blush canes are the main focus of this look. So pinky beige canes, blushes, bronzers, and eyeshadows
0:30
And also lips. So all the shades that we're using are in the same nudey beige cane family, which is great for the cool and neutral skin tone
0:39
For warm golden or olive skin tones, you may want to use more of a golden undertone
0:44
And I'll focus on that in another makeup lesson, but you can just follow along with your chosen tone
0:49
So let's begin and start applying. Starting with the eyes, I'm taking an eyeshadow brush and using the E45 by Blanc Air Cosmetics
0:58
And this will be the only brush that we're using for this eye look. I've primed my eyes already with some eyeshadow primer, so the lips are now a decent eye color
1:09
I've chosen a beige cane for at least one shade darker than my skin tone
1:13
I find at least one shade darker is enough for this look. So take a look at your own skin and choose a matte eyeshadow at least one shade darker
1:20
Dip your blending brush into the eye shadow, tap off any excess, and we will be slowly building this up to the rest of your face
1:27
We're going to start in the crease of the eye and blend on forward
1:31
So the best way to apply this is to actually hold the brush quite low down on the handle, and keep your hand low on your face as well
1:40
We want to create a blurring effect. We're almost buffing the eyeshadow across the lid because we barely want to touch the skin
1:49
Let the brush glide over the lid and don't apply too much pressure
1:56
By doing this look you'll see that the eyeshadow is shade from the crease upwards towards the eyes
2:02
And it's a very effortless way to create a blurring effect. Next I'm going to take my brush, which I'm going to devise using eyeshadow
2:13
I'll be using this brush later on my face, so this will bring the entire look together
2:18
So taking the brush I'm going to focus on the outer half of the eye to fill out some depth and change this look
2:27
I'm still holding the brush quite low on the handle and my hand is still quite low as I blend this
2:34
Going back to the original eyeshadow I'm going to apply this on the eyes and for the nose I'm using the same brush
2:41
So I press it down to create a stand and then I glide this under the lashes
2:46
Obviously you may want to use a smaller brush like a pencil brush or a flat brush
2:51
That's totally up to you and the type of brushes that you have available to you
2:55
Once I apply the eyeshadow underneath the eyes along the lash line I then want to readjust the brush and hold it in the center of the angle and sweep around to blend the eyeshadow out
3:06
I want more control so I'm holding the brush a little higher
3:10
This will also prevent me from getting a too soft outside of eye shape while still allowing me to create that blurry blend
3:17
Bear in mind I haven't actually took any additional product with this look
3:22
The only other eyeshadow that we'll be using is a bronze tan with a metallic finish
3:27
So this is a shimmer that will add some depth to the look. This eyeshadow should be at least two shades darker than your skin tone and I like a shimmer finish
3:35
I'm going to apply this using my fingertips. I'm starting at the lash line and then blending across the lid focusing mostly on the center
3:44
Next I'm going to apply a thin layer of black liquid liner. I call this invisible liner
3:49
It's really just about darkening the lash line and thickening the look the less
3:53
You can use brown for a softer look but I do like to match my skull with the liner
4:00
So if I'm using black mascara I would recommend using black liner as well
4:04
For the face I'm applying a sheer layer of mineral foundation which is a powder
4:08
I want my own skin to show through so a sheer amount of coverage is all I need
4:14
Once my base is on I'm going to move on to applying a little baby pinky tone
4:18
I'm going to start with a matte bronzer in sort of a baby pink
4:22
I'm going to apply this on my entire face. I'm going to apply this on my entire face
4:26
I'm going to apply this on my entire face. I'm going to apply this on my entire face
4:30
I'm going to start with a matte bronzer in sort of a baby tone
4:34
I'm going to use those to create some shape and then I can go in and add the pink tones and work around it
4:40
To apply this I'm using an F37 brush brush by Tenerife Cosmetics
4:44
You want a small brush that will give you control but isn't too firm
4:48
So I'm setting low on the apples of my cheeks and I'm swirling this in small circular motions
4:54
working upwards towards the top of the ear and this will lift the face
4:58
Now you do want to adjust this depending on your face shape
5:02
If you need help, ask us and let me know. Once again we're building this up slowly so with each new application and each new click of the product
5:10
I start a little further away from the apples and this will just avoid applying too much bronzer on the apples
5:16
because we still need to apply blush. I want to bring this up around my forehead and you want to adjust this depending on your forehead shape
5:24
For instance, smaller foreheads, you want to keep it really close to the hairline
5:28
You don't need to add too much shape. It's just about adding some balance
5:32
For shorter foreheads you may want to focus on the sides and avoid the top
5:36
Long, focus on the top and avoid the sides. So I'll kind of try on everywhere but a little goes a long way
5:42
Now we'll be taking some blush and I'm mixing three different tones together
5:48
I'm mixing here a blush blender together with a touch of your highlighter
5:52
if you don't have a blush palette like the one on your finger. I'm applying this on the apples of my cheeks and just a touch on the nose and softly blending this out
6:00
Again, adjust this depending on your face shape. For example, long faces, you may want to start on the apples and blend outwards to your ears
6:08
Round, you want to start lower on the apples and blend upwards to your ears
6:12
If you need help with your blush application, you can always message me on my Instagram
6:16
For the lips, I went again keeping the same baby pink I made by mixing a cream pink and a touch of concealer together to customize the perfect beige shade
6:26
I'm using a pencil brush to brush this into the lips for a softer finish
6:32
So rather than the color sitting on the lips, it's softer in
6:36
I can always go in with lip liner if I need to sharpen it up afterwards
6:40
I applied lashes and added some jewelry off camera. I do find that this adds something extra to the look
6:48
Now I'm going to go in and apply some fake freckles. I found this Urban Decay liquid brow liner. This is great for this
6:56
Apply it on the top and the center, then just press to blur it out
7:00
Seeing freckles through your makeup gives the illusion of a very sheer, natural skin
7:06
I finished with a setting spray, which I couldn't do without. The right setting spray can be dangerous for your makeup look, so I would recommend adding one if you don't already have one
7:16
And there we go. That's the finished look. If you enjoyed this or learned something, definitely leave a comment or you can press the like button
7:24
I would really appreciate it. If you want to see more of my videos, you can click the screen now
7:28
And definitely let me know what you guys' type of videos you'd like to see
7:32
Take care, be kind to yourself, and I will see you in the next one
Online Video
Beauty & Fitness
Face & Body Care
Make-Up & Cosmetics