Up next in 10


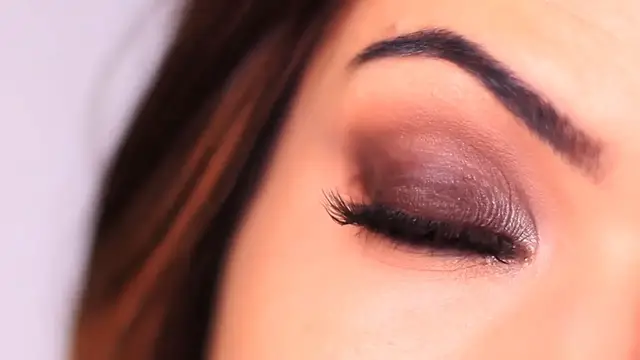
Beginners Eye Makeup Tutorial | How To Apply Eyeliner & Eyeshadow
//Creative Commons Attribution Licence video (Reuse allowed)
Show More Show Less View Video Transcript
0:00
For today's makeup lesson, I want to show you how to create three different makeup looks using the same products
0:05
But with just a different technique This is a great one for beginners because it allows you to see and visualize how all these eye makeup looks are created
0:14
But in a very simple way all you're gonna need is a liner
0:18
This can be gel or pencil in any deep shade that you want Next you want a shadow that works with the liner. So I picked brown liner
0:26
So I'm using a brown eyeshadow and finally you need a shade lighter and a shade darker than your skin tone
0:32
This is going to be used to contour and highlight your eye shape. All of these looks were created with the same shadows
0:38
It's super easy to recreate them. So let's get started we're gonna start off with this one the most basic one as
0:46
With every look that we create you want to start off with a good base now for dry skin like me
0:52
I use just a matte concealer This creates a smooth base it gives the eyeshadow something to hold on to but for oilier lids
0:59
You want to use an eyeshadow primer? Just to prevent those oils from breaking down the eye makeup and then for mature lids a little bit of both
1:07
Can actually go a long way a lot of primers can weigh down the lid
1:11
So a sheer layer even using a damp sponge to apply it will be great for a mature skin
1:17
But I do have an entire video talking about how to work on mature skin if you want to check that out after this one
1:24
Then you want to take a shadow at least one shade lighter than your skin tone This should be matte and use this to brighten underneath the brows
1:30
This is going to give us that nice lifted brow appearance Then you're gonna bring your brush slowly down so it gets into the crease and then just slightly onto the lid
1:39
Just using whatever is left over on the brush This will just create a smooth texture for us to work over but also set the primer in place as well
1:49
The next eyeshadow should be at least one shade darker than your skin tone
1:53
So think of your contour your bronzer as long as they're matte in the same way that they shape and frame your face
1:59
This is gonna shape and frame your eyes Take your favorite blending brush and I'm gonna be using this one. What I love about this is I can use it
2:06
Horizontally, but also vertically it's great for blending and I'm gonna be holding this in the middle of the brush handle
2:12
They're just gonna give me a lot more movement But still control and we're gonna start by sweeping this into the crease of the eye
2:19
What I would recommend doing is keeping your eyes open and just hitting where the eye shape is
2:25
Creasing so right where the lid is creasing into the eye shape you want to go right in there and slightly higher
2:31
Now don't worry about blending it up or down too much right now because if you're using a brush like this
2:36
Once you actually apply into the crease you can then turn the brush on its side
2:41
And what this is gonna do is sweep it up and down for us. That's why I love this brush so much
2:48
Just remember we don't want to blend this up too high. We still want to leave a little highlight under the brows
2:53
Next I'm gonna take the gel liner and I'm using the brown shade You can use any shade that you want and I'm applying this with an angled brush
3:00
Now what I like to do when I'm using an angled brush is I start in the middle
3:04
But I always make sure that the pointed angle is to the outer edge
3:08
Bringing it to the middle and then when I do the inner corner I flip it around to get to the inner corner and blend it to the middle again
3:15
I always like to make sure I'm not doing one solid line from the inner corner to the outer corner
3:19
It's just a really easy way to apply your liner if you have slightly shaky hands
3:24
I'm also going to apply the gel in between my lashes by taking my brush and pushing upwards
3:29
Pushing this gel right in between the lashes now if this is too ticklish for you or maybe because you wear contact lenses
3:36
You're a little iffy about using gel. That's totally fine. You can definitely skip it
3:40
I just really like the way that this looks it just adds a little bit more of a smoky look
3:45
For the next step you want to grab that shadow that works with the liner
3:49
This can be any deep tone if you use black you don't necessarily have to use a black eyeshadow
3:54
You can use like a deep brown or a deep green or a deep purple and you just apply this over the top
4:00
Just as long as it works and has that same depth It's also going to fill in any areas where the liner might not be very smooth
4:08
But it's also going to set it in place, which is great You want to be using a stamping pressing motion very similar to how we applied the gel
4:16
You're basically doing the same thing but using a powder to hold it in place as this is more of a natural look
4:23
I'm gonna be using my favorite natural lashes And this is my sixth time using them and look how good the shape is now to finish the look and this is optional
4:31
But I applied a nude liner on the lower waterline What this is going to do is create a contrast with the upper depth at the lash line
4:38
So we're just gonna have more of an open but really defined eye And then you can use whatever is left over on your liner brush and smudge this
4:45
Just in the center of the lower lash line and then I just use my fingertips to sweep and blend this out
4:51
And there you go. That is my quick and easy Defined eye makeup look this is great for beginners
4:56
It's a great way to start using eyeshadows if you haven't already and also to include that liner
5:02
So you can kind of get used to applying liner now for the next look we want to use the same products
5:07
But we're just going to apply them in a slightly different way to create more of a smoky look
5:12
So with every look that we create you want to start off with a good base, especially true for a smoky
5:17
Eye, I should have primers will help create a barrier between your skin But it'll also make sure that we have a neutral blank canvas for the smoky
5:24
Eye to sit on top of it also prevents your eyeshadows from going very muddy and over blended
5:30
So if you feel like it always just looks like a kind of a bruise II mess just apply an eyeshadow primer
5:35
It will give you more grip and more hold the first shadow that we're using should be at least one shade lighter than your skin tone
5:41
And this is going to be used to brighten up underneath the eyes And then you're gonna slowly bring this down
5:47
Into about the crease area and slightly onto the lid with whatever's left over on the brush
5:52
What this is going to do is create more of a contrast with the smoky eye So having a nice clean area underneath the brows will definitely bring out the smokiness that's going to be on the lid
6:01
Next I'm going to take the gel liner and this is very similar to before I'm basically pressing this at the lash line
6:08
However, what we want to do is we'll want to go up a little bit higher Now what I like to do when I'm using an angled brush is I start in the middle
6:15
But I always make sure that the pointed angle is to the outer edge
6:19
Bringing it to the middle and then when I do the inner corner I flip it around to get to the inner corner and blend it to the middle again
6:26
This is a great way to make sure you're not creating just one line from the inner corner all the way to the outer corner
6:32
Particularly if you don't have steady hands for the next step you want to use a shadow that matches your liner
6:37
This can be any deep tone that you want and I'm going to be using a pencil brush to apply this
6:42
What I like to do is I like to push it down with my index finger What this does is it creates more of a fan shape which is great for smudging
6:49
It also gives me a little bit more control. So I'm only applying a small amount over the liner
6:55
Once I apply the shadow then I can open up the brush and start to slowly smudge this over the top of everything else
7:02
This is just going to make sure that we're not going up too high But we're still creating that nice smudgy effect and setting the liner in place as well
7:09
We don't want to bring this smokiness up too high We want to keep it to the lower half of the lid working across the lash line
7:17
Now to create more depth and more shape We're going to take a shadow at least one shade darker than your skin tone
7:23
Or you can use your contour your bronzer as long as it's matte We're going to start by sweeping this into the crease of the eye
7:29
Keep your hands nice and high as you're blending and also keep your eyes open
7:33
This is a great way to see the shape that you're creating Bear in mind when you're blending you don't want to blend up too high keep that highlight underneath the brows to add some more contrast
7:43
with the smokiness Now if you feel like this isn't smoky enough for you
7:47
You can actually go in and reapply a little bit of that brown shadow Keeping this on the lower part of the lid a little will go a long way
7:55
Particularly because we've already applied our contour shade on the lid So just very slowly build this up until you get the smokiness that you like
8:03
Now to add more smokiness, I'm going to take that gel liner and push this in between at the lashes
8:09
This is a totally optional step I know that some people find this a little ticklish so you can definitely skip it if you want
8:14
But it does add a little bit more depth and a little bit more smokiness
8:19
I went ahead and applied some lashes and these ones are a little bit more dramatic
8:23
But you can just build up your natural lashes if you want. That's what I like about smoky eyes
8:27
You don't always need false lashes with them But they definitely add some more drama and I want to add some more drama underneath the eyes as well
8:33
So I'm going to smudge whatever's left over on my brush Just at the lower lash line and then what I'm also going to be doing is pushing this onto the waterline as well
8:42
This is just going to give us an overall smoky effect But you can skip doing anything on the lower lash line and just apply it lots of mascara if you want
8:50
I know some people worry about it smudging underneath and going down onto their cheeks
8:54
So you can always keep this area clean, but just apply lots of mascara
8:57
I love love applying lots of mascara on the lower lash line with a smoky eye. It just brings the entire look together and
9:05
That is the finished look. It's just a little bit extra than the first one. We're just very slowly bringing up this smokiness
9:12
So we started at the lash line with our first look now We've gone a little bit onto the lid and now we're going to add a little bit more drama by moving all the way up
9:21
Covering the lid I know a lot of people get a little scared when you're applying shadow all over the lid because their eyes can look a little
9:27
Beady a little smaller, but I'm going to show you a little quick tip on how to counteract that
9:32
So let's get started with this look As with all the looks that you create you always want to start off with a good face
9:39
Especially when you're doing a super smoky eye, so make sure to apply some eyeshadow primer
9:44
This is going to create a barrier for the eye makeup. So make sure you apply an eyeshadow primer of some sort
9:50
This is just going to create a blank canvas for us to work on and this is also going to prevent our eyeshadows from going
9:56
Too muddy and too over blended it gives us a little bit more grip and a little bit more structure
10:02
Unlike any of the other looks that we created we're gonna start off with a gel liner
10:06
This doesn't have to be a thick layer Doesn't have to be a super dense layer a sheer layer is all you want and you just want to apply this from the lash
10:14
Line all the way up covering just the lid area Now as you can see my eyes look a little kind of small a little black buttony on my face
10:24
We don't want that. So one thing that I like to do is look upwards
10:28
so what you're gonna do is you're gonna look upwards and this is going to stamp a little bit of the liner and create more
10:33
Shape and now I can actually just follow this shape Which is my natural eye shape and just work and fill in this entire area
10:40
You just want to keep this layer nice and sheer Once you've applied that you then want to take your shadow that matches the liner if you're using black
10:48
You can use any deep tone You don't necessarily have to use black over the top of black liner deep purple deep browns deep greens
10:55
Anything as long as it's deep and I'm using a pencil brush to apply this
10:59
What you want to do is you want to start at the lash line and very slowly start to work your way up
11:04
You also want to be a little quick with this because some of those liners can set quite quickly and then we won't get that
11:10
Nice soft smooth blend try doing one eye at a time applying the liner and then the shadow over the top
11:15
This is just gonna make sure that one side doesn't have too much time to set now Don't worry. It's gonna look messy, but we're gonna keep going
11:22
I always like to start at the lash line and very slowly start to build this up until we're covering all the gel area
11:28
Next you're gonna use an eyeshadow at least one shade darker than your skin tone
11:31
You can also use your contour or a matte bronzer if that works for you
11:36
And this is going to add some more shape to the eyes So take your favorite blending brush and you want to keep your hand nice and high and just blend around the edges
11:45
What this is gonna do is it going to remove any of those harsh lines and make sure we have some depth right at the
11:51
Lash line and that's going to dissipate and get nice and sheer and create that smoky look
11:56
But it's also going to make sure that we have some structure into the crease particularly for hooded eyes
12:01
This is a great way to make sure we're blending and smoking this out Try keeping your eyes open when you're doing this so you can see the shape that you're creating
12:10
Now if you have watery eyes or maybe this is the sixth eye makeup look that you've done today because all of the other ones
12:15
The hard drive got damaged and you lost everything so you had to start again But maybe you have a little bit of weeping on the side of your eye
12:22
No, eye makeup is gonna stick to this area once this starts unfortunately
12:26
But a little thing that I like to do is take mineral foundation Press this over the top
12:31
wait until the eyes kind of settle a little bit and Then I can go back in with a bit more of that deep shadow and press this over the top of the loose mineral foundation
12:41
This is the only way that I can find that fills in that gap I don't know what my tears are made of but honestly, it's the best eye makeup remover in the world
12:49
It just takes everything off Now I'm gonna go ahead and sweep underneath the eyes with a mixture of the liner and the shadow
12:56
That's just again gonna add some more smokiness. And yes, it's gonna look very messy, but that's the thing with smoky eyes
13:03
They look very messy until they're done Don't worry You can just add a little bit of that bronzy tone that we used in the crease and smudge and blend this underneath the eyes
13:11
It's gonna smudge out any of that liner underneath and I'm also gonna add some more drama by adding the liner to the waterline
13:18
as well this is really going to add that smoky effect and
13:22
Look at the difference that lashes and a little bit of highlighter makes once you clean up underneath your eyes
13:27
Apply a little bit of highlight and apply your lashes Everything is gonna come together
13:31
Smoky eyes look very messy and then they look awesome You just have to not be afraid of them and when in doubt do this before you take a shower
13:39
So you can just wash it off if it doesn't go, right? It does take a little bit of time to get used to doing a smoky eye
13:44
Particularly because when you're halfway through you want to start again, but trust me just keep going and there you go
13:50
You have a super smoky eye makeup Look now you can change up the different tones and shades and you can create more kind of colorful ones
13:58
Just using the same technique just changing up the different shades and colors that you're using and let me know what your favorite combination
14:04
Of eye makeup would be I'd love hearing from you I love hearing what works for your eye color and your skin tone
14:10
but if you're not sure what will work for your eye color and your skin tone definitely let us know because either I or
14:16
Somebody else will definitely help you out We're all here to help each other in our makeup chairs
14:21
And as always my friends be kind to yourself be kind to others and I'll see you in the next one
14:28
You
Beauty & Fitness
Cosmetology & Beauty Professionals
Make-Up & Cosmetics