Up next in 10


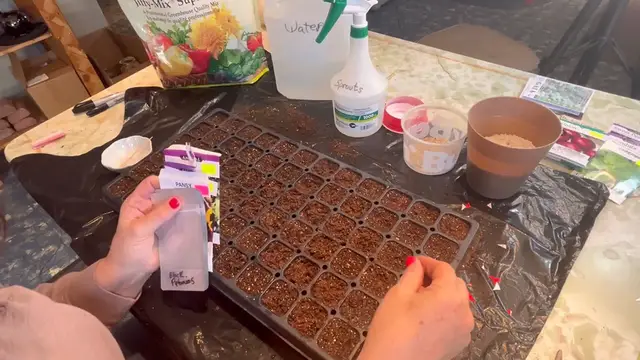
In this video I will show to start a variety of flowers from seed that can save you time and money. You can start a whole variety of flowers from seed for your outdoor garden at home and save on the high cost of bedding plants from the greenhouses. Welcome to the Saskatchewan Prairies, Growing Zone 3 - Canada! On my channel you will learn about cold climate growing techniques, indoor gardening during long cold winters and see what's cooking in the Little Garden Kitchen!
//Creative Commons Attribution Licence video (Reuse allowed)
Show More Show Less View Video Transcript
0:00
So I don't know about you, but I have really noticed that the price of flowers and different bedding plants that you get at the greenhouse are really going up in price
0:10
I used to be able to go and buy all the flowers and fillers for my pots and flower beds at the greenhouse easily for, you know, less than $100
0:21
Now, you know, if I was to buy everything that I actually wanted, it would be hundreds of dollars
0:26
and so the last few years I have been starting a lot of my flower seeds myself indoors
0:33
and I want to show you that you know it's not really that hard and it is a great way to save money
0:38
so I'm going to be doing some pansies, petunias, coalesces these are things that I love to put in my
0:46
pots and in my flower bed I've collected some petunia seeds which I have shown how to do in other
0:52
videos it's very easy so let's get started and let's get planting some flowers
0:56
So if you are someone who starts your vegetables indoors, like your tomatoes, peppers, onions, eggplants, those kind of things that need to be started indoors, you know, before the several weeks, before the last frostate, then you may have a lot of supplies you need just to do the flowers
1:16
And one of the things here that I like to use is a 72 cell system
1:22
This is also great for, you know, spacing issues. If you don't have a lot of space, to
1:26
to start your indoor seedlings. I can say you can get a lot going in this small space
1:32
It fits nicely on a seedling heat mat, which I highly recommend for flowers
1:38
because it really helps with that success rate and that uniform germination
1:44
I don't start tons of tomatoes and peppers for my garden. I'm a small gardener, so I like to use these solo cups
1:51
or something that's like a three or four inch pot to start my tomatoes, peppers, and squashes maybe indoors, right in one of these, so I don't
2:02
have to worry about potting up. But for flowers, I like a whole ton of them. Like, you can never
2:08
have too many petunias and pansies. You know, there's always somewhere you can stick them. So
2:13
that's kind of where I focus on more of, you know, quantity as opposed to my vegetables because
2:19
you know, I want a lot of them. Once they are to get to that, you know, four or something, you know
2:24
six leaf stage and they need to be potted up into bigger containers. We're getting close to
2:30
you know, last frost date. I got lots of sunlight in my garage windows. So if you have sunny windows
2:35
it's very easy to transfer them into a sunny window and you don't have to worry about space under the grow
2:40
lights. So I'm going to show you, first of all, how to get the tray set up here. So because we're just
2:47
going to be using this for starting the seeds and then potting them up into larger containers later
2:53
I'm just going to be using a seed starting mix such as this Jiffy Premium
2:59
It just is a mixture of spagnam moss, a little bit of remiculite
3:03
So it's very light. It's very easy for the seeds to germinate
3:07
You don't want anything too heavy. So I filled it all up and want to make sure that you don't have any air pockets in it
3:15
So when you get it about halfway filled, it's a good idea to go around and press that dirt in
3:22
make sure it in there good and tight You can also moisten it prior to putting into your cells if you want I actually put it in dry and then bottom filled the tray with a bunch of water and also gave the top a good spraying So either way works it up to you And so as I am planting up the seeds it going to be wicking up the water from the bottom
3:47
And setting it up in a tray like this is highly recommended so that you can bottom water your seedlings
3:53
as opposed to surface watering because that can just place your seeds
3:58
It also can help bring on that damping off. where you get a bit of bacteria or mold growing on your surface here that can kill off your seedlings
4:10
So I'm just doing two colors of petunias today. I may pound some more, but I like to have a good supply of white petunias because they, you know, they go good with anything
4:22
So white два punias can be hard to find sometimes in greenhouses. They get picked quickly and the supply usually dwindles very quickly
4:32
in greenhouses so I always like to get a good supply of white going and I've really been liking
4:38
these black petunias they're called the Sophistica blackberry they make a really nice showcase in a
4:46
container with the white but as you can see the price here on these petunias is 499 and this is what you
4:54
get it's a little holder here that I think has 10 pelleted seeds in it so
5:02
basically they're costing you 50 cents a piece and germination rate you know not sure how successful
5:11
it's going to be so last fall I pulled some of the branches off of my black petunias I just kept
5:17
him in a paper bag over winter and then this spring I just kind of went through them and sifted them
5:23
and I got a very small supply of super tiny seeds here so we're going to try starting those as well
5:30
and we can compare to see, you know, how these ones that I harvested from last year's plants do
5:37
compared to the new seeds that I just purchased. Pansy's, unfortunately, I didn't collect seeds last year
5:44
and it's super easy. I don't know, sometimes it just fall, things get away on you
5:49
and I didn't get any collected, but they also are very easy to collect
5:54
but we're just going to try to get a good variety going here. $2, not a lot to spend
6:00
colias colias is one of my favorites to put into pots and so I thought I'll just start off
6:08
with one of these rainbow mixes that gets you a whole different variety of different coales
6:13
and we will see how successful we are with getting these going
6:18
so when you're working with these tiny little seeds I highly recommend if you get
6:24
some kind of a little white dish like this or a clear dish something
6:27
that you can safely put your seeds into while you work with them
6:32
Because then if you spill these, you know, they're gone. Make sure you don't sneeze
6:37
Or they could be all blown away. So I'm just going to try and open up this and dump them in here
6:46
I like to work with a toothpick as well. So I just wet it in my toothpick so that I could easily grab one of these seeds
6:55
You can see that you can pick it up quite easily. just gently put it on top of the soil here we're not going to press it in too far try to
7:06
just going to put one per cell and hopefully last year i did the same thing i planted 10 i only got two or three successfully germinate so that was a little disappointing
7:22
Somehow, I've only got nine here. I don't know. Somewhere I think I planted two accidentally in one
7:29
And I said it's really hard to see once you got this in here and there's vermiculite and little pieces of stuff
7:35
So no big deal. I'm just going to go with that. I want to be able to mark this
7:42
so I know exactly where I planted these. So I've made these little markers here
7:48
I'm going to put one right here. It'll mark these three. I'm just going to put a little dollar sign just showing that those are the ones that I purchased and paid for
8:01
So I could keep track. Now we don't want to bury these too deep and we don't want them to get displaced when we water them
8:10
so I'm just going to use a little bit of this vermiculite
8:15
It's nice and fine just to cover it up. You can also use just a little more of the steed starting mix as well
8:28
That will work. And because these are pelleted, they got a bit of a coating on them
8:33
I expect that these will take longer to germinate them, the ones that I harvested from my outdoor plants
8:40
they usually pop up pretty quick. So I just dumped in my seeds that I had harvested myself for the black petunias in there
8:49
Now it's pretty hard to see, but there are quite a few little tiny seeds in there
8:54
There's also a lot of just chafe and stuff from the plant
8:59
So it's really hard to separate them. So I'm going to just try to do a light sprinkle in as many cells as I can here
9:08
see how many of these I can get going. I really don't know, but you can kind of feel the
9:18
thickness of the seed between your fingers compared to whether it's just, you know, pieces of chaf
9:26
or broken up leaves. So I think I'm going to be getting, you know
9:33
several of these in each of these cells. Okay. I get a little sloppy here
9:46
I know sometimes you end up with stuff growing in the cell next to it
9:50
because things kind of jump around, but that's okay. Again, I'm just going to cover with a light layer of the vermiculite
10:03
I was able to collect quite a few more white petunia seeds this year
10:08
So I have a pretty good supply here. Again, there's a lot of chaf and ground up plant material
10:18
but I can see that we seem to have some seeds in there
10:23
So I'm going to try and get two rows of the white petunia going here
10:28
Again, I'm just going to sprinkle. So petunias are super, super tiny
10:34
When they first germinate, you have to really look hard to spot them
10:38
but it's very exciting to see when they do. And they seem to be pretty hardy
10:46
If you got them on a heat mat and you keeping them moist and warm they do well And you know they not super fast growers so you can keep them in these trays for you know a good month or so before you have to start thinking about
11:04
potting them up. So the pansy seeds are quite a bit larger and I think a little bit easier to work
11:12
with. Okay, so four rows of pansies are planted and I'm running low on my
11:20
vermiculite but hopefully I'm going to have enough to cover everything here today
11:28
As I said you can also just use some of the seed starting mix to cover just very lightly
11:34
Most of these types of flower seeds need light to germinate so you don't want to bury them too deep
11:45
So now I'm going to be setting these on a heat mat
11:50
Your grow lights that will be set to come on for about 16 hours a day, shut off for eight hours
11:58
The heat mat will be on 24 hours a day on the whole time until germination
12:06
And once your seedlings get to, you know, pass that two-leaf stage and are getting going
12:12
that's usually when you want to remove it off of the heat mat. Okay, so there is 72 cells of a whole variety
12:20
of flowers all planted up. As far as seeds here, I've invested about $10
12:28
I've used some of the seeds that I collected myself. I'm using a container that I've
12:33
you know, get many years used out of. Seed starting mix is very economical
12:39
And if you can get these to germinate and up pot them into bigger cells
12:44
So I think, you know, doing it this way, you are saving yourself 100
12:49
if not several hundred. You could do this on a couple different 72 inch cells and get all sorts of flowers started
12:58
I know I will be starting some more later in the season that don't take as long
13:02
Most of these are 10 to 12 weeks before last frost date, so that's why we're starting them now
13:08
So these are ready to go under the grow lights. It's also recommended if you have a humidity dome like this to put it on top to help keep that moisture in there
13:18
So as I mentioned earlier, having a seedling heat mat under flowers is highly recommended
13:27
It really helps speed up that germination and helps with more consistent germination
13:33
So if you haven't done so, I would recommend doing these if you're one who's starting plants indoors, tomatoes, peppers, flowers, you know, a seedling heat mat is always going to get used and will last you for many years
13:47
So I've just lowered the lights here to get as close as I can to the surface here
13:51
so that they are getting the maximum light when they germinate. These are just LED lights that I purchased, I believe, from Lowe's
14:00
They are a Fiat brand. They are not actual grow lights. They're just LEDs and they've been working great for me
14:06
and all my indoor growing for the past couple years. I'll leave a link to them below
14:12
So flowers are planted. I got ornamental grasses started. onions are going next so please stay tuned for the next video coming up on the channel
14:22
I hope you enjoyed this one and I hope you will try growing your own flowers indoors
14:28
saving yourself tons of money and thank you for watching see you on the next video
Finance
Home & Garden