0:30
Welcome back to part two of the cigar tube circuit tester
0:41
In part one, we modified a PCB board to be able to fit in our cigar tube handle, and
0:50
then we transferred our circuit components from our redboard prototype circuit to our PCB
0:57
board and then we created our paper clip test probe and soldered it to our PCB board
1:04
And then we also created our black wire test probe. In this video we will be finishing up our black wire test probe by adding an alligator
1:13
clip to the end of it. And then we will install our paperclip test probe and circuit board with LEDs inside the cigar
1:23
tube and finish up this project and have a working. cigar tube circuit tester
1:30
So here I have an alligator clip that I will attach to the other end of our black
1:35
wire test probe. This alligator clip has a black grommet at the end of it
1:41
And what I'll do is I'll keep that on there and I will place a heat shrink tube over it
1:47
and the wire in order to keep it protected and make it look nice and neat
1:51
So I need to get a longer heat shrink tube, and then I'm going to cut it down to size
2:01
I want mine a little bit longer than the short piece that I had
2:21
So when adding heat shrink tubing you need to remember to place it on your wire before you start connecting components That something that I forget all the time
3:11
So what I need to do. the cap of the cigar tube in order to run the black wire through it
3:22
So I'll go ahead and drill a hole somewhere near the center of the cap
3:44
and go ahead and feed the wire through that hole. Next what I want to do is start preparing to attach the wire to the alligator clip
4:39
I'm going to go ahead and remove this little screw on this alligator clip
4:46
I want to fit the wire through the end of the alligator clip
5:03
through the end of the alligator clip, and I want to feed the wire under this tabbed hole
5:11
that's on this particular alligator clip. And what I want to do is push down this tab
5:17
a little bit more with a small flathead screwdriver in order to make that gap or opening a little wider
5:24
to be able to fit my exposed stranded black wire through that piece of the alligator clip
5:32
the alligator clip. And what I going to do is just feed that wire through this whole or tabbed section of the alligator clip
6:04
And now I'm going to solder the area that I pulled the stranded wire through the alligator
6:16
clip and that way I can make a secure connection between the wire and the alligator
6:22
clip itself. Now all I need to do is just pull up the grommet and heat shrink tubing back up to the alligator clip
6:48
And I'm going to take a heat gun to the heat shrink tubing in order to shrink it and fit it to the grommet and to the black wire
7:04
And now we have a nice clean looking connection between the black wire and the alligator clip
7:34
probe through the cigar tube. And make sure that I line up the LEDs with the holes that we drilled in video part one of the cigar tube
8:04
If you haven't seen part one of this two-part video series on the Cigar Tube Circuit Tester Project
8:10
I highly recommend that you go check that video out. I'll leave the link to that video down in the description below
8:24
Now I just need to feed the cap of the cigar tube down the black wire, since we've already fed that wire through the hole that we drilled earlier
8:54
And that's pretty much it
9:06
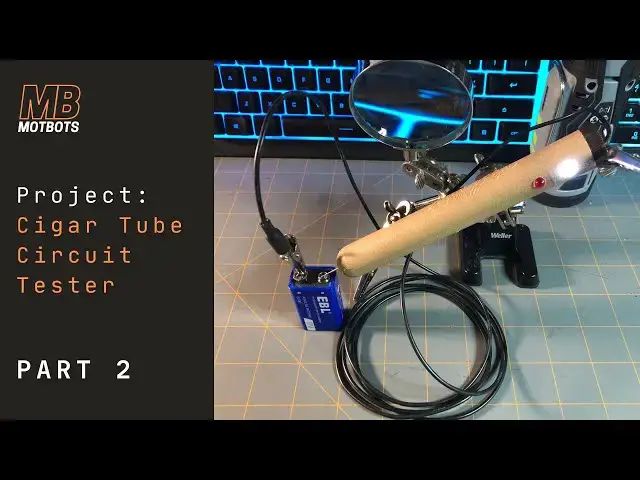
The whole Cigar Tube Circuit Tester is pretty much complete. And now all we need to do is just make sure that it is working and we will test it again
9:15
with the 9 volt battery. I'll clip the alligator clip to the negative terminal of the battery and I will take the paper clip
9:36
probe that's a part of the cigar tube handle and touch it to the positive terminal
9:43
of the battery and we see that the white LED light lights up and that means that we
9:49
have a negative ground since the alligator clip is clipped to the negative
9:54
terminal of the battery. And now I'll switch the probes around and attach the
9:59
alligator clip to the positive terminal of the battery and then touch the paper clip
10:04
probe of the cigar tube handle to the negative terminal of the battery. And we
10:11
see that the red LED lights up and that means that we have a positive ground
10:20
So that's it for this project. The cigar tube circuit tester project I hope you were able to complete this project and build one for
10:29
yourself this was a lot of fun I hope you enjoyed it as much as I have and I hope
10:35
that you stick around with Mott bots for some more projects in the future
10:45
remember to keep at it and stay motivated thanks for watching