0:00
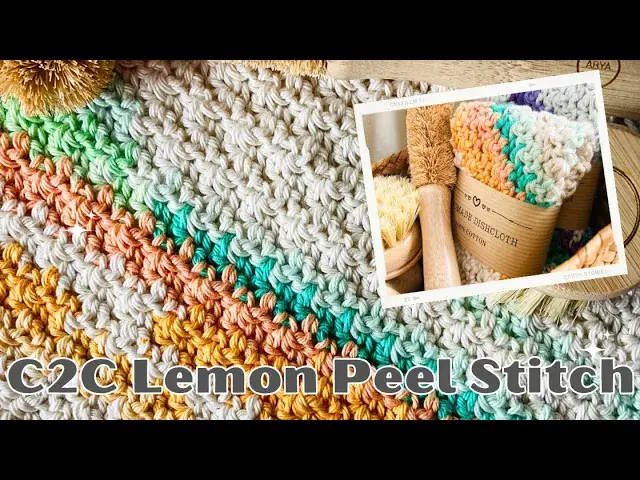
Hi everyone, it's Catherine here from Lullaby Lodge and in this video I'm going to show you how to crochet the corner to corner lemon peel stitch
0:07
I'm also going to show you how to add a simple border so that you can use your swatch as a dishcloth
0:12
Just crochet in cotton and it makes a great dishcloth. Now I recently made a baby blanket in this corner to corner lemon peel stitch and I will leave a link to the pattern, the full pattern on my blog in the description below and then you can crochet the lemon shadow baby blanket with this tutorial
0:28
Yes, I'm using a 5mm hook today and some ironweight cotton yarn to make my swatch
0:35
We're going to start with putting a slip knot onto the hook and chaining four
0:42
It's one, two, three and four. Now we're going to put a single crochet into the first chain here, which is the fourth from hook
0:53
Put a single crochet in there. And then we're going to put a double crochet into the same stitch
1:07
And then you can see already we're starting to get that little triangle shape forming
1:12
So in order for our corner to corner pattern to work, we need to increase one stitch on each side on every row so that that triangle gets bigger and bigger
1:21
So next chain three. And turn. Now in order to do it
1:28
increase we're going to put another stitch into this same stitch as the chain three so
1:32
we're going to put a single crochet in here we're always going to be alternated between a single
1:36
crochet and a double crochet and we're always going to put a single crochet into a double
1:41
crochet from the previous round and a double crochet into the single crochet from the previous
1:46
round so here we've got a single crochet so we're going to put a double crochet in there it's
1:50
very very easy pattern to remember and next we've got the chain space here so this is the corner of the
1:57
edge again where we need to increase so we're going to put single crochet and also
2:04
a double crochet in that same space then we chain three and turn single
2:15
crochet into the same space as this chain three then a double crochet and a
2:25
single crochet always alternating and a double crochet. This stitch sometimes can be a little bit tricky to see this last single crochet Sometimes you just have to pull it a little bit And then a single crochet into the chain space
2:43
And then end with a double crochet in that same space. And you really are just going to keep repeating this
2:50
until your project is as big as you want it to be
2:53
So if you're making a dishcloth around about eight or nine inches and you will measure along one of these edges of the triangle
3:00
So you will keep increasing. until this measurement is as long as your pattern tells you you need it to be or as long as you want it to be
3:08
And then we go to start decreasing. Okay, so I've added a few more rows to my swatch, and I'm going to show you how to decrease
3:16
So you decrease by decreasing a stitch on each side, and that will make a square
3:22
If you wanted to make a rectangle, you could carry on increasing on one side, and then decrease on the other, and you would get a rectangle
3:30
I'm just going to show you how to do the square today, but it is very simple to do the rectangle
3:35
So to start decreasing, we're going to chain two this time and turn
3:40
So in order to decrease, we're going to skip the first couple of stitches
3:45
and we're going to work into this double crochet here. And because there's a double crochet, we're going to put a single crochet in there
3:53
And now we just work across the row, alternating between... double crochet and single crochet
4:13
We're coming towards the end now, this row. And once you've done your single crochet into this double crochet here
4:23
you've got a couple of stitches left. What we're going to do is we're going to double crochet two together
4:29
together over this single crochet stitch here and this chain space. So we'll just do the first part of our double crochet
4:40
We won't yarn over and pull through those last two. Then we'll yarn over again
4:44
And we'll go as if to make a double crochet into the space, yarn over, pull through two
4:49
And then we're going to yarn over and pull through all of those loops. So we've double crocheted two together over those two stitches there
4:56
And now you can see this is starting. to make our corner there
5:02
So we'll chain two and turn. And we going to repeat that row now So it the same thing You going to skip these first two stitches Find this double crochet here and put a single crochet in there And then alternate between single crochet and double crochet
5:19
All the way across. Until you get to your last two stitches
5:24
Well, the last one is actually a space, not stitch. Here we are. We're at the last two stitches
5:37
So the last single crochet and the last space. So we'll double crochet two together into that single crochet
5:46
and into that chain space. There's our double crochet two together. And then we'll chain two and turn
5:54
And we will keep repeating that until our square is almost closed
6:01
Okay, so we're down to our last five stitches. So again, we're going to miss these first two
6:07
put a single crochet in that first double crochet stitch there and then we're going
6:13
to double crochet two together over this single crochet and chain space
6:21
Like so and then we're going to chain one, turn and put a single crochet into this chain space here
6:31
Now to do this little trick I'm going to change my hook to a larger hook
6:36
because we're going to be working a series of slip stitches around our project and they
6:42
tend to come a whole little bit tighter and you want this to be quite loose and easy
6:46
for you to crochet into on the following round so to start off we're going to slip stitch
6:54
rather than in the hole that you can see here this space we're going to go in between these
6:58
stitches here you want to try and get your slip stitches if you can in between
7:06
the threads of yarn of the stitch rather than around the stitch
7:11
So we're going to go into this bit here. It can be a bit tricky
7:18
Keep your slip stitches nice and loose. And you're going to work your way all the way around
7:29
Now in the corners, you just need to put one slip stitch in the corner. Because there's not any height to this stitch, you don't need to put any extra stitches in the corner
7:36
we will put extra stitches in the corner on the following round and keep going down the edge
7:43
Now how you know how many stitches you need is going to depend on your attention So you going to want to just it a bit of trial and error really If you find that the edges is starting to go a little bit roughly or wavy that means you got too many stitches And if you find that your crochet
7:58
is kind of pulling in a little bit, that means you have too few. So you might have to just experiment
8:02
rip it back a little bit, try again. But do persevere with it because it really is worth it
8:07
I'm at the first corner here. I'm just going to put slip stitch right in that corner. And this will be the stitch that we work extra stitches
8:14
two on the following round and then carry around the whole project doing exactly the same
8:22
Okay, so I've worked all the way around my swatch with slip stitches. I'm going to chain back to my five millimeter hook
8:36
And we're going to start a single crochet round. So chain one, we're going to work into the back
8:40
loops here now. So we put a single crochet into the back loop. So we put a single crochet into the back
8:44
loop all your stitches across the side. Keep doing this until we get to that
8:58
corner stitch. In this corner stitch we're going to put three single crochet
9:20
And then carry on with single crochet in each stitch across. So we're going to repeat this around, three single crochets in each corner stitch
9:32
and a single crochet into all the other stitches. So I've worked all the way around
9:39
I'm just going to finish with three single crochets into this corner space here
9:43
and then join with the slip stitch to that first single crochet
9:53
Oh, that's just in the back loop. Maybe join that properly. There we go
9:59
And as you can see, this makes such a difference to those uneven edges that you get
10:05
when working on a corner to corner project. It's a really good way to add a good base for your border
10:11
You could add any border you wanted onto this now. or you could leave it just like this, like I have for my dishcloth
10:17
If you're making the Limoncello Baby Blanket, be sure to check out my next video
10:22
while I'll show you how to crochet the spider stitch edging