live_tv
Livestream Starting Soon
00
Hours
:
00
Minutes
:
00
Seconds
Up next in 10

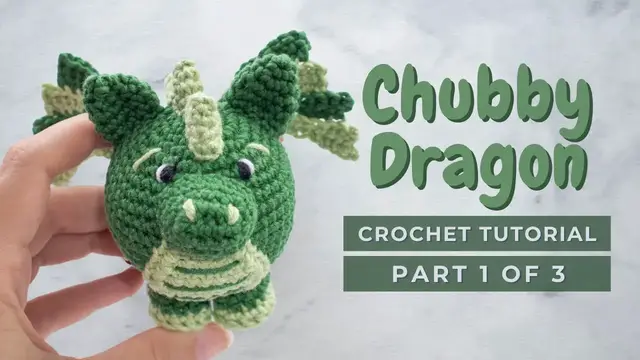
Chubby dragon amigurumi PART 1. How to crochet a little dragon. Tutorial pattern
Nov 4, 2022
Chubby Dragon amigurumi stuffed animal crochet pattern! Chubby Dragon is part of the Chubby Animals available here on the channel!
FOR PART 2: https://youtu.be/xRI-vYbwtJE
FOR PART 3: https://youtu.be/VkZ7S27-ij0
Chapters:
00:00 Chubby Dragon materials
00:44 Dragon body
11:21 Legs
14:18 Dragon Spikes
You can find the complete Chubby Dragon crochet pattern free on my website here:
https://littlecrochetfarm.com/chubby-dragon-free-amigurumi-pattern/
For a low cost (3 USD) and printable pattern, you can find it here:
Ravelry: https://www.ravelry.com/patterns/library/chubby-dragon-amigurumi
Etsy: https://www.etsy.com/listing/1164851324/mini-dragon-amigurumi-pattern-chubby
If this video was helpful to you, consider supporting my channel by doing one of these little actions below:
★ You can like this video, or
Show More Show Less View Video Transcript
0:00
Hello there, it's Anna here and welcome to Little Crochet Farm
0:04
Today I will show you how to make this chubby dragon. The chubby dragon was the most voted in the community tab here on YouTube
0:14
I really hope you enjoy this little guy. There is a lot of sewing for this pattern
0:19
The spikes you need to sew one by one and all of the other details
0:25
But it turns out to be very cute, so I hope it's worth it
0:28
well I used again the 2mm crochet hook and the cotton yarn alright let's jump in and start this pattern
0:44
all right so we'll start here with the head with the chubby body right which is just the head that
0:51
we have and we'll start as always with the magic ring and six single crochet inside the magic ring
0:57
all right so here it's my magic ring if you don't know how to make the magic ring there is a link in
1:05
the description below that will take you to a complete video tutorial about it all right but
1:10
here you can just watch it a couple of times and you'll get it okay so now i'm here finishing my
1:17
six single crochet for this magic ring one two three four five six and then you close this single
1:25
crochet tight. Alright, now let's move on for our second round. You will work here 6 increases
1:33
having a total of 12 stitches. When I say 6 increases, it means that you will crochet 2
1:40
single crochets inside each stitch. Alright, so here I'm the first one, and again inside the same
1:46
wait I hit the camera I'm sorry okay so two single crochets here inside of each of these
1:54
stitches okay and you will have a total of 12 single crochet here at the end of this round
2:00
I will move a little bit fast here so we can finish this round and then as I always
2:12
advise you to do, I close tight, I double check here that it's a very nice enclosed
2:18
the beginning of the toy, so it will not unravel or open or leave it a little bit whole on the
2:25
middle. So I take a sewing needle and I hide this a little bit here. So now it's tight and it's very
2:34
nice enclosed. And now moving on for the third round, here I add my stitch marker. I like to use
2:40
just a piece of a different color yarn. And for the third round we will work one
2:45
single crochet, one increase, you will repeat this for six times or all the way
2:50
around and you should have 18 stitches at the end of this round. So it's very
2:54
simple here. So you can see here one stitch and then one increase in the
3:01
stitch next to it. Repeat all the way until the end. Alright, once you're done
3:07
with that we move on for our third fourth round and you will make two single crochet one increase
3:15
repeat six times and you should have a total of 24 stitches okay i always tell you to count how
3:22
many stitches you have at the end of each round one stitch here one here and one increase here you see
3:28
repeat all the way until the end and this is how you you should be looking like your detail right
3:34
now. So for the fifth round you will work three single crochet, one increase, repeat six times and
3:41
you should have 30 stitches at the end of this round. Right? Count how many stitches you have
3:47
especially if you are a beginner, it can make a big difference if you count
3:53
So here, one two three and my increase is here, you see? Repeat all the way until the end
4:00
and this is how it should be looking like. now moving on for our round number six you will work
4:06
four single crochet, one increase, repeat six times and you should have 36 stitches at the end of this
4:12
round. okay? so here now my increase here one and two. all right? so repeat this all the way until the
4:24
end and you will arrive here. So let's count these and then you learn how to see the stitches
4:29
One here second here third fourth And you see this too is the increase Alright now for our round number seven you will work five single crochet one increase repeat
4:43
six times, and you should have 42 stitches at the end of the round. So here
4:48
now we're starting to have more stitches, count how many stitches you have, alright
4:55
super good here my increase so one two three four five and this is the increase okay all right once
5:07
you finish this you will move for round number eight and this is the last round with increases
5:12
for now so we'll work six single crochet one increase repeat six times or all the way until
5:19
the end and you should have a total of 48 stitches at the end of the round
5:24
All right, so I'm arriving here now on my increase and that's it. Now you repeat
5:34
all the way until the end and I will catch you up for the other instructions
5:38
Okay, so once you finish now we'll start giving here the height or the length of
5:44
our chubby body or the hat. So you will work for round 9 to 15, 48 single crochet
5:54
So here you will count 7 rounds with just 48 single crochet
6:01
Once you're done with your 7 rounds, this is the result. So here, this you see is our last
6:07
increase. So you have one round, two, three, four rounds, five, six and seven. Okay? Now let's start
6:17
the decreases. So for round number 16 you'll work six single crochet, one decrease, repeat six times
6:24
and you should have a total of 42 stitches at the end of the round. And I'm bumping all the time in
6:30
my camera today, I'm sorry it's shaking a little bit. Okay, for the invisible decrease here for
6:37
amigurumi we used invisible decrease. So you grab the front loop only of the next two stitches and
6:44
you proceed crocheting the single crochet. So now you have here one decrease. You see, it's two
6:51
crochets here together. So all the way around and this is what you should have. If you don't know
6:57
how to make the invisible decrease, check the link in the description below, there is a tutorial
7:02
about that. Alright, so for round number 17 you will work 5 single crochet, 1 decrease
7:08
repeat 6 times or all the way until the end, and you should have a total of 36 stitches at the end
7:14
of this round here. Okay, so here again we are always working with the invisible decrease, it's
7:22
very simple. Just grab the front loop of the stitches, okay? Let's arrive here into my decrease
7:30
so you can see it. And as always, I will do the first repetition. One, two, three, four, five. Okay
7:37
So here it's my decrease front loop, you see? Yarn over inside two loops, yarn over inside the next
7:45
two loops. Alright, and we have the decrease here. Super good, it's looking nice. So now let's move on
7:53
for round number 18. You will work four single crochet, one decrease, repeat six times and you
7:58
should have a total of 30 stitches at the end of this round. So let's go for the first repetition
8:05
together. Alright, one, two, three and four. And now let's move on for our first
8:16
decrease here. Front loop only, yes, check. Yarn over inside, yarn over inside the
8:24
loops. Super good! So this is one, two, three, four, and the decrease. Great! Now for
8:31
round number 19 you will work three single crochet, one decrease, repeat six times and you
8:36
should have a total of 24 stitches here at the end of this round. And we are closing this
8:44
little amigurumi chubby body of our dragon. Okay, now arrive here
8:56
and super good! Now for round number 20 you will work two single crochet, one decrease
9:04
repeat six times and you should have a total of 18 stitches here at the end of this round So it getting very fast and easy
9:15
It's coming to an end. So here my first decrease. Super good! Alright, so now here this is the result after you finish the round 20 and we'll
9:28
stop here a little bit to add stuffing material because we have just one round more before we're
9:32
closing this toy, okay? So add as many, as much stuffing material you want. And now
9:40
let's move on for our round number 21 and it's our last round, okay? So here you
9:46
will work one single crochet, one decrease, repeat six times, and you should
9:50
have a total of 12 stitches and that's when we will stop. We will stop with 12
9:56
stitches before closing this toy. Here let me do my first decrease here with you
10:04
so my first repetition, okay, front loop only, and continue. Alright, so once you're
10:14
done, you cut this, leave a tail for closing this toy, alright, take your sewing
10:20
needle, and now what's gonna happen here is you will start taking only the front
10:26
loop of the 12 stitches left. You don't need to pull it tight here, just grab
10:32
just introduce the needle in the front loop of all the stitches here
10:36
All right, just make sure here that you are grabbing only the front loop, okay
10:43
because when you're gonna pull this yarn, if you insert in the middle of the yarn it
10:49
will be a little bit hard if you introduce the needle in the middle of the plies, okay
10:55
so here just close it tight and now again as the same as in the beginning of the toy that i double
11:01
checked that this is very nice and closed and tight we do the same here at the end so we have
11:07
a similar beginning and ending and then you hide the remaining tail a little bit inside of the toy
11:17
and that's it. Now you can squeeze it back to its shape. Great! Now we'll start working here for the
11:25
pulse, okay? So here you will start again with the magic ring and you will repeat round one and two
11:33
from the body. So you'll work six single crochet inside the magic ring, following up by six
11:39
increases and then you will end up with 12 stitches, all right? And because we already
11:45
we already have done this before at the beginning of this video. Now I will just move fast forward
11:53
and we'll arrive here once we are done with the 12 stitches
12:00
Okay, this is super good. Now for the round number three you will work with back post single crochet
12:09
So the back post single crochet you work in the posts between the stitches. There is a
12:15
complete tutorial showing you about the back post single crochet, if you don't
12:20
know how is it. But this is how it's done. You introduce your needle from the back
12:25
to the front of the stitch and then again from the front to the back and you
12:31
work the single crochet in between the posts, alright? If you have any questions
12:37
please leave them in the comment box below. Okay, once you finish working your
12:42
back post single crochet you are again back into working with the single crochet
12:47
Okay, so for the round number four you will work only 12 single crochet. Very
12:53
simple here, just 12 single crochet. Very nice, here I am at the last stitch, we will
13:03
stop here a little bit for a color change, we will work with your contrast
13:07
color that you decide to choose you decide to use and from the round number five to seven
13:15
you will work just 12 single crochet okay and for this color change um there is a video with
13:23
for the four most used ways to color change into amigurumi i advise you to go there and watch
13:30
because maybe how I do it, you like some other ways. And I chose the four most used ways
13:38
Okay so once you finished this is how it should be looking like We cut the yarn Here we leave a tail for sewing all right let hide these threads and i will pull this back to inside of the toy because this helps when you
13:54
are sewing later right okay so now we add a little bit of stuffing material here just you know enough
14:03
and like this one you should make um four other so three more so you should have four in total
14:12
okay so here is my fourth super good now let's move on and we will start working the spikes you
14:22
know those spikes that it's on the back of this dragon on the tail and here we'll go very slowly
14:28
because it's a small detail so you start with the magic ring again but now you will work three single
14:34
crochet inside the magic ring all right so let's go slow here it's a small detail and we'll work
14:41
it together so now i'm working here my three single crochet inside this magic ring so we close it tight
14:51
normally as we would for the six single crochet. And here is the tricky one, because it's very small
15:00
so maybe a little bit complicated to find the stitches, so that's why we'll go slow here so
15:07
you see exactly where it is. So for the second round you'll make two single crochet inside each
15:13
stitch, so you'll work three increases, okay? So you should have a total of six stitches at the end
15:21
it can be like very tight for you to insert the needle but it's just on the
15:26
first stitch so here it's my first one so I work one single crochet and another
15:33
one so we have our first increase here and then the second stitch here so we
15:43
work two single crochet again and now here is the third stitch so we'll work
15:51
here two single crochet again and now we should have six stitches and then you
15:58
can see here my detail it's a bit going to the outside so we just organize a
16:05
a little bit and you can see the spike of the spike, the shape that we want. Okay, so we will
16:15
increase again three stitches here. So you will work one single crochet, one increase, and you
16:21
repeat three times. You should have nine stitches here at the end of this round. So let's go slowly
16:27
again, so one single crochet and one increase. Here I don't add stitch marker because it's very small
16:35
so I just count. So now the first repetition is done, so second repetition, so one single crochet
16:42
here and one increase on the next one. Super good, so now my second repetition is done
16:51
so we go for the third and final repetition so here it's one single crochet and here we work one
16:59
increase all right and now you should have nine stitches here again the stitches is going to the
17:07
outside so we just organize this stitch all right and we have the shape here this is what we want
17:15
here. Okay, so pretty good. Now the fourth round and is the last round also, you will work just the
17:22
nine single crochet. So here is very easy, just work the nine single crochet and I will catch you
17:28
up back here once you've finished, because you have a lot of job for the next one. Super good
17:34
So this is the final stitch. So we cut here now, let me just hide this tail inside. You can cut it
17:43
the tail also if you want. I will just hide the remaining things inside. And then you cut, leaving
17:50
a bit of tail for sewing here. And as the same thing that I did with the paw, I will do with the
17:59
spikes also. I'll bring this yarn here to the back or to the inside of the spike here. This helps when
18:07
you are sewing later. Okay, so this is super good and like this one you should make a couple more
18:15
all right? So we will make five in total. So stop the video here and come back
#Crafts
#Fiber & Textile Arts
#Stuffed Toys
#Educational Toys