0:00
Welcome to EdTechHustle, my name is Rich and today I'm going to show you how you
0:04
can embed a YouTube video inside an email. Well, kind of. Let me explain. So
0:11
I've had this problem for a long time. This is an email that I wrote and I want
0:15
to share one of the videos on my channel with a colleague. So this is the video
0:20
that I want to share. Now what I would like to do is embed the video directly
0:26
inside the body of this email message, but that option technically doesn't
0:32
exist inside Outlook. So what you're left to do is to kind of just paste the link
0:37
kind of like that. It's there. I did bold this text and put an icon right here. So
0:44
hopefully that person will watch the video. Other times when I paste the link
0:49
Outlook will sometimes convert this into a preview at the bottom, which is better
0:54
than just the the plain hyperlink text, but it's still not as good as embedding
1:00
it in the body of the email. But again I want to embed the video inside the body
1:05
of this email and there's no way to do it. Until now. Let me show you one work
1:11
around that you can kind of create the appearance of embedding a video into a
1:15
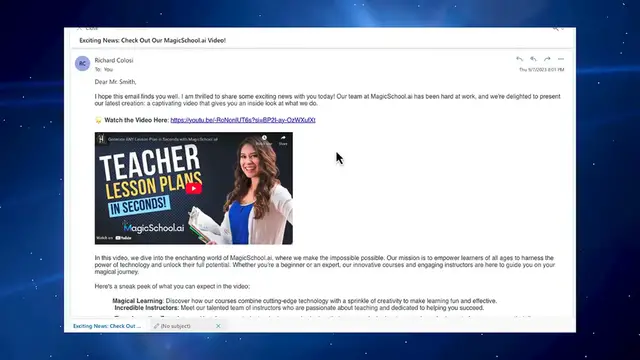
message. So the first thing you'll have to do is go to whatever video you want
1:19
to share. So in this case it's this one on the screen about magic school that AI
1:23
We're going to select share, but this time I'm not going to copy the hyperlink
1:28
Instead I'm going to choose this option that says embed. Okay now this embedded
1:34
video text is right over here. This code we're just going to ignore that. What I'm
1:39
now going to do is use some kind of program that will let me take a
1:44
screenshot of just this video right over here. So I'm on a Mac. I'm going to use
1:50
preview, but if you're on a Windows computer you can use the snipping tool
1:55
Another product is Snagit which works really well. But let me go ahead and just
2:00
take a snip of this video. And I am just going to take a snip of just this video
2:08
right over here. Okay now I have it. I do have to copy this. If you're using the
2:13
snipping tool it should automatically copy to your clipboard. So that's step
2:18
number two. Okay so now what I'm going to do I'm going to go to the spot in my
2:24
email where I want to embed the video. I'm just going to paste that image right
2:28
inside the body. Maybe make this a little smaller kind of like that. Okay so this
2:36
looks almost identical to how it would look if I had the ability to embed
2:43
the message. So the last step for me to do is now to link this video to this
2:49
image. Okay to do that I'm going to select share. This time I'm going to copy
2:53
the URL to the video. I'm going to go back to my email. I'm going to select the
3:00
video and I'll navigate up to the top where you see the link button. I'm going
3:06
to insert a hyperlink. Okay you can see that it is displaying as that image. I'm
3:13
going to go ahead and paste the URL to the video and click OK. Well it looks
3:19
like I pasted that link directly inside here. Now you'll notice that when I click
3:23
on that image the cursor changes to an arrow to this icon to tell me that this
3:29
image is hyperlinked. This is what the email is going to look like when the
3:34
recipient opens it. You can see my text is here. Here is the video. It looks just
3:39
like an embedded video but the difference is now when I hover my mouse
3:44
over it it will open in a new window. If I click that in a new tab that video
3:52
there we go that video is now open in a brand new tab inside whatever default
4:00
that user has. So again it looks just like an embedded video. The difference is
4:05
it's just an image that's hyperlinked. Again there's no way to embed a video
4:10
inside Outlook but at least this way might be helpful for you when writing an
4:15
email. So I hope this video has been helpful. If you have any questions please
4:18
feel free to leave them inside the comment section below