0:00
This video is sponsored by Skillshare. More on that later in the video
0:03
Experiment time! Today I'm going to test different baking vessels for your sourdough bread
0:09
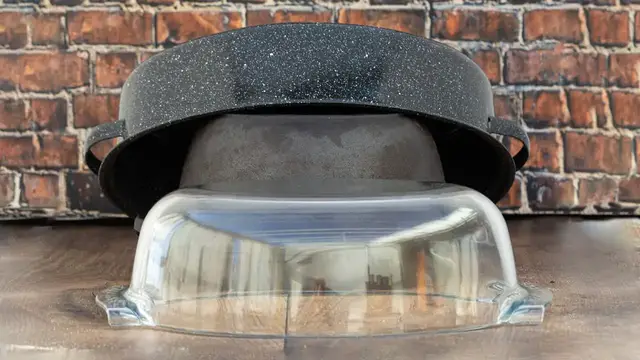
A cast iron pot, a Pyrex glass dish, and the lid of an enameled roaster. Which one is the best
0:15
Hi, I'm Sune and I'm a food geek
0:28
Today I'm going to see if it makes a difference what kind of vessel you cover your dough with when baking sourdough bread
0:34
Some people, including myself, swear by cast iron. It has an excellent heat retention and it always gives me great oven spring
0:41
But those things are heavy and they can also get a bit pricey too
0:46
Another problem is that it's hard to find one that's very big, especially if you like the cigar-shaped type of bread
0:53
So I decided to buy an Oblong Pyrex roaster and an enameled roaster and compare them to my trusty cast iron combo cooker and see what difference it makes
1:04
Skillshare is an online learning community for creatives where millions come together to take the next step in their creative journey
1:11
As a member, you get unlimited access to thousands of inspiring videos with hands-on projects and feedback from a community of millions
1:20
When I first started out here on YouTube, I had never recorded video, and I didn't really know how to get started
1:26
I joined Skillshare as a member and found some wonderful classes about how to record professional-looking video
1:32
I also found some classes about how to edit video using Premiere Pro that were very helpful
1:37
The last thing I didn't have any experience with was talking on camera
1:41
I found a class by fellow YouTuber, Drog Jazza, where he went through how to relate to people through the camera
1:49
I'm a lifelong learner, and my creative output is my motivation. Since you watch my channel, I think that may describe you as well
1:57
The first thousand of my subscribers to click the link in the description will get a two-month free trial of premium membership so you can explore your creativity
2:06
I'd like to thank Skillshare for sponsoring this video. The loaves that I'm baking today are 700 gram loaves with 80% bread flour and 20% rye flour
2:15
The flour that I'm using is from a local mill called Coenby Mule. The hydration is 80% like in all of my experiments, so it's the dough that you know and love
2:24
With regards to the baking, I will be baking at 260 degrees Celsius, 500 degrees Fahrenheit for 20 minutes
2:31
Then I will uncover the bread, turn down the oven to 230 degrees Celsius, 450 degrees Fahrenheit, and bake until the bread is done
2:38
usually around 20 minutes more. If you'd like to support the channel
2:43
please buy some merch or use the links in the description for tools and ingredients or consider becoming a Patreon which I linking in the card above Thank you Those were the words This is the experience
2:56
If you're interested in the formula for the bread, you can follow the link in the description or the card above
3:02
I'm making all the dough together as there's no difference in the dough, only in the baking vessel
3:13
First, I start out by mixing all the ingredients together until I have a pretty shaggy mess
3:39
I let that rest for an hour and then I start bulk fermentation
3:43
Planning to do three sets of stretch and folds with 30 minutes in between
3:47
The first set of stretch and folds. The second set of stretch and folds
4:09
and the third set of stretch and folds. Then I do a windowpane test to see if the gluten development is good
4:30
and it is, so I move the dough to a bulking container to monitor the growth of the dough
4:35
I put the dough in the proofer and let it grow 25%
4:41
When it's grown, it's time to pre-shape the dough. After the dough is pre-shaped, I let it rest for 20 minutes on the counter
6:26
I let the dough retard in the fridge for about 18 hours and then I preheat my oven to bake
6:45
the bread. First I will bake in the cast iron cooker as that will need to heat with the oven
6:50
I grab the dough out of the fridge, dust the bottom of the dough with rice flour to be able
6:55
to easily get it off the peel. I score it
7:25
and then I load it into the oven. After 20 minutes, I lift the top off and turn down the oven
7:50
Wow, great oven spring. Cast iron rules. and here's how that looks out of the oven
8:01
then the next dough that will be baked under the pyrex lid
8:07
score it and then into the oven
8:25
Then after 20 minutes I remove the Pyrex dish Hmm, great oven spring too, I guess Pyrex rules too
8:41
And here it comes out of the oven. Then the dough that will be baked under the roaster lid
9:07
And then I put it in the oven. And after 20 minutes, it's time for the big reveal
9:23
Great oven spring too. Well, what do you know? And here it comes out of the oven
9:37
Well, let's have a look at the crumb in these three breads. First, the cast iron baked bread
9:46
Nice and well fermented crumb. Then the Pyrux baked bread
9:55
It looks like a twin of the cast iron. Then the roaster baked bread
10:11
A little bit less open crumb, but nothing major. Still looks good
10:18
Well, ain't that a kicker. It doesn't seem like it makes much of a difference what you cover your dough with
10:24
I love the Pyrex dish because you can watch your bread's oven spring live
10:29
The enamel roaster is super light though, so if the weight of the vessel is an issue for you, it's a great choice
10:35
In this case, I didn't use the bottom of the vessels and I placed the dough directly on
10:40
my baking steel. I did this to have the covering vessel be the only variable, because the enamel roaster
10:47
didn't come with a bottom, so you have to lower the bread into the pan, which in my
10:51
experience is a bit dangerous and it can also deflate the bread if you're not super careful
10:57
I hope you learned something today. See you next time