live_tv
Livestream Starting Soon
00
Hours
:
00
Minutes
:
00
Seconds
Up next in 10


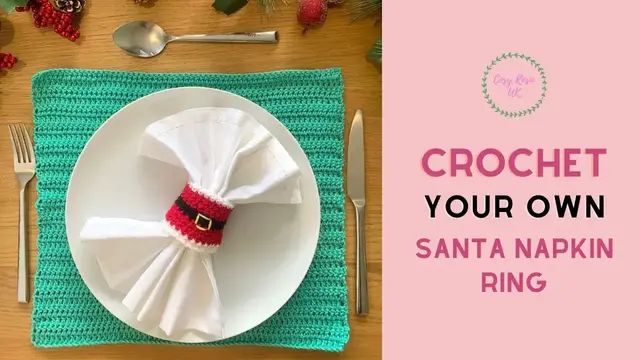
Santa Crochet Napkin Ring
Crochet your own Santa inspired napkin rings for Christmas with this quick and easy crochet pattern
You can find even more Christmas Crochet patterns here - Easy Crochet Patterns Playlist: https://youtube.com/playlist?list=PLpGsL3JrW9Xw9bB6T5f7aCThqWx1tjfui
You can view the written patterns for Santa Napkin Ring here: http://www.cosyrosieuk.co.uk
Materials Required This pattern uses size 5/Chunky/Bulky yarn
In this pattern tutorial, I used a total of 35m WeCrochet Brava in the shades White, Red, Black and a scrap of yellow for the buckle
- 5mm Crochet Hook
- Scissors
- Tapestry needle
JOIN THE COMMUNITY: https://www.facebook.com/groups/CosyRosieCrochetCommunity
JOIN THE NEWSLETTER - and get updates when the next square design is released: https://landing.mailerlite.com/webforms/landing/y7s4x3
NEED MORE CROCHET INSPO?
Find me here:
Show More Show Less View Video Transcript
0:00
So welcome to another crochet tutorial with CozyRosieUK. Today I am showing you how to stitch up this super cute Santa napkin ring
0:07
It doesn't take much yarn and it doesn't take much time so let's find out those materials we need to get stitching
0:12
If you haven't already make sure you've hit that subscribe button and of course that notification bell so that you never miss out another one of my crochet tutorials or patterns again
0:21
Now this super cute Santa napkin ring really doesn't take much yarn. In fact in total you only need 35 yards in total
0:29
now I'm going to be using some Brava worsted weight yarn now this was originally sent to me
0:34
free of charge so it is a sponsored yarn but it was over 12 months ago so I haven't declared this
0:39
as a sponsored post so this is a size 4 or a worsted slash Aran weight yarn and the recommended
0:45
hook size is a 5mm so colour A is going to be the Brava worsted in white we've got colour B
0:52
there we go colour B in red and then colour C in the black here now you are going to need a very
0:58
small scrap of yarn to create the buckle in yellow or gold or if you've got some thread you can use
1:04
that. So the other materials we're going to need are very simply a darning needle and a pair of
1:09
scissors because we are going to change colours every few rows. So gather your materials and we're
1:14
going to get started. So grab your hook and your first colour which is going to be colour A which
1:20
is our white and we're going to start by making a slip knot and placing that onto our hook
1:26
we are then ready to start our project. So for row one we're going to start by making a chain of 23
1:34
so we yarn over and bring our hook through the loop on our hook 23 times. That's one, two, three
1:44
four, and 23. Once we have our chain of 23 we're then going to join the chain to create a ring
1:56
So to do that we need to make sure that our chain is completely flat. I kind of run my fingers down
2:01
making sure that the front of the chain is facing me, not the reverse. And from here we're going to
2:08
bring the slipknot up to our hook and you just pop that first loop onto your hook, drop the tail
2:16
yarn behind picking up your working yarn and then we're going to yarn over and slip stitch straight
2:24
through the loop on our hook to form our ring. So now that we have our ring formed we can continue
2:30
with the rest of round one. So we yarn over and pull through to create a chain one and then we're
2:37
going to work in one single crochet into each stitch around. Our chain one does not count so we
2:43
have to work into that stitch just underneath our chain. So we insert our hook, yarn over, bring a
2:50
loop up, yarn over and pull through two and we're going to work one single crochet into each stitch
2:56
around. So we just have to insert our hook under that top loop of the next chain, bring our loop up
3:02
and pull through two and we repeat that again. You can see you've got a stitch coming out of that
3:08
one there so we go under the next one, pull through two and work all the way around back to where we
3:15
first joined our round and where our slip stitch is. So continue to work one single crochet into each
3:23
chain around making sure that your chain isn't becoming twisted or you're working under the
3:27
different loop. It just helps to keep your stitches all facing the same way. We don't
3:33
want this twisted when we get to the other end and I'll meet you ready for joining at the end of round one
3:38
Now at the end of round one we need to change colours and the best way to change colour is
3:48
before we finish the last stitch of the round. So I'm just going to pull back and rework our final
3:54
stitch showing you how to get the best colour change So we insert our hook into the final stitch yarn over bring a loop up and before we yarn over and pull through those two loops we going to grab our next colour Now our next colour is colour B which is the red colour and we going to yarn over and finish that stitch in our new colour
4:16
To tidy this loop up, we're just going to pull on that white, let them fall behind for a moment, because now we need to slip stitch to join our round
4:25
You can see that we still have our slip stitch from the previous round remaining
4:30
There's our chain one we did at the beginning and this is actually our first stitch here
4:35
So you've got a slip stitch, a chain one and there's our first stitch that we're going to join into
4:40
So we just insert our hook under both loops, yarn over, pull through, just pinching those yarns at the back to keep them secure and pull through the next loop
4:49
I'm going to pull on both of those to keep them nice and tight and I'm going to work over that
4:54
red one we're going to need the white again right at the end of the project so we're going to fasten
4:58
that off in a moment so that is the end of round one and we're ready to go into round two with our
5:04
colour B so for round two to four we're going to start with a chain of one and we're going to work
5:11
into that same stitch as our chain one so we just simply and we're going to work one single crochet
5:18
into each stitch around. So bring up our second loop, yarn over and pull through two. I'm just
5:24
going to pull on that red yarn, the tail, just to tidy up any loose bits there. Then I'm going to
5:29
continue to work around, working one single crochet into each stitch around. We're going to
5:35
repeat this for rounds two, three and four, all in our red colour. At the end of round four, we're
5:42
going to change to colour C. So keep working your next three rows all in your colour B
5:48
working one single crochet into each stitch around and I'll meet you at the end of round four
5:55
ready to change colours. So I've reached my last stitch of round four and I'm ready to change colour
6:07
to color C. Color C is the color black so we can start working on Santa's belt. So just like we did
6:14
before we're going to place the yarn over the hook with the tail furthest away from us and just pull
6:21
through that loop. I'm going to pull on this red yarn just to bring that down, move that black, find
6:28
the working yarn. Remember we've got that slip stitch and that chain one and we're going to insert
6:34
the yarn through the top of the first stitch of the round. I'm going to put that black end there
6:44
so we can work over that. Pull through and straight through the loop on your hook and we are finished
6:49
with the red for now. Now we're only going to do two rows of black so I'm not going to fasten off
6:55
my red yarn because I'm going to change back to it in a couple of rows. It just means one less end
7:00
to weave in. I can find the black, there's it gone. I am going to work over my tail as I go
7:08
because for rounds five and six so we're going to do two rows of single crochets in the black yarn
7:15
so we're going to yarn over and pull through for our chain one and then work into that same stitch
7:20
as our chain one for our first stitch of round two, no sorry, for our first stitch of round five
7:28
So we're just going to continue to work around, working one US single crochet into each stitch around, but this time in colour C
7:36
And then for round six, we repeat that again. I'm going to meet you for the start of round six to give you some top tips of working with these darker shades of yarn
7:46
because some people find it quite tricky to know exactly where they're inserting their hook
7:51
So I'm going to share some top tips with you when we get to round six. I'll meet you at the end of this round, ready to show you those top tips
7:58
I just worked my final stitch of round 5 and already you can see there not a lot to see when it comes to working back into this black yarn So if you finding that it quite difficult to see these stitches I have a very good light over
8:15
my head and you can always have a bit of a, normally I would have something potentially white
8:20
behind this yarn because it increases the light coming through the stitches. So you can see the
8:25
bottom there, that's not where we're working. You see you've got your front loop and your back loop
8:31
So we need to insert our hook underneath the front and the back loop of our black yarn
8:41
So we're going to yarn over, pull through and straight through the loop on our hook
8:46
So that completes round five. And already you can see, because I've got a bit of tension, you can see the hole of that stitch now, the hole in the stitch
8:55
And with that white behind, it just shines through where you need to insert that hook
9:01
If I take that white yarn away, it's not quite so obvious
9:05
So if you have your ball of white near you, just pop it behind your work so you can see what you're doing
9:10
So going into round six, we repeat round five. Again, we're working one single crochet into each stitch around
9:16
We've done our chain one to start. So we're going to insert our hook back into the same stitch, yarn over, bring our loop up, yarn over, pull through two
9:25
Pull your work apart and you can see the space where you're working into your next stitch
9:31
yarn over, pull through two, again a slight pull apart and you can see where you need to work your stitch
9:37
So work one single crochet into each stitch around for round six and I'll meet you at the end of round six where we're changing back to our colour red
9:46
And I'll show you why I haven't fastened off. So I've just worked into my last stitch of round six and I had unfortunately already completed that final stitch
9:58
So I'm just going to yarn over and pull through back for my final stitch
10:02
Now because our red is still attached, I'm simply going to untwist all these ends back through
10:10
And I'm going to pick up the red yarn that's still attached at the back of my project
10:15
And instead of having to work with another end, I'm just going to yarn over and pull through
10:20
And I'm gently going to pull on the black yarn just to bring that stitch down
10:24
And then we are ready to slip stitch. through the top of that first black stitch there of round six to join
10:36
There we go and I've made sure that this isn't too tight because otherwise it will pull on our project
10:42
and create a dip in this part of the project and we don't want that
10:50
So for round seven, eight and nine you've guessed it we're going to work one single crochet into each stitch across
10:56
We begin with our chain one and then we are ready to work three rounds in our red colour for rounds
11:03
seven, eight and nine. So I'll meet you at the end of round nine where we're going to change back to
11:10
our white colour and then after that round we'll be sewing on our buckles
11:16
So I'll meet you at the end of round nine ready for our final colour change
11:20
oh I've done it again I've worked into that last stitch let me just pull back on there
11:27
I fastened off my black yarn so we can get rid of that one and we're going to need our white again at the end of
11:35
round nine so I need to work my final stitch ready to change color so I'm just going to pause there
11:42
and grab color a again and then place the tail at the rear of the hook and bring through just as we did before
11:54
I'm just going to move that red behind so that I have even less to sew in on the end of this row
11:59
and just like we've done before we're going to slip stitch to the first stitch of the previous
12:04
row in our new colour so I just going to make sure that nice and tight and pull through and pull through that loop and then we can just neaten everything up give it a nice neaten I going to trim the end well cut off the red and then we are ready to work
12:24
our final round and we're going to be able to sew on our buckle in a moment as well
12:28
so we're going to work one final round starting with a chain one and this time we're working in
12:34
colour A for our final round. So work one single crochet into each stitch around in your colour A
12:41
and I'll meet you back at the beginning and we can join, fasten off and get all these ends woven in
12:47
So I'm just working my final stitch of round 10 and I'm going to slip stitch to join
12:53
a final round and then we are ready to fasten off. So I'm just going to snip
13:00
that white yarn and use my hook to bring that through, pull it a little bit tighter and then
13:06
unfortunately we're going to need our darning needle to get all these ends woven in and neatened up
13:13
So I'm going to start by t those ends that I worked over, you get all of your ends woven
13:18
and then I'll show you how to attach or sew on your buckle. So that's all my ends woven in and
13:26
I'm just going to put my seam to the back and lay it flat for a moment because now we need a small scrap of our yellow
13:37
I've got scissors everywhere today, normally I've got no pairs. I'm just going to take the yellow and thread it onto my darning needle
13:45
Once you've found your seam, we're going to try and come through the middle opposite the seam so the seam is always going to be at the back
13:53
and we want to kind of come in in between these red stitches but in the black as the well
13:59
so we're just going to bring that through leaving a tail and we're going two rows across and in again
14:05
and then I'm going to come diagonally out above this stitch here
14:19
so pull them tightly because you want them to be a little bit loose I'm going to go back in where we came out of that stitch and we're going to come out two stitches across on the other side and just pull that through
14:37
Make sure that loop sits nicely. We can go back in to where we came out of before and then we're coming back out to the bottom here
14:47
So another kind of cross at the back. Making sure our buckle is sitting in the right place
14:55
And then finally, I've got enough thread I have. We're going to go back in again where we were
15:02
There's our tail. So we're just going to come all the way back through. And that completes your buckle
15:09
You don't want it overly tight. You don't want it too loose either. So it's kind of getting that happy medium
15:14
Once you're happy with your placement, you can see that it's nice and secure at the back
15:18
we're simply just going to tie a little knot but a double knot so we're going to do one
15:24
and then wrap the yarn around itself twice so you've got like a double loop
15:31
and then you can pull tightly and it won't tighten the stitches
15:34
and that will just hold your buckle in place so all that's left to do then is to weave in
15:41
your yellow ends I'm going to pretend that we've done that Tuck it away
15:47
And that completes your napkin ring. So now all you need to do is get that iron out, get your napkins ironed, ready to insert to create your little table setting
15:57
So I hope you've enjoyed this quick pattern. I have no doubt that you'll be making more of these so that you can have one at each place setting on the table and have yourself a very Merry Christmas
16:06
Thank you so much for joining me for this crochet tutorial to make your very own Santa napkin ring
16:10
I'll see you all again very soon for another one of our crochet tutorials and patterns again
#Online Video
#Crafts
#Fiber & Textile Arts
#Party & Holiday Supplies