Up next in 10

Try This Heart Card Craft With Stuff You Already Have!
Aug 6, 2025

Join me for 30 days of mixed media card making! In this video, learn how to make a heart themed card with simple materials. This tutorial teaches you how to make a handmade card that anyone would love to receive using supplies you probably already have.
As an Amazon Associate I earn from qualifying purchases
--------------------------------------------
HOW TO ACCESS THE FREE PRINTABLES:
Simply visit my website at https://christines-crafts.com/enjoy-the-craft-gardening-resource-library/ and sign up to my regular newsletter.
You can unsubscribe at any time
--------------------------------------------
Resources you will need:
Card or card blank - https://amzlink.to/az0U0dahg7ZUO
Tissue paper - https://amzlink.to/az0Af5RW9Sc5k
Glue - https://amzlink.to/az0ab8UUcr2Ls
Free printables
--------------------------------------------
V I D E O S T O W A T C H N E X T :
Show More Show Less View Video Transcript
0:00
Hi, welcome to 30 mixed media cards in
0:03
30 days. So, this little series is going
0:06
to show you 30 cards that you can make
0:08
at home. You don't need to be a
0:09
specialist card maker and you don't need
0:12
lots of fancy equipment. You can adapt
0:14
what I've done to suit what you want.
0:15
And if there's anywhere you need
0:17
anything I've printed off, you'll be
0:18
able to get it free. So, we're going to
0:21
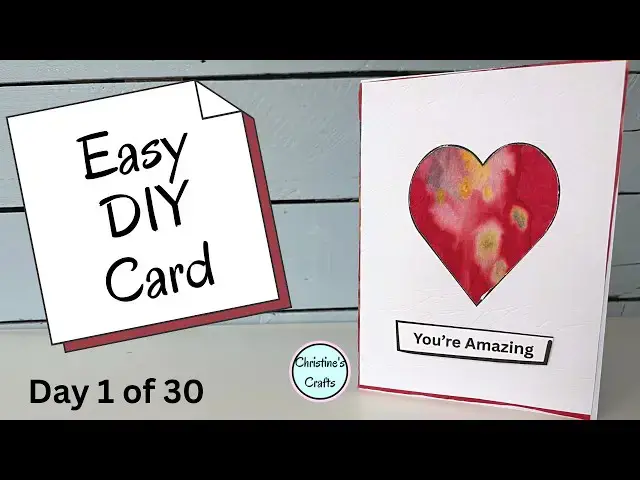
start today by making this card here.
0:24
Okay? Nice and simple. Thing that's
0:26
printed off, you can get free from me.
0:28
So, don't worry. So, let's get started.
0:32
All you need to start is a piece of
0:34
card. Now, this is actually card blank,
0:36
but it's just a piece of card folded in
0:38
half. And when mine's folded in half,
0:40
it's 7 in tall by 5 in wide, which is
0:43
quite a standard size. And then you're
0:45
going to want some tissue paper. Now,
0:47
you can see mine's quite funky. That
0:50
didn't come like that. It was an
0:52
accident. Um, if you want yours to get
0:54
all nice pretty colors and all mixed
0:57
like that, get it a little bit wet in
0:59
the pack with the other colors and you
1:02
get some sort of rainbow effect. Um, but
1:04
obviously that's just a happy accident.
1:07
So, all you really want to do is cut out
1:10
a piece of your tissue paper that's the
1:12
same size as your card. Now, I'm going
1:15
to have my tissue paper sticking out
1:16
around the heart on the front. So, I'm
1:19
making it as big as the card front. If
1:22
you don't want it to stick out around
1:23
the edge, you want a tidier finish, just
1:26
cut it a little bit smaller so that
1:28
you'll never see it. Just needs to be
1:30
big enough to go behind the heart.
1:33
And then just stick it to the front.
1:35
Now, I'm just using an ordinary glue
1:37
stick. And I'm not going to worry about
1:40
wrinkles. I just think it adds to the
1:42
effect. If you want it really smooth,
1:44
make sure you start right in the center.
1:46
Smooth it out and take a lot of care.
1:48
You'll see I'm just going to plon it on,
1:51
push it down flat, and not worry about
1:54
wrinkles. I'm not even worried if it's
1:56
not stuck right to the edge. It's just a
1:59
little bit more texture in my opinion.
2:03
And there you go. You can see from the
2:04
back, you can't see it and it's just
2:06
covering the front. Now, the heart I
2:09
talked about, I have got one that you
2:12
can download for free. There's a link in
2:14
the description below and on the screen
2:16
or you can just find a heart template
2:17
from anywhere to be honest. Don't worry
2:19
about it. I haven't put any markings on
2:22
this card because I didn't want to
2:26
restrict you with the size of your card.
2:28
So, just measure the size of your card
2:30
and then draw that rectangle around your
2:34
heart. Again, if you want to make it
2:37
smaller, you can do, but I'm just going
2:39
to certainly to start with make it the
2:42
size of the card. I'm not doing anything
2:45
fancy. I'm just marking it up and then
2:49
drawing those lines in. If you use a
2:52
card or paper cutter, you want to make
2:54
sure your lines go right to the edge of
2:56
the page. I'm going to use scissors for
2:58
my cutting out because to me, this
3:00
series is all about making cards if you
3:02
don't normally. You don't need to have
3:04
all the fancy equipment. If you've got
3:06
it, great. If you haven't, you can still
3:09
follow along and make them. And that's
3:11
the idea.
3:13
So then just cut that out and then try
3:17
it on your card and see if you're happy
3:19
with it. At this point, of course, you
3:22
can still cut it down some more.
3:25
What you can't do is glue it back on.
3:28
So, if you're enjoying this video and
3:30
enjoying making your card, please give
3:31
me a thumbs up below because it really
3:33
does help it spread to more people and
3:36
then try that on there. Now, I've got a
3:38
little bit of red poking out around the
3:39
edges, but not really enough.
3:42
So, what I might do is cut the card down
3:44
a little bit. But also, we now need to
3:47
cut that heart out. The best way to do
3:50
this is with a cutting board and a craft
3:52
knife, and you'll get a really good
3:54
edge. But assuming you haven't got that,
3:57
just get your little scissors
4:00
and cut round as carefully as you can.
4:02
Now you see I've tried three different
4:03
pairs of scissors and I'm on these
4:05
little tiny precision ones. I'm also
4:08
leaving some of the black line on. You
4:10
could make sure you cut it all off for a
4:12
nice clean edge. I rather like the
4:15
effect of a bit of the black, so I'm
4:17
making sure some stays on. It's all
4:20
about being creative and making your own
4:22
personal choices.
4:26
So, I'll just tidy that up a little bit
4:30
and then that can stick on there now. A
4:34
little bit of damage. But, I mean, I
4:35
don't want to turn it over to hide the
4:37
black anyway, but I'm just showing that
4:38
you could do. But, as I say, I would
4:41
like a little bit more of the red around
4:43
the edge. So, I'm just going to
4:48
draw a line on it and cut it off. And
4:50
you'll see I haven't measured it
4:52
accurately. I've just cut a strip off
4:54
the bottom.
4:56
And then we can glue that on.
5:02
So, just make sure I'm happy. Yes. I
5:05
just like that hint of red around the
5:07
edge.
5:09
Again, I'm just going to use an ordinary
5:12
glue stick and just glue that down nice
5:15
and flat.
5:17
Just make sure you get your glue stick
5:19
all the way to your edges because you
5:20
don't want it catching and peeling up at
5:23
the edges. You'll see that I'm working
5:24
on a piece of paper underneath and that
5:26
is purely so that I can take the glue
5:28
right out to the edge and I don't then
5:30
have to scrub it all off my table.
5:34
So, let's stick that down.
5:37
And it's coming together. And you could
5:39
finish there. But if you'd like to put a
5:41
greeting on the front, you can find one
5:43
from anywhere or you can use one of
5:46
mine. Obviously, you could embellish the
5:48
front with other things as well. It's
5:50
entirely up to you. But this here uh is
5:54
a selection of greetings that I've made
5:56
that you can use. You can print off.
5:58
They're free. You can see there's a link
6:00
on the screen and a link in the
6:02
description below and you can just go
6:03
and get those and use those if you want
6:05
to. And I'm going to use one of those.
6:08
I'm going to use you're amazing. And
6:10
what I tend to do is use these little
6:13
foam pads just to raise it up off the
6:15
surface because it just looks so good.
6:19
Um, if you haven't got any, you can
6:21
always get some easily from any craft
6:23
shop or stationers or you can just put
6:26
it on with the glue stick like you did
6:28
the others. So, I hope you've enjoyed
6:30
this card and I hope you're looking
6:31
forward to the next video which if it's
6:33
live will be on the screen now. and
6:36
happy card making.
#Visual Art & Design
#Hobbies & Leisure
#Crafts
#Crafts