0:00
Do you want a teddy bear kit to make that is super special
0:03
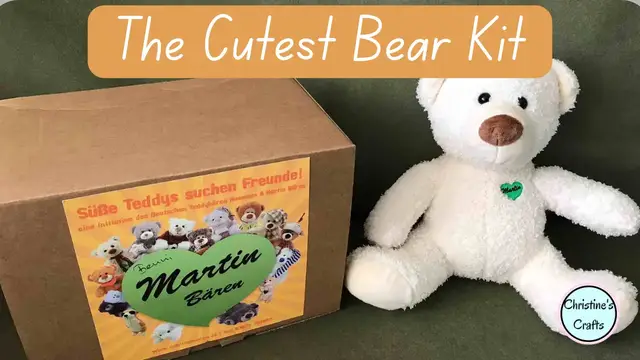
Then join me as I unbox and create this Martin Bears kit with you today to produce Benny
0:09
This adorable cuddly bear. So what will you receive? You'll receive a box like this
0:15
And you can see straight away that Martin bears are from Germany. So don't let that put you off
0:21
If you don't speak a word of German, neither do I. And this clearly says on the top that it's got Benny in there
0:27
So I know I've got the right bear. but you can see there's a real selection of bears and animals that you can get
0:33
So when you open it up, the first thing you're going to get is this booklet that is your bear's passport
0:40
So when you open it up, you'll see there's some instructions and a picture of lots of different bears and animals
0:47
A needle that's already threaded up with a knot in it, which is great
0:51
And it's also not a very sharp needle and a passport that you can fill in for your bear
0:56
If you do want to translate any of the German, there's always the internet
1:01
But without speaking a word of German, I've had absolutely no difficulty
1:06
And you can see there are little pictures on the instructions, so you'll be just fine
1:10
especially if you've watched this video and you've seen me making mine. So there's also your bear
1:16
So we can see I've got Benny with his little green heart that says Martin on it
1:22
so we know he's a genuine bear. and he's just adorable if a little flat
1:28
There his hole that we going to stuff him through And here the stuffing we going to use Oh what that Oh I got a spare needle I not sure you going to get one of those in your kit
1:39
I think you're supposed to only get one. And here's all the stuffing. It's actually really soft
1:44
It's really nice stuffing because it's not always, is it, if you've ever made toys
1:49
And presumably there's enough for the bear. So what we'll do is we'll put that stuff in in the bear
1:56
So you'll find the holes, it's not too big. but it isn't too small either. Just don't try and push too much in at once. So you're just going to
2:03
take some and push it to whatever extremity you want. So I'm going for his nose first. You might choose
2:09
to do his arms and legs, but I just wanted to give him a little bit of character. There isn't
2:15
a right and a wrong way to stuff a bear really. My recommendation is that you make sure you get
2:20
right to those extremities first and then work your way back towards the hole. And what I would say is
2:28
I used all the stuffing in the box and nothing extra. There was plenty in the box
2:34
You can see it's empty and my bear is full. But it's left him nice and squishy
2:40
He's not a really solid bear. He's not supposed to be. He's a squishy, cuddly bear
2:46
So once he's full and we're happy, we're going to sew up that hole
2:52
So as I said earlier, you get a needle that is sharp enough to go through the fur
2:56
but it's not really, really sharp. And it comes with a nice strong thread on it that has a knot on it So that what makes this kit ideal for kids Once you got them started they going to have a bear really quickly
3:11
They've not got to spend days and days making a bear. They're making it, but it's only a little job
3:18
So none of that fiddly threading the needle either. So it's up to you which way you sew your bear up
3:25
But I'll be honest, I chose to go from the head down to the tail
3:31
partly so that I can hide the finishing stitch behind that little tail in case I need to
3:37
So we're going to use a ladder stitch or an invisible stitch, depending what you call it
3:44
And there's a picture showing it on the instructions. So you're going to go through that seam that's in there
3:50
And if like me you worry about such things, just do another stitch and put your needle through the loop to form a starting stitch
3:59
But the knot should be sufficient, but I have. I get nervous. So if you open your little booklet, you'll see a picture that shows ladder stitch
4:08
So that's what we're going to do. And all you do is take a little bit of fur from one side and do make sure you get the needle right in through the fur and back out
4:19
Don't just go through a loop of the fur. Make sure you go right through the fabric
4:23
You want him nice and secure. And then a little bit from the opposite side
4:28
And then you just going to keep repeating that all the way down the bear So you can see straight away it starts to pull the edges together But it pulls them together so that your seam is invisible It just looks like a continuation of the seam that already
4:47
there. So just work your way all the way down to the tail. And while I just do that, let me just ask
4:54
you to give me a thumbs up for this video if you're enjoying it. And then we can spread martin bears
4:59
to more people. They've been making martin bears for a hundred years and you can actually buy collectible
5:04
ones on the website. There's a teddy bear museum there with the world's largest teddy bear
5:09
It's really worth having a look at their sites. So I'm going to put the link in the description
5:13
below and on the screen and I recommend you check them out. Whilst I was gifted this bear
5:18
I'm not on any sort of commission. I just really enjoyed it and thought he was really sweet
5:23
and a little bit special. So once you get all the way to the end of your scene
5:30
just do a little stitch and then put your needle through the loop
5:34
and that's just going to secure it. And then my recommendation is that you poke the needle into the bear
5:41
and then out somewhere else from his body. Just so that you get a nice long length after your little knot stitch
5:50
And then when you've cut off your thread, you've got a complete bear
5:56
And there he is, all cute and cuddly and ready to go. So thank you for sticking with me and watching
6:02
If you like sewing, then please check. Check out the video that's on screen now and enjoy your bear
6:09
I hope you get one for Christmas