Up next in 10

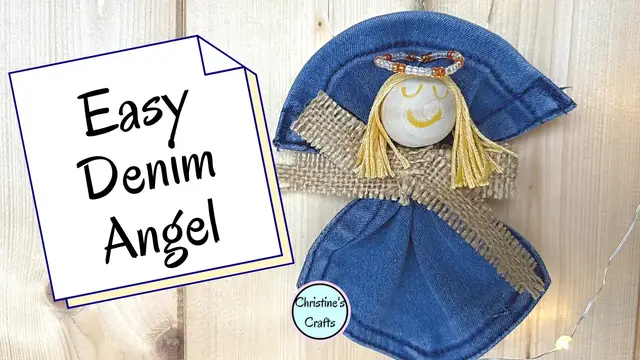
How to Make Cute Denim Pocket Angels With Old Jeans
Nov 13, 2025

Let's create some unique Christmas decorations! This tutorial shows you how to make a charming Christmas ornament using simple crafts and upcycling techniques. Add some diy decor to your home decor this festive season with this fun diy craft.
Upcycle those old jeans into something pretty!
--------------------------------------------
V I D E O S T O W A T C H N E X T :
All the videos in the Christmas series are here - https://www.youtube.com/playlist?list=PLJDvtpQDF0PftYyvRR0ID_iVKyZ9k1FO5
--------------------------------------------
Enquiries: [email protected]
--------------------------------------------
➡️ Want to see loads of written tutorials too? If yes, click here: https://christines-crafts.com/🆓 Access my resource library for free: https://christines-crafts.com/enjoy-the-craft-gardening-resource-library/
--------------------------------------------
#christmasangel #christmasdecorations #xmasornaments
Show More Show Less View Video Transcript
0:00
Let's make denim pocket angels. I'm going to show you exactly how and how to adapt it a little bit
0:06
to suit the supplies you've got. Let's get started. The first thing you're going to need is a pocket
0:12
off a pair of jeans, any sort of jeans or trousers, but you know the style of pocket, the patch sort
0:16
of pocket. Something to tie around the angel, so a ribbon or twine, anything you want to decorate it
0:24
with and a head. I'm using a wooden bead that's one inch across and I'm using wire and beads to
0:31
make the halo. Now we'll talk later on about other options. You could use whatever you like but I find
0:36
that works really well. It's so nice. I'm also going to use cool melt glue or hot melt glue
0:41
and multi-purpose glue. You can use whatever glue you've got. I just like these two so that's what
0:47
I'm using. You can draw a face and if you want to draw a face you're going to want some marker pens
0:52
but you don't have to they look gorgeous without and also some sort of hair I'm going to use
0:59
embroidery thread but you could use yarn or scraps or anything you've got that you think looks like
1:04
hair to be honest get raiding your supplies so the first thing I'd say is if you're going to
1:11
decorate your pocket which you do not have to you do that first now you'll see on the screen I've
1:16
got two that I've already made one's got decoration on it little pink flowers and one hasn't and I
1:22
have to say it looks gorgeous without. But if you want to, you can stick them on. Now I've called
1:28
this a no-sew angel and it is. I'm not going to do any sewing but there are opportunities where you
1:34
could sew if you want to. So if you want to embellish your pocket by sewing, embroidering on
1:40
it, sewing some detail on like some lace, please do. You know, you can always adapt but you don't
1:46
need any sewing skills. So like me, you can just glue them on. You could use hot melt glue for this
1:54
I don't tend to have the finesse. So I like to go back to my multi-purpose glue and just use that
2:00
You could obviously use a fabric glue as well if you had one. Now let's form the angel
2:07
So you want to get some ribbon or twine or string or whatever you're using and then fold
2:13
fold your pocket. Now the only thing that really matters is that either side you fold to the back
2:19
because you just get a much nicer finish Check you got a little dint in the middle that your head can go in and then tie your ribbon Now what you can do is stitch it first to hold it in place but as you can see I didn and then have a look You could then tweak it a
2:37
little bit so you might want to move your ribbon up or down. A basic rule of thumb is a third of
2:44
the way down the pocket gives you a good set of wings at the top behind your angel behind the head
2:51
and then you're going to tie a bow which you're probably really good at and I'm rubbish. I keep
2:57
trying to do it lots of different ways I'm still not the best at bows. I should use a bow maker
3:02
really to make bows but anyway onwards. So trim up your ribbon or your string, your twine, whatever
3:10
you've used and just adjust it make sure you're happy with it and then once you're happy we can
3:16
move on. So let's think about that halo. We've got a piece of wire and we're just going to make it
3:25
into a circle. So as you can see, I'm just using a glue stick. You just want something round
3:31
something circular that you can wrap it round about the size of your bead that your head's made
3:36
from. And then you want to make sure on one end of that curve that your beads can't get off
3:45
so I'm using some round nose pliers you could just use long nose pliers just ordinary ones
3:50
and just curve it round to make a little circle you want a little circle because you're going to
3:56
later put the other end of the wire through it and then just feed your beads on I'm using little
4:01
tiny seed beads they work really well and I'm using the clear ones and then some very light blue ones
4:08
but you could do whatever colors you like and whatever size beads you like but you'll notice
4:14
I don't pick the beads up and feed them on. The easiest thing in the world is just to get the wire
4:18
and feed it through the beads whilst it's on the surface. And if you can, do it on fabric or a soft
4:26
surface and then they won't roll away. Now, if you don't want to do it like this, you could have
4:31
some leaves, some lace, anything you think you might be able to form a halo with. But if you're
4:38
doing it like me, once you've got the full circle full of beads, just push the end through and then
4:45
tweak it back a little bit, overlap it so that it won't come out again. And then you should have
4:51
a nice pretty halo about the size of your bead So let think about putting some hair on that head I using embroidery thread so if you want to do it just like me just place it around the bead and make sure you cut it
5:07
longer than you're going to need it to get the length of hair you want because you will end up
5:11
t it and making it look prettier at the end. So just make sure you've got some extra
5:16
and then you are going to cut as many lengths as you think you need to cover your head
5:23
so I can't give you a figure it depends on your bead but just do quite a few like this
5:30
and then glue them on now again you could use the hot melt glue but I find it's just so fast
5:37
you've got to move so quickly and I'm just getting slower I think as I get older so I like
5:42
multi-purpose glue and just cover the top at the back where you want the hair to go
5:49
and then it's really awkward holding on to it and not getting in the glue and then place the front
5:56
section and that shows you what your face is going to be like and then just keep building it up for
6:03
the back you can see I'm just doing little groups you could do them individually you could try and
6:07
push them all on at once it's up to you and then you want to come back a little bit towards the
6:11
back of the head you don't need to do the whole of the back of the head because she's going to have
6:15
angel wings behind her and then just fold it down the sides just like hair and you can see
6:24
she's starting to become your angel and at that point you might decide that is your angel's head
6:32
I personally like to do a face but I'm not artistic so I like to keep it simple
6:37
Just little eyes and a little mouth. Now you'll see I'm doing blue and pink here, very traditional
6:45
But you'll see on the ones on the left, I just did them the colour to match the actual angel
6:51
And I actually really like that. I probably prefer it to the one I'm doing now, but I like to do a little bit of variety
6:59
So you can see we've got a nice little head now. We're just going to look at that hair
7:04
All right, that one didn't stick. It doesn't matter. Let's trim those ends
7:10
Obviously, I didn't get them all perfectly positioned. You don't need to. Let's just trim it
7:15
And to get both sides the same, just hold it on either side with the hair down the front and away you go
7:23
And you got a lovely little angel head with beautiful hair So the next thing is to attach the halo to the head I found that the easiest way of doing it Hot melt glue because it instant and I don have to sit there holding it for ages like you would have to
7:39
Or at least leave it for ages. And once you're sure it's firm, you might have too long a bit of metal, too long a wire
7:51
doesn't matter if you have just trim it down if you've already cut some wire you've got some wire
7:57
cutters just trim it just be very careful because little bits of wire fire off and then pop it in
8:04
the wings just make sure it goes now if you're having trouble if you've left your wire a little
8:08
bit long just trim it again there's no problem doing that if you're enjoying this video would
8:16
you give it a thumbs up please so it spreads to more people i mean who wouldn't want a denim
8:21
pocket angel in their life. So once you're happy with it you're going to glue it in place. Now you
8:27
can see that little bit of wire is just holding the head up away from the ribbon and I don't want
8:34
that. I want it to sit nicely on the ribbon. So I've just trimmed it again and now I'm going to
8:39
glue it in place. And I like to use the hot melt glue because it'll hold it instantly and it's a
8:45
good strong bond. Put plenty on and then push it into your wings. There you go. And you can just
8:56
push on the top of her head and the front of her face and it'll just hold it in nicely. If you've
9:01
got any little glue strings just remove them. Took her hair in if it's nice and long and you've got
9:08
a beautiful little angel. But if like me you want to hang it, I mean you could be finished there if
9:15
you want to just pop it in somebody's little gift as a little angel you're done. If you want to hang
9:20
it get some more of your ribbon or your twine and cut it to the size you want to make a little loop
9:26
and if you're dealing with twine I recommend tying a knot. If you're dealing with ribbon
9:32
just glue the two together and then glue them to the back of your angel. So I tend to glue quite
9:41
near the top and I'll turn it over so I can see that it's going to hang exactly how I want
9:47
So I hope you've enjoyed the video and I hope you're going to enjoy making your angels and
9:52
happy angel making
#Crafts
#Crafts
#Fiber & Textile Arts