0:00
Hi, and welcome to day 22 of the 30-day
0:03
mixed media card challenge. If you want
0:05
to find all the others, they're in the
0:07
description below, on the screen,
0:08
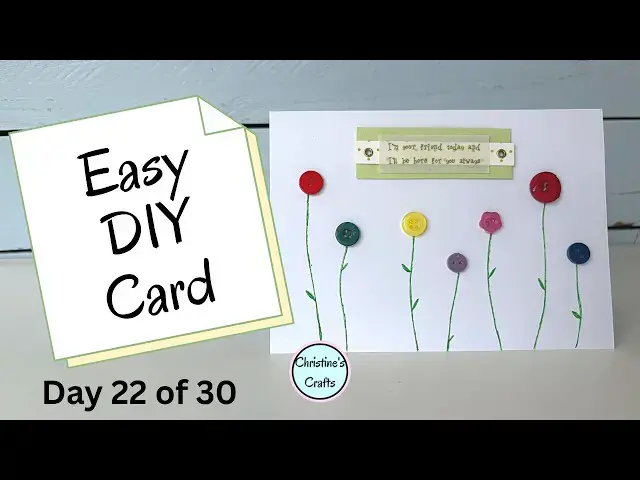
wherever. But today's card is this one
0:12
here. So, let's get started. You're
0:15
going to need a large piece of card that
0:16
you folded in half or a card blank.
0:19
Mine's 7 by 5 in this card. And then
0:22
you're going to need some buttons.
0:25
So, you could use any card blank or any
0:27
piece of card, any colors you like. I've
0:29
gone for white just because I think it's
0:30
nice and and bold with the little little
0:33
flowers. What am I talking about? Little
0:35
buttons that are going to be our
0:36
flowers. Just arrange them however you
0:39
like. And just a little word of warning,
0:41
if you're thinking of sticking anything
0:42
on like a greeting, just position that
0:45
before you glue anything down. Um I've
0:47
got some free greetings if you'd like
0:49
them. So there'll be a link on the
0:50
screen in the description below and you
0:52
can print those off. And then you're
0:55
literally going to glue those buttons
0:57
down. I'm using a cool melt glue gun,
1:00
which is just like a hot melt glue gun,
1:02
but the glue is a little bit cooler and
1:03
doesn't burn your fingers. But you could
1:06
use a multi-purpose glue. You could
1:09
probably even use a glue stick, but they
1:10
wouldn't be as secure. It's just about
1:13
getting them to stay on there. And it's
1:15
your pattern, your design. Just think a
1:18
little bit about where your stems are
1:19
going to go. If you put any of the
1:21
flowers above the others, you might have
1:24
a stem that runs behind one, and that's
1:26
that's fine, but just give it a little
1:29
And once they're all in place, we can
1:32
give them stems and leaves. So, I'm just
1:35
checking my little greetings going to
1:37
fit. And it has one of those sticky pads
1:40
on the back, and I've kept it far too
1:43
long, and it's no longer sticky. So, if
1:44
that happens to you, just do what I'm
1:46
doing. Apply some glue and use it
1:48
anyway. There's nothing wrong with the
1:50
greeting or the topper. It's just the
1:52
glue on the foam pad.
1:55
And then that's in place. Let's get some
1:58
stems. Now, I'm using a fine green pen.
2:01
You could use more of a marker pen. It's
2:05
all to personal choice, but don't use a
2:07
ruler. You want your stems to look
2:09
natural. So, they're all going to curve
2:11
a little bit. They're going to curve
2:12
different ways. I tend to take mine
2:15
right down to the bottom.
2:18
And then I don't have to worry about
2:20
what they're in. They're just flowers.
2:23
And I think those stems are a little
2:25
narrow. So if you've got stems and
2:26
you're not happy with them, just go over
2:28
them with your pen. You can see I'm just
2:31
coloring it in basically and making it a
2:33
bit stronger, a bit more prominent.
2:36
Obviously, if you're using a thicker
2:37
marker, you're not going to need to do
2:39
that. If you're enjoying this card,
2:41
please give it a thumbs up. And if you
2:43
like making cards, I've got a whole
2:45
selection of these, all very, very
2:47
different. I do recommend you take a
2:48
look. So, I'll link to that as well.
2:51
Now, once I've got stems, I like to add
2:57
my drawing is not great, so I just stick
2:59
to nice little simple leaves just like
3:02
that one. And you can add as many or as
3:05
few as you like to your stems. And
3:08
you're just going to keep repeating this
3:10
all the way along them all
3:13
and building it up. And what you'll see
3:15
with your leaves is that you might go
3:19
back later and add them. It's the
3:21
overall composition that you're trying
3:23
to get to look how you want. So don't
3:26
feel fixed that, oh, I finished that
3:27
stem, I can't go back to it. Because of
3:30
course you can. And it's worth sometimes
3:32
just stepping back, having a look, see
3:36
It's your creation. You could also add
3:40
petals around your flowers if you wanted
3:42
around your buttons, which is another
3:45
thing that you can do to create a bit
3:47
more interest. I've chosen to just keep
3:49
my buttons as the flowers, but you could
3:51
draw petals. You could draw them to
3:53
match. You could draw them to contrast
3:58
You could add a background to this. You
4:00
could have put a square or probably a
4:03
rectangle of a different colored paper
4:05
or perhaps a scene you printed off a
4:09
field. Then you could add these on the
4:11
front. This is just a basic card for you
4:14
to go away and create whatever you would
4:16
like. And once you've got those on,
4:19
you're done. You've got a beautiful card
4:22
that anyone would love to receive. And
4:24
what I would say is you can use this
4:25
technique for art as well. So, I'm just
4:28
going to show you some button art that
4:31
I've done. So, I've just done a simple
4:33
picture just the same as the card. And
4:35
I've also done one where I drew a heart
4:39
and then stuck the buttons in the heart
4:41
shape. And you can do that with anything
4:42
you like. I do have a video about that
4:44
which is linked on the