Up next in 10


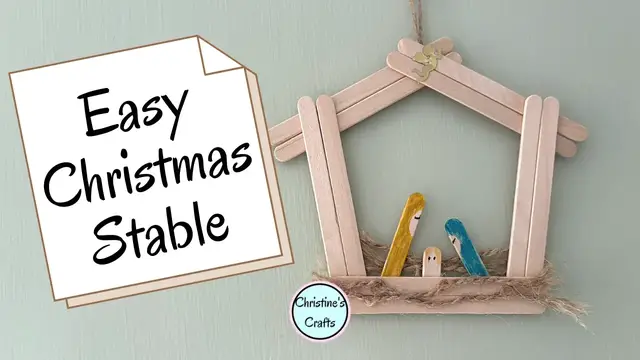
Join me to create some charming diy Christmas decorations! This tutorial will show you how to make a sweet Christmas Nativity Scene using simple popsicle stick crafts. It's an easy diy project with great craft ideas that anyone can enjoy.
As an Amazon Associate I earn from qualifying purchases
--------------------------------------------
Resources you will need:
12 craft sticks - https://amzlink.to/az0ADRsWbiADa
Marker pens or paints - https://amzlink.to/az02eeuCu4QQZ
Twine - https://amzlink.to/az0fOQPAaNFdX
Glue - https://amzlink.to/az0M3MLv2a7MG
Angel (optional)
--------------------------------------------
V I D E O S T O W A T C H N E X T :
All my Christmas videos are here - https://www.youtube.com/playlist?list=PLJDvtpQDF0PftYyvRR0ID_iVKyZ9k1FO5
--------------------------------------------
Enquiries: [email protected]
--------------------------------------------
Show More Show Less View Video Transcript
0:00
In this video we're going to make one of these hanging stables for a Christmas decoration
0:05
They are so sweet and so easy to make. You're going to love them
0:10
So all you need 12 craft sticks or popsicle sticks depending what you call them
0:15
You need 10 for your stable but you need another couple to make your Mary, Joseph and baby Jesus
0:22
So let's deal with those characters first. Let's take two of the sticks and let's cut them up to make them
0:30
So one of the sticks, cut it about two thirds, one third. And that's going to make your Mary and Joseph
0:36
Now you'll see I'm using scissors. It's not ideal, but I want to show you that you can in case you do not have a craft knife
0:41
If you have a craft knife, by all means, or a little junior hacksaw, that's what you want
0:47
Now the baby Jesus, obviously you just want it that bit smaller than Mary and Joseph
0:53
Oh, and that happens when you use scissors. So I'll just go and get that. Here we are
0:58
Right, so once you've got all three, just going to colour them in
1:02
Now you can use paint for this, or as I'm doing, a marker pen
1:06
It's much easier to set up and clear away and makes less mess. So just make sure you leave a little curved space for the face
1:16
And then you want to colour them in. Now for Mary, I've used the traditional blue that you often see
1:22
and I'm also just going to go around the corner onto the side it's just so it makes it complete
1:30
and we don't get that edge of the stick look where people think oh that doesn't look so great
1:35
it's up to you you don't have to and as I've said you might be painting this
1:39
but then once you've got Mary it's a simple case of repeating the whole process for Joseph
1:48
in whatever colour you like. Now I was thinking of doing quite a brown colour and I tried it on a
1:56
little bit of stick and I thought it was too dark. Now Mary tends to come out a bit light so I'm going
2:01
over her twice just to darken the colour. But Joseph I'm going to use what is actually supposed
2:07
to be a gold pen but it coming out at quite a nice golden brown I think Quite yellow but a bit lighter and I like it but it up to you whatever color you like and then Jesus is just getting a little bit of cover at the top like he wrapped in his blanket and you can do
2:29
that whatever colour you like but I thought a nice light colour was appropriate and then all they need
2:35
are faces now you can get as detailed as you like but all I've done is eyes so two small eyes
2:42
and then one little curved eye because we're on the side of Mary and Joseph
2:49
And there you go. You've got your characters for your scene already
2:54
And then let's position them how we think we want them. And we need two craft sticks for the bottom
3:02
Now, at this point, you can check the depth. If you think your characters are going to stick out below
3:07
or they're going to be too tall or it's just not quite looking how you want
3:11
you can trim them down but do do it before you start gluing glue you can use any glue you like
3:18
I always say use what glue you have to hand I've used multi-purpose glue I've used a tacky glue
3:24
which is what this is and wood glue is obviously the perfect glue um I haven't done one with hot
3:33
melt glue I'm not sure how well that will stick so as I say those are the glues I've tried
3:38
and they work really well. So you can see I've just positioned those two sticks in front of my
3:44
characters and I'm just moving them about a bit which is another benefit of using a glue other
3:52
than hot melt glue. You've got that wiggle room and then once we've got that we need two sides to
3:59
our stable and it's simply a case of popping them in there and gluing them in and it is worth
4:08
just spending a little moment here thinking about the angle you want them at. You don't want them
4:13
too wide so that your roof doesn't fit over. I'm trying to keep the other one on the screen so you
4:18
can see what I'm talking about. And then just apply a little bit of glue to the bottom end of
4:23
those sticks and then they're going in place. Now if you're enjoying this video please could you
4:30
give it a thumbs up because that helps me and it helps it spread to lots more people because I do I do think they rather cute The inspiration came from someone showing me one they been sent from a Scandinavian country So maybe somebody on here is going to tell me where they come from and that they really common But I don know I never seen one
4:50
before, but it inspired me to make my own. So let's get the... You see, I have trouble getting
4:56
the glue out because this glue has been well used because it's a good glue. I'm sure you
5:02
understand and then they're on and once you're happy and and if you're worried about them
5:11
gluing completely you can always add a little bit of weight while they dry and it'll just press them
5:16
together and then we'll turn our attention to the roof we want our two sides overlapping at the
5:23
middle and I'm sorry I've gone off the top of the screen here do you know it's really quite difficult
5:28
to film and make sure you're completely in the middle of your screen. So I do apologise. But all
5:33
I've done is positioned them so that they're going to overlap the sides of the barn beautifully
5:39
Barn? Where did barn come from? Stable. And I'm just going to glue them together before I glue
5:47
them onto the walls of the stable. I've just found that's a good way around of doing it. I mean
5:53
you can do it in whatever order you like, but I'm just recommending the way I did mine
5:58
And once you're confident that they're going to stay together, it's time to put them on your stable
6:05
You can see I'm just making sure they're going to hold. Let them dry a little bit and then it's time to add some glue
6:12
So you could add it to the front of your roof like I'm doing or you could add it to the back of the walls
6:20
It's entirely up to you. Again, you want enough to stick it, but you don't want so much it's oozing out everywhere
6:27
but you can always use a big kitchen roll to clean any spare glue off. So put it where you think is in the middle and then start adjusting. Again we're back to that
6:38
oh yeah that's not quite right, let's tweak that across a little bit. And then we've got a stable
6:44
and it's time to think about an angel. I do like little wooden angels but I couldn't get any and
6:50
they did have a gold angel just in my supplies So ever the one for a budget it getting a gold angel It always good to use up the things you got if you can and the little wooden angels that I did find were just a bit too big so I wasn prepared to commit to those
7:12
So once you've got that stuck on you really have got your stable with an angel and now we want to
7:22
make it look more like a stable. So we want it to look like it's got hay or straw. So I'm just using
7:27
ordinary twine, the sort you have for your crafting or for the garden. And I'm just opening it up a bit
7:34
So I'm just using my fingernails to tease it just to make it look rough and ready, just to give those
7:40
fibers a bit of space, just to, well, you can see the effect I'm going for. And then repeat it with
7:47
a few bits. I think I've got four but you can do as many or as few as you like. And then to make it
7:53
look really natural glue some to the back of your stable. And I tend to just put a little bit of glue
8:01
onto the twine but you could put it onto your sticks and then stick the twine to that. It's
8:10
entirely up to you. I think I'm going to put two on the back of here
8:17
there's no pattern you just want them to look like they've just landed there and I'm going to
8:24
stick some on the front as well just at the bottom and you can see I'm making sure they don't go on
8:31
straight because that's not what we're hoping for and you could indeed use lots of small bits of
8:37
twine and make an even more natural effect and there you have it a stable so then you just need
8:43
to hang it. So I'm going to use some more twine and you could, once you've got it the length you
8:50
want, just hook it through there, tie a knot, excuse me, and it will hang. Or if you prefer
8:58
because that is what I did with the other one, but if you prefer you could tie a knot in it
9:02
and then glue the knot to the back. It really is entirely up to you which one you prefer
9:10
I think both hang well if I'm honest the one where I just looped it through has hung better
9:15
for me because it can adjust to make sure it's level and there you go I hope you enjoy making
9:20
your stable
#Crafts
#Crafts
#Holidays & Seasonal Events