0:00
Hey everyone, I'm Tina and welcome to Buy Golden Berry where I design sustainable crochet patterns
0:10
If you were thinking about buying new tinsel for your Christmas tree this year
0:14
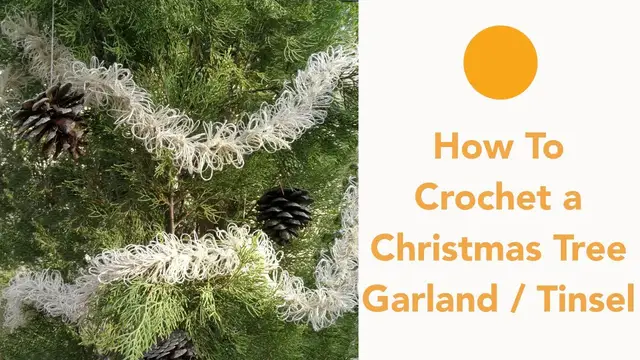
then please consider making this eco-friendly version instead. The pattern I'm going to show
0:20
you today makes this Christmas tree garland that looks just like normal tinsel. It acts the same
0:27
way and drapes the same way. It's really really lovely. You can wrap it around your Christmas tree
0:33
or hang it across your chimney breast or wrap it around the banister like you would a normal tinsel
0:40
Making this tinsel pattern means you can choose a more sustainable material, you can choose any
0:46
colour you like and it means at the end of its life it won't be hanging around and polluting the
0:54
environment. If you already have tinsel at home but you just don't like it anymore please don't
0:59
throw it away. Give it to someone else who will use it and keep it out of landfill as long as
1:06
possible. Okay let's get started. To make this pattern you'll want a lace weight yarn. I'm using
1:13
hemp. I'll link it in the description below along with some other suggestions in case hemp isn't
1:18
available to you and you need a two millimeter crochet hook. I'm using 2.3 but a 2 or a 2.5 would
1:27
be fine as well. We're going to make a tinsel that is about 100 inches long, that's about 2.5 meters
1:35
and for that length you will need about 273 yards of lace weight. Obviously you can make it longer
1:44
or shorter if you like it's up to you. To make a tinsel that is 2.5 meters long we're going to
1:51
start by chaining 800. I know that sounds a lot but we're going to do it in in 20s so that we can
2:01
keep track of how how many we have. So for that you're going to need a few stitch markers. I'm
2:08
going to use these paper clips. So grab yourself some stitch markers and we'll
2:16
start chaining So we begin by chaining 20 at first So let do that 1 2 20 So once we done 20 we grab our stitch marker and mark this 20th stitch
2:42
and then we'll do another 20. that's another 20. Grab another stitch marker, mark the 20th stitch and carry on like that and
3:07
then at the end when you're nearly at 800 you can just count them up really quickly in 20s. So get
3:16
to your 800 and meet me back here. Just for the purpose of this video I've made
3:21
200 chains and not 800 just to give you an idea of what the chain looks like. So
3:28
we've got this long chain with stitch markers in every 20 stitches which means
3:33
we can easily count them up in 20s to get to 800 or you want to count your
3:39
stitch markers and you should have 40 to have 800 chains. So once we've done that we then want to
3:48
start making our loops. So if we look back at the tinsel you can see that it's made up of lots and
3:59
lots of loops so we'll start making those now. Once you're happy that you have the right number of
4:06
chains you can just remove these stitch markers to make it easier. Just take them
4:14
all off and then we can start our loops. So I've taken off all the stitch markers
4:26
and I'm happy with the number of chains that I have or the length that I have
4:32
I've kept one stitch marker available for the loops. I'll go through that in a
4:38
bit. We start our first loop in the very first chain from the hook right there
4:45
And what I like to do is use this stitch marker to mark the second chain from the
4:53
hook The reason I do this is because making the loop tends to tighten the next chain So I keep it there just to keep track of the second chain or the next chain that I going to be working in So we going to work straight into
5:13
this first chain here. So what we want to do is we want to hold our yarn in a way that creates
5:22
this V shape here. You need it to be lifted. I use my middle finger but you can you could use
5:31
your index finger instead if you prefer if that's easier for you like that. Whichever finger you use
5:39
it doesn't really matter so you just want this V shape here. So how we work the loop is we put our
5:50
hook into the stitch, into the chain, sorry, and move our hook around this first
6:02
piece of yarn here and hook on to the back like that. Bring it forward to the
6:14
front of the other strand and pull it through the chain. Then you have two loops
6:26
on the hook. At this point you can take this loop off your finger, move it to the
6:34
side here and yarn over and pull through the last two loops on the hook. So this
6:43
is your first loop. So we'll do that again, we're going to make three of these
6:50
loops into each chain so we'll go back into the chain into the same chain
7:02
Hook on to the back strand, pull it to the front, pull through the chain, take the loop off your finger, yarn over and pull through
7:21
both loops And one more time into the chain go around the first strand hook onto the strand at the back bring it forward through the chain take the loop off your finger move it to the side yarn over and pull
7:49
through. So at this point the first chain of three loops is done. We can remove
7:57
this stitch marker and move it to the next chain. And then we can start working
8:09
our loops into this one, into the second chain. So we'll go in, around the first
8:17
strand, hook on to the back, bring it forward, through the chain, take the
8:27
loop off your finger, move it to the side, yarn over and pull through. So you'll
8:35
continue like that making three loops into each chain until you've gone
8:40
through 20 chains and meet me back here. I've worked through 20 chains and this
8:46
has made a piece that is about two and a half inches long so that works about
8:53
right for 800 chains you will get a piece that is 100 inches long. So after
9:02
after these 20 chains you can see that it's starting to curl a little bit and
9:09
that's because we're making three loops in each chain. It gives it this nice
9:16
tinsel-y shape I think. So we just need to continue like that all the way along
9:22
the chain until you reach the end. Once you've reached the end just trim your
9:29
working yarn and you can either just tie a knot and cut it really short or I've
9:36
chosen to attach it to the underside of the foundation chain just to keep it a
9:43
bit more secure. And that's it! Then you have a nice sustainable tinsel to use
9:49
this year. I really hope you enjoyed this tutorial and that you make your own eco-friendly tinsel
9:57
I would love to see your versions. If you enjoyed this pattern please subscribe
10:01
and I will see you next time with another sustainable crochet pattern